Google Groups
Subscribe to The Culinary Creative
Email:
Visit this group
Showing posts with label craft. Show all posts

Wednesday, August 21, 2013

Not-a-Food Recipe: Homemade Play Dough

 
Since everyone already knows you can use flour for baking, I thought it would be fun to dough something else instead. Hee hee hee.  So here you go, a little something that you and the kids (kids of any size, mind you) can make at home for hours of creative fun.

Homemade Play Dough (aka "K-Dough")
requires stovetop cooking
NOT for eating, but shouldn't kill you if you do

1 cup flour
1/4 cup salt
2 tsp. cream of tartar
1 cup warm water
1 tsp. veggie oil
food coloring for tinting

In a saucepan, mix together flour, salt and cream of tartar, breaking up any large lumps that form.
 
Slowly whisk in warm water and oil.
 
 
Cook mixture over medium heat, stirring constantly as it thickens and starts to come together. 
 
 
Remove from pan and turn out on a rolling mat.  Let it sit a minute or two to cool off a bit then knead until smooth.


I cut mine in half to make two colors.  I added a couple of drops of food color and kneaded it in until the color was evenly spread. (3 drops blue = light blue, 2 drops red = pink, 2 drops yellow = yellow, 3 drops green = bright green)
 
 
Remember, it’s going to be hot so even if the outside feels cool-ish, the inside may still be hot.  Let it completely cool to room temp before you let the kiddoes play with it.

Store it in an airtight container.  Should be good for up to 3 months.
 
NOTES

I made two batches to get four colors.  I used empty frosting containers for storage.


Making this would be a fun activity to do with kids, basic intro to (non-edible) cooking and a great way to get them started on the color wheel (blue + yellow = green, yellow + red = orange, red + blue = purple).

Wednesday, November 4, 2009

In vino veritas


We’re starting off our Food Gifting marathon with wine. Now we don’t claim to be wine experts by any stretch of the imagination –- Wendi doesn’t drink wine and K2’s more a “ooh, look a pretty bottle” connoisseur –- so actual recommendations we’ll leave to the experts, BUT we will give you ideas on how to make a Wow presentation with your gift!

We look at wine gifting as a chance to expose friends to new wines that they might not have chosen for themselves otherwise. So, to that end, our rule of thumb is that if you don’t know how it tastes, go with how it looks. (If you’re not that brave and want your wine-drinking friends to ask you back, we would suggest asking someone who knows.)

“Simply” Elegant

If you want a near-to-no brainer gift, pick out your wine gift bag first then find a wine to match it! There are so many cool labels and bottle shapes out there that it should be easy to do. It’s subtle, but if you find a bag, bottle, and tissue that has a theme it’s going to make your gift look well put-together and it will register on some level that this is more than just a grab-and-go gift.


A Little Something Extra

Don’t send your wine out on its own! Add a little something extra to tag along with it -- like chocolate, a nice corkscrew, fancy nuts, or some cute coasters. There are lots of little things you can find that will make a nice companion for your vino. Check out the dollar bins at your local craft store or hit a dollar store to see what you can find.


A Trisket A Trasket

Gift baskets are fun to put together, though honestly it’s not always the less expensive route to go. But when cost is not really an issue, what we like about doing it ourselves is that it can be personalized to suit your "giftee's" tastes or used as an opportunity to show off your artistic and/or culinary talents.

This basket has two half-bottles of wine, three sample-size cheeses and a variety of homemade crackers – cracked pepper, sesame, and plain. With smaller items you can get a wider variety of goodies in it. You may already have a favorite cracker recipe, but if not, this is the one we use and just add our own spice variety to it, http://www.recipesource.com/baked-goods/breads/07/rec0708.html.


For more of a splash, we picked a red color scheme for this festive bucket. The shiny star spray and red fill (both from the Dollar Store) picks up the shininess of the metal bucket. Then for the gift we have a bottle of red, some fancy crackers, a wheel of brie and a matching red bottle opener (sorry not really visible, see "stuff" photo above).


The Right Stuff

For baskets, buckets, and other containers, we recommend you check not only craft stores, but hardware stores or shops like Ross or TJ Maxx where you can find unusual items at discount prices. Thrift shops is another place to find baskets or unusual containers. Fills, bows, and funky ribbons can be found inexpensively at dollar stores, fabric shops, or craft shops.

Most grocery stores these days have a pretty decent selection of wines and there are any number of wine warehouses around too, but if you’re in the market for great wine at great prices you should check out the smaller specialty stores. In fact, we have a family & friend favorite to recommend for those of you who are local, Wine Authorities in Durham (check out our “Check It Out” post for their web link).

We hope this will give you some things to think about and get those creative juices flowing!

Saturday, September 26, 2009

PC PCs: A Recipe for Recycling

We know, we know, sending things in the mail...snail mail...is SO old-fashioned, but don't you love getting something in the mail that isn't a bill for a change? We always keep a stack of postcards handy for when we want to send a quick thank you to someone, or just let someone we haven't talked to in a while know that we've been thinking of them. It costs less than a regular card or letter and, to us, is much more personal than email.

Staring into a full recycle bin one day, we realized that we had a lot of food boxes and thought, hmmm, why not make our own postcards? It's simple and easy to do.

First things first, save your boxes...food boxes, snack boxes, beer or beverage boxes...as long as it's pretty sturdy, it will work.


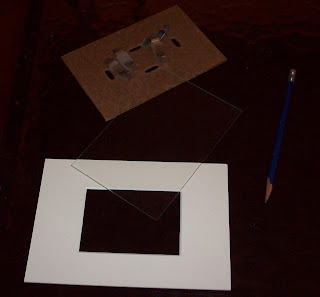
Standard postcards are 4 x 6" in size. We suggest using either the glass from a frameless frame or a picture mat with a 4 x 6" opening to trace with because that way you get to see what you're cutting out (p.s. the mat in the photo is NOT 4 x 6", but the only one on hand to show you what we mean).


Take the glass (or mat) and trace out the image you want on the card.


To cut the cards out, you can either use a fancy Fiskar (if you have one) or just your favorite pair of scissors.


And voila! Recyled postcards! Fun, different, unique, and homemade. And, for Ducky Nguyen, the winner of the first Culinary Creative Question Contest, an excellent prize. We'll be sending her a set of homemade cards with the postcard stamps to mail them too!


We want to thank everyone who submitted questions, lots of good things to think about. We'll be posting answers for each of them along with the one for Ducky's about...well, you'll just have to stay posted until Wednesday to find out. :)

Hope you enjoy the rest of your weekend!

Sunday, August 30, 2009

Soup-AH!

This is really a tasty light soup, perfect for a summer meal, doesn’t sit heavy in your stomach which for the anniversary dinner was good considering there were still three courses to follow. By far, it was the favorite dish of the meal (or at least tied for first with the cheesecake).

Avegolemono

7 ½ cups chicken stock
½ cup orzo pasta
3 eggs
Juice of 1 large lemon
Salt and ground white pepper to taste
Lemon slices and/or lemon zest to garnish

1. Pour stock into a large and bring to a boil.
2. Add the pasta and cook for 5 minutes.
3. While the pasta is cooking, in a separate bowl beat the eggs until frothy then add the lemon juice and 1 tbsp of cold water.
4. Start with a ladleful of the hot stock and slowly stir it into the egg mixture, repeat with additional stock until egg mixture is just above room temperature.
(FYI – the reason for bringing the egg mixture up to temperature first is so that when you add it to the large stock pot, you don’t coddle the eggs…instead you need to mollycoddle them because eggs are very delicate and persnickety that way, they need the extra attention, so don't be afraid to ladle away until they are just right!).
5. Add the egg mixture to the stock pot and turn off the heat, stir well (again, don’t boil mixture with egg in it unless you want scrambled egg soup…bleck).
6. Season with salt and white pepper to taste and serve at once, garnish with lemon slices and/or zest.

NOTES

* We added an extra dash (dash being a quick squeeze or two) of fresh lemon right before serving to give it some extra zing.

* Don’t be alarmed if the orzo still seems al dente after you cook it for 5 minutes, by the time you serve it, it will be just right!

* We actually used pre-made chicken stock since we didn’t have time to make stock ourselves. You can substitute chicken broth, but to us, it won’t have the rich, bodied flavor that chicken stock provides. If you DO decide to use broth instead of stock, be aware that you will definitely need to taste the soup before adding salt since broth is already seasoned... stock is not (though tasting before seasoning is always a good practice to get in the habit of). We found chicken stock at Whole Foods, so if you can’t find any at your regular grocery store I would suggestion checking a specialty food store. It will be well worth your while to make the extra effort to get the chicken stock, we promise!

* If you have leftover soup, it will separate after it’s been refrigerated. To reheat, put it in a pan on the stovetop over medium-low heat and using a whisk or slotted spoon, blend it back together.