Google Groups
Subscribe to The Culinary Creative
Email:
Visit this group

Thursday, February 26, 2015

Spicy Turkey Sausage Lasagna


When my friend Laurabee came into town a few weeks ago I threw together a couple small lasagnas, one for us to share and one for the Parental Units since Mom was still in recovery mode from her knee surgery.  Apparently it turned out pretty well because her first question was when was I going to post it? So finally got a chance to throw another together to share with you guys.

Spicy Turkey Sausage Lasagna

5 hot turkey sausage links
4 cups (32 oz.) crushed tomatoes
salt and fresh cracked pepper, to taste
2-1/2 cups ricotta
2-1/2 cups shredded mozzarella
2 tsp. dried parsley
1 zucchini, halved and sliced thin
4 cups fresh chopped spinach
oven ready or regular cooked lasagna noodles (14-16)
1/4 cup grated Parmesan

Remove the casings from the turkey sausage links and tear the sausage into small pieces.  Cook the pieces over medium-high heat in a deep skillet, chopping into smaller bits with a spatula.


Once the turkey sausage is browned, add in 3-1/2 cups of the crushed tomatoes (set aside other 1/2 cup for final layer).  Season with salt and pepper to your liking.  Reduce heat to low.


In a medium bowl, mix together ricotta with 2 cups of the shredded mozzarella (set aside other 1/2 cup for final layer) and dried parsley.  Set aside.


Chop the zucchini into flat pieces (easier for layering).


Julienne the fresh spinach into smaller pieces. I actually found a spinach-arugula blend that adds another flavor note to the mix.


In a 9 x 13 pan, spread 1/4 cup of the crushed tomatoes you had set aside.  Lay down a layer of noodles.


Cover with half of the spicy sausage tomato mix.  Next add half of the cheese mixture.  Next sprinkle half the zucchini pieces and half of the chopped spinach.


Lay down another layer of noodles and repeat process.

Cover the whole thing with one more layer of noodles.  Top with last 1/4 cup of crushed tomatoes and sprinkle the rest of the shredded mozzarella and the Parmesan.


Cover with foil and bake for 45-50 minutes at 375 degrees.  Uncover and cook for another 10-15 minutes until baked through.


Buon appetito!

NOTES

If you've never tried them before, oven ready lasagna noodles are pretty good. They do cost a bit more than regular, but if you're into time saving, then they're pretty handy.

The first time I made this I used regular turkey sausage.  I accidentally picked up the hot sausage this time and now I think I would not go back to regular.  It's hot, but not burn-your-face-off-hot.

Sunday, February 15, 2015

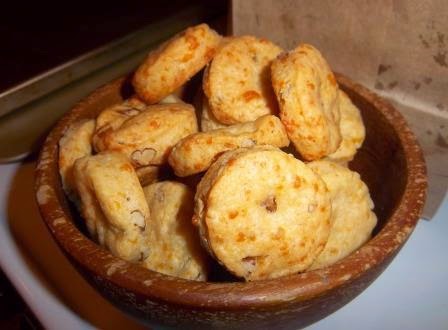
Cajun Spice Pecan Cheese Bites


Since my blog promoters (aka Parents) have been touting these goodies about town, I wanted to get them posted for you all sooner rather than later.  I have some guests posts coming up this week that I think you are really going to like.

Last weekend I helped celebrate my friend Dana's birthday with a mini feast of Cajun goodness.  My contribution to the eatin's were these little treats.  I really wanted to make cheese straws but much to my chagrin, I found I didn't have a cookie press readily on hand so went the biscuit cutter route.

The cheese bites have just that, a nice bite that sneaks up on you.  The pecans make a sweet complement to the red pepper and bring it all together.

Cajun Spice Pecan Cheese Bites

8 tbsp. butter, softened
1-1/2 cups sharp cheddar cheese, shredded
1/2 cup pepper jack cheese, shredded
1 cup flour
2 tsp. baking powder
1 tsp. salt
1 tsp. cayenne pepper
1/2 cup chopped pecans, small bits

Cream together the soft butter and cheeses.


Add flour, baking powder, salt and cayenne pepper and bring it all together as a dough.


Mine was very crumbly in the mixing bowl, so I transferred it to a rolling mat and kneaded it together until it formed a solid ball of dough.


Fold the pecan bits into the dough until evenly distributed.


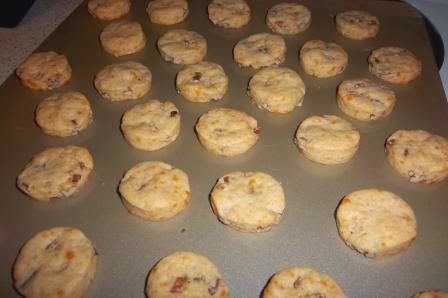
With a rolling pin, roll dough out to about a 1/2" thickness and use a small biscuit cutter to cut small discs.  I split my dough in half and rolled out one half at a time, made it easier to manage.  You can re-roll the dough until all is used up.


Place discs on lightly greased cookie sheet and bake at 350 degrees for 10-12 minutes or until crispy and golden brown around the edges.


Remove from oven and immediately transfer to a cooling rack.

Sunday, February 8, 2015

Pina Colada Upside Down Cake


Was feeling inspired by my last post and decided to tackle a full on upside down cake, but with a TCC twist.  May I just say, "Mwah, delicious!"

Pina Colada Upside Down Cake

topping
6 tbsp. unsalted butter
1 cup brown sugar, packed
6 pineapple rings (fresh or canned)
5-6 maraschino cherries
1 tbsp. Myers dark rum or rum flavoring

cake
1-1/2 cups flour
1-1/2 tsp. baking powder
1/4 tsp. salt
1/2 cup coconut flakes
1/2 cup (1 stick) unsalted butter, softened
1/2 cup sugar
2 large eggs
1 tsp. coconut liqueur or extract
1/2 cup coconut milk
1/2 cup pecan bits (optional)

For the topping, melt butter over medium high heat in a small saucepan.  Add in the brown sugar and rum.  Continue heating until sugar melts.


Pour the sugared concoction in the bottom of a 9" cake pan (square or round, your choice).  Next place the pineapple slices in the bottom of the pan.  Add the maraschino cherries.  Set aside.


I chose a variation on the classic pineapple layout for my plan, but feel free to let your inner culinary artist run free and come up with your own pineapple design.

In a small bowl, mix together the flour, baking powder, salt and coconut flakes.  Set aside.

Cream the softened butter, takes about a minute.  Gradually beat in the sugar.  Then add the eggs one at a time, incorporating each well.  Add in the vanilla.


Starting with the flour, alternate adding flour and coconut milk, blending well and making sure to scrape down the sides of the mixing bowl.


Carefully spread the batter in the pan over the topping mixture.


Sprinkle the pecans on the top of the batter.


Bake at 350 degrees for 30-35 minutes.  I would recommend placing the cake pan on a cookie sheet covered with parchment paper or foil to catch any spillovers (because there will more than likely be spillovers).  Bake until cake is golden or springs back to the touch when gently poked.


Remove cake from oven.  Run a knife along the inside edges of the pan.  Take your serving plate and put it upside down over the pan.


Using a thick towel or oven mitts, grab the edges and flip the pan and plate over and carefully lift the pan off the cake.  If any of the topping sticks to the pan, scoop it out and plop it on top.


Let the cake cool for about 15 minutes (so that you don't burn your face on the hot sugar topping).


Saturday, January 31, 2015

Pineapple Upside-Down Muffins


Hello!  The prodigal blogger returns.  Have been busy in the kitchen but mostly whipping up old favorites to help Mom during her post-surgery convalescence.  BUT today I had some friend over for brunch and was determined to try something new.

Found this gem of a recipe in my 1965 "McCall's Practically Cookless Cookbook." I love going through the old books because you never know what you'll find.  I realized that I have never made pineapple upside-down cake before so figured this would be my baby step to the big league.

Pineapple Upside-Down Muffins
paraphrased from original recipe, makes 16

pineapple topping
1/3 cup butter, melted
1/2 cup light brown sugar, packed
1/2-2/3 cup pecan halves
1 (8 oz.) can crushed pineapple, drained

muffin batter
2 cups Bisquick
1/4 cup granulated sugar
2 tbsp. butter, melted
3/4 cup milk
1 egg

Grease bottoms of 16 muffin tin cups.

To make the pineapple topping, first combine the melted butter and brown sugar.  Divide evenly between muffin cups.


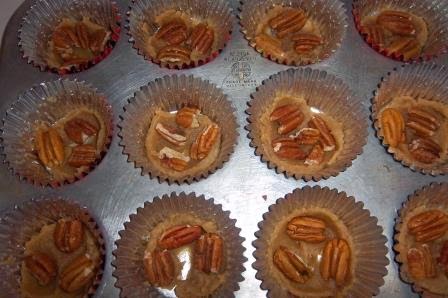
Arrange 2-3 pecan halves per muffin cup.  Then top with crushed pineapple, dividing evenly between cups.


To make the muffin batter, combine all the ingredients in a bowl.  Quickly stir with a wooden spoon, do not beat.  The batter will be lumpy.

Divide the batter evenly between the cups (filling to about 2/3 full).


Bake for 15-20 minutes at 400 degrees until golden. Mine took 18 minutes.


Loosen the edges of the muffin cups with a spatula or knife.  Invert immediately onto a cookie sheet. Let the pan rest on the muffins for about a minute then remove pan.


If any pineapple mixture sticks to the cups remove it and spread it over the bottom of the muffins.

Serve warm.

NOTES

So there was some reading misunderstanding on my part and I used foil cupcake holders instead of just doing them in the muffin tin itself.  The original method will be easier because I found my batter tended to stick to the sides of the foil cups.  Still delicious and edible.

I used Bisquick but you can use any packaged biscuit mix.

The other thing I meant to do was put a piece of maraschino cherry in the topping as well to make it more traditionally pineapple upside down...next time!


Wednesday, December 31, 2014

Check It Out: Helpful Hints from Freixenet for NYE

I'm in the middle of a house purge which means tackling the piles of accumulated wealth that have stacked themselves in every corner of my house. While engaging in a bout of "Dire, Must Keep This!" and "Where Did This Come From?" I rediscovered a little gem that seems holiday appropriate for this evening.

Apparently during the many years in which I made a bottle of Freixenet central to my New Year's celebrations, I acquired a copy of their The Freixenet Social Survival Guide. Great little book and a fun read. It covers all your Party Guest/Host Do's and Dont's plus so much more.

They also had a section which seemed perfect for this evening so I thought I would end this year by sharing some helpful passages brought to you by the makers of this fine bubbly beverage with many wishes from me for a Happy New Year and Bon Appetit for 2015!

THE FREIXENET SOCIAL SURVIVAL GUIDE
Selections from "Chapter 4 -- Cheers" (p. 39-48)

HOW TO HOLD A WINE GLASS

By the stem. Always by the stem. If you hold it by the bowl, cold white wines, champagnes, and martinis will lose their chill, while cellar-temperature reds will become too warm.

A NOTE TO THE SUAVE

Never drink to your own toast -- that is, when you're the one being toasted. It's equivalent to giving yourself a pat on the back.

GREAT OPENINGS

Whether it's a prestige selection from an ancient winery or a young, punky blend from a place you've never heard of, you should give every bottle of champagne...an opening that even a seasoned sommelier would approve of.

HOW TO OPEN A BOTTLE OF SPARKLING WINE

Make sure the champagne bottle has been stored on its side and hasn't been jostled recently. Check the temperature: it should feel like it just came out of the refrigerator (about 45° F.). If it's a bit tepid, put it on ice in a champagne bucket for 20 minutes.

1. Keep the bottle pointed away from every living creature, including yourself.

2. Prop the bottle on a table or counter top.

3. Remove the foil wrapper from the top part of the neck area.

4. Cover the top of the bottle with a cloth (a linen napkin or hand towel will do just fine).

5. While keeping the cork stabilized with one hand, loosen but don't remove the metal cage that holds the cork in place. This is done by untwisting the protruding wire loop. Never leave the cork unattended with the wire cage off.

6. Grasp the cork firmly. Hold the bottle from the base with your thumb inside the well and slowly twist it out from under the cork. Though you may hear a muffled pop, the bottle will likely let out a gentle sigh when the deed is done. 

7. Use a slow hand when decanting the bubbly into champagne flutes. Tilting the glass while pouring will help keep it from foaming up, but a slow, steady, trickle-like pour is the best strategy.

A NOTE TO THE SUAVE

Use narrow flutes or slightly flared tulip glasses when serving champagne. And don't chill the stemware. Sparkling wine is at its friskiest when served in cool, dry glasses.


NOTES

The Freixenet Social Survival Guide by Todd Lyon
Random House, Inc. (2000) / ISBN 0-609-50344-8


Freixenet comes from a Spanish winery who produces sparkling wine using the méthode champenoise (champagne method).  Because as you may know, only sparkling wines from the French province of Champagne can be called such.

My favorite is the Cordon Negro Brut (all black bottle), but Freixenet has a variety of cavas that you can try out, depending on what your taste runs to. 

Tuesday, December 30, 2014

Dark Chocolate Salted Caramel Pecan Fudge


I am discovering that my favorite treats to experiment with are ice cream and fudge.  When you can establish a good base recipe, it makes an excellent platform for experimentation.  I like to explore new taste options or try variations on things I've tasted elsewhere. As salted chocolates are still pretty trendy, I thought I'd give it a whirl myself.

If you are looking for an easy-to-make hostess gift for New Year's, I think you should try this.

DARK CHOCOLATE SALTED CARAMEL PECAN FUDGE

2 cups dark chocolate chips
1 cup milk chocolate chips
1 (14 oz.) can sweetened condensed milk
1/2 cup chopped pecans
1/2 cup caramel bits
1 to 1-1/2 tbsp. grinder salt

In a deep saucepan over low heat, melt together the chips and condensed milk until smooth and well blended.


Fold in the pecans and caramel bits and pour into an 8" x 8" (or 9" x 9") baking pan lined with wax paper, and spread out evenly and smoothly.


Sprinkle the salt on top.

Put in the fridge to set for at least 30 minutes before removing and cutting into bite-sized pieces.

Ready to package or to nibble at your leisure.

NOTES

I found some caramel bits at Southern Season in Charleston which I used for this recipe, but Kraft makes caramel bits too.  If you can't find those, you can small dice the wrapped caramels to add to the mix.


I also used Celtic Sea Salt (a Christmas gift from my good friend CJ) as my salty sprinkle, but you can use whatever kind you'd like.  You want a nice rough grain salt to stand out on top of your treat. 


Treat boxes are pretty easy to find these days, I get mine from Not Just Paper in Durham, NC (red ones), but you can also find them in Michael's or AC Moore's (usually white ones).  I use 1/2 pound boxes lined with wax paper.


Then I either pre-cut the fudge into bite-sized pieces (will fit 8-10 depending on what you call bite-sized) or cut out a piece that just fits in the box and include a little plastic knife in the box so your recipient can cut their own pieces.  Tie up with a decorative ribbon and you're all set.