Google Groups
Subscribe to The Culinary Creative
Email:
Visit this group
Showing posts with label snack. Show all posts

Wednesday, May 20, 2015

Vietnamese Bánh mì Sandwiches with Fresh Pickled Radish & Carrots


My plate has been super full these days, but I am most fortunate to have foodie friends willing to help out. This post came about because on a recent food-filled trip to Charleston we saw a stall at the Saturday morning Farmer's Market selling Bánh mì sandwiches (Bánh mì is a Vietnamese term for all kinds of bread). Turns out my pal Deborah is a BIG Bánh mì sandwich fan and actually makes them at home (a lot). So for your eating edification, she offered to share not only the How To process but her recipe for crispy, Fresh Pickled Carrots and Radishes.

Vietnamese Bánh mì Sandwiches  

If you've ever had a Vietnamese Bánh mì Sandwich, you're probably already a fan. They are brilliantly magical! Starting with the lightly crisped bread, to the layered flavors of condiments, tangy crunchy vegetables, pungent fresh herb, the zesty bite of a chile pepper, and of course the savory protein star of the sandwich, everything about this sandwich is right.

The genius of the Bánh mì sandwich comes from its cultural fusion of French and Vietnamese flavors (from France's colonial period in Indochina). The Bánh mì sandwich pairs a sturdy French baguette, sausages and even pate with distinctly Asian flavors resulting in a portable meal that is both hearty and delicate. Bánh mì sandwiches can be made with any meat, from a thin-sliced garlicky chicken sausage or Asian-spiced pork tenderloin medallions to seasoned tofu or beef sate. You get the idea.

For many, the magic of these creations lies in the fresh vegetable pickles. Crisp and tangy, they elevate a humble sandwich into something sublime. Luckily, they are ridiculously simple to make and to experiment with. No canning or processing -- just slice up the veggies, add a hot sweet brine, wait at least an hour and voila! You've got fabulous pickles that are perfect for Bánh mì sandwiches, or to perk up any salads or antipasto plates.

Fresh Pickled Carrots and Radishes

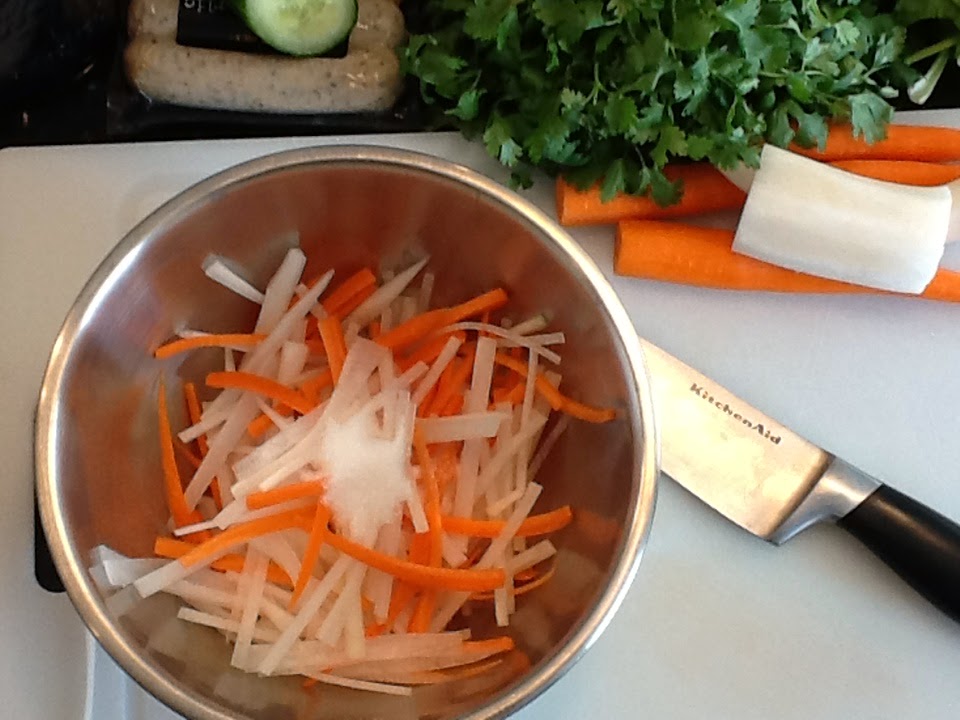
2 large carrots (or 3 medium)
about 1 lb (16 oz.) Daikon or red globe radish both types of radish are easy to find in supermarkets
1 tsp salt preferably fine sea salt
2 tsp plus 1/2 cup sugar you can use Splenda or other substitute, you just need to experiment a bit to get the sweetness to your liking
1-1/4 cup white vinegar
1 cup water
Quart jar

Peel the daikon radish and carrots, then slice into matchsticks of roughly the same length and width. If using red globe radish, you can cut it into thin rounds vs. matchsticks. These radishes also give the pickles a beautiful pink tinge.


Place the vegetables in a bowl and sprinkle with the salt and 2 tsp of the sugar. Gently massage the vegetables for around 3 minutes. They will release some liquid and soften up.


Rinse the vegetables and drain in a colander. Then transfer them to your quart jar. You can also make these in a tupperware container if you don't have a jar.


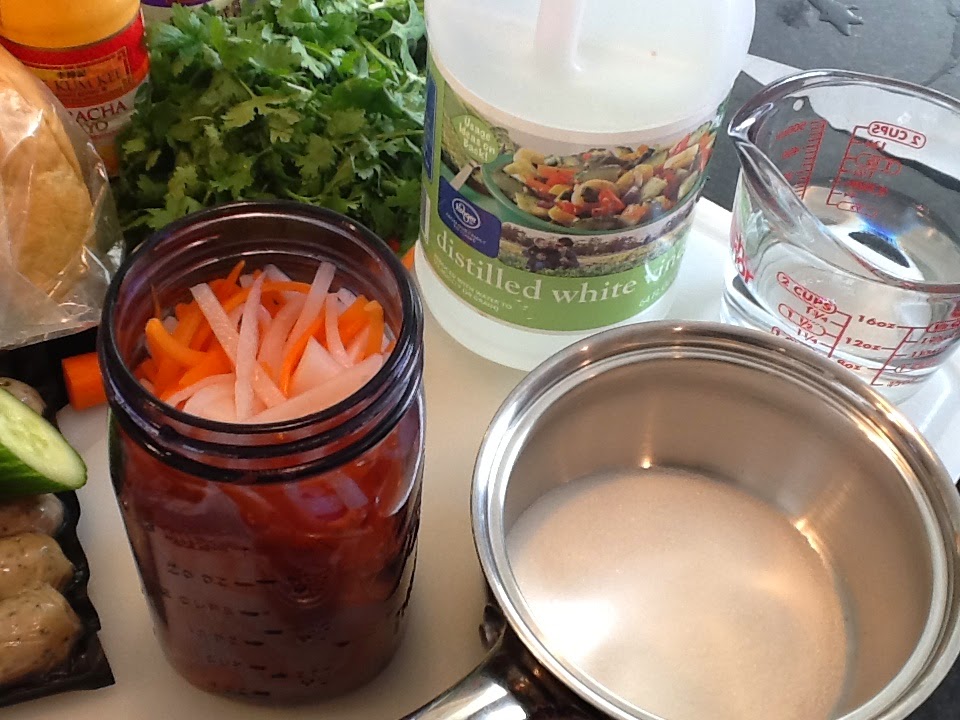
For the brine, stir together the remaining 1/2 cup sugar with vinegar and water over medium head until the sugar dissolves. No need to boil. Be sure all bubbling has stopped, you want the brine to cool a bit before pouring into the jar. This is important because you want to brine the vegetables -- not cook them! Fully cover your veggie pickles and discard any remaining brine.


Let them sit for at least an hour and then taste to adjust for seasoning. If you want them to be a touch sweeter, add more sugar. If you like them more tart, add a bit more vinegar. Play around!

You can use your fresh pickles after an hour, but the flavor is best after at least 24 hours. These pickles will keep in your fridge for up to a month, but I bet they don't last that long.

Note: radish pickles can seem a bit stinky when you first open the jar. Don't worry! They are still good. Just let them air out a bit before assembling your sandwich.

Now it's time to assemble your Bánh mì sandwich!

BREAD -- Slice open your bread roll, lightly toast, and take out some of the crumb on one side to make room for your vegetables. The only rule here on bread choice is don't pick a bread that is going to scratch up the top of your mouth when you eat the sandwich! You know what I mean. So use what works best for you: hoagie roll, ciabatta roll, baguette, etc.

FAT -- Use a homemade mayo, salted butter, garlic aioli, mashed avocado or my favorite -- sriracha mayo. Be sure to spread from edge to edge on your bread.


CONDIMENT -- Here's where you can get creative! Use hoisin sauce, Maggi seasoning (a wonderfully flavorful version of soy sauce), Sriracha sauce, or just a light sprinkling of fish sauce. Most any Asian sauce will work, it all depends on what you like. Again, be sure to spread from edge to edge on your bread so that every bite is perfectly flavorful.


PROTEIN -- You can use just about anything that makes your mouth water, just be sure it is sliced thin so it is easy to bite through. My favorite is a flavorful chicken sausage sliced on the diagonal.

CUCUMBER -- Thinly slice the cucumber of your choice. You can use any kind of cucumber, and peel them or not, as you wish.


CHILE PEPPER -- It's traditional to use thin slices of a chile pepper, but if that's not you're thing, no worries. Think jalapeno, thai chile, Anaheim or your personal favorite. I'm not so into the hotness, so I skip this part.

PICKLES -- Now it's time to use your favorite pickled vegetables! Drain them slightly before adding to your sandwich so it's not drippy and messy.

FRESH HERB -- Think cilantro, Thai or sweet basil, mint, or any pungent fresh herb that makes you happy.


Now take a look at your colorful, savory delicious masterpiece and enjoy!


Sunday, February 15, 2015

Cajun Spice Pecan Cheese Bites


Since my blog promoters (aka Parents) have been touting these goodies about town, I wanted to get them posted for you all sooner rather than later.  I have some guests posts coming up this week that I think you are really going to like.

Last weekend I helped celebrate my friend Dana's birthday with a mini feast of Cajun goodness.  My contribution to the eatin's were these little treats.  I really wanted to make cheese straws but much to my chagrin, I found I didn't have a cookie press readily on hand so went the biscuit cutter route.

The cheese bites have just that, a nice bite that sneaks up on you.  The pecans make a sweet complement to the red pepper and bring it all together.

Cajun Spice Pecan Cheese Bites

8 tbsp. butter, softened
1-1/2 cups sharp cheddar cheese, shredded
1/2 cup pepper jack cheese, shredded
1 cup flour
2 tsp. baking powder
1 tsp. salt
1 tsp. cayenne pepper
1/2 cup chopped pecans, small bits

Cream together the soft butter and cheeses.


Add flour, baking powder, salt and cayenne pepper and bring it all together as a dough.


Mine was very crumbly in the mixing bowl, so I transferred it to a rolling mat and kneaded it together until it formed a solid ball of dough.


Fold the pecan bits into the dough until evenly distributed.


With a rolling pin, roll dough out to about a 1/2" thickness and use a small biscuit cutter to cut small discs.  I split my dough in half and rolled out one half at a time, made it easier to manage.  You can re-roll the dough until all is used up.


Place discs on lightly greased cookie sheet and bake at 350 degrees for 10-12 minutes or until crispy and golden brown around the edges.


Remove from oven and immediately transfer to a cooling rack.

Saturday, January 31, 2015

Pineapple Upside-Down Muffins


Hello!  The prodigal blogger returns.  Have been busy in the kitchen but mostly whipping up old favorites to help Mom during her post-surgery convalescence.  BUT today I had some friend over for brunch and was determined to try something new.

Found this gem of a recipe in my 1965 "McCall's Practically Cookless Cookbook." I love going through the old books because you never know what you'll find.  I realized that I have never made pineapple upside-down cake before so figured this would be my baby step to the big league.

Pineapple Upside-Down Muffins
paraphrased from original recipe, makes 16

pineapple topping
1/3 cup butter, melted
1/2 cup light brown sugar, packed
1/2-2/3 cup pecan halves
1 (8 oz.) can crushed pineapple, drained

muffin batter
2 cups Bisquick
1/4 cup granulated sugar
2 tbsp. butter, melted
3/4 cup milk
1 egg

Grease bottoms of 16 muffin tin cups.

To make the pineapple topping, first combine the melted butter and brown sugar.  Divide evenly between muffin cups.


Arrange 2-3 pecan halves per muffin cup.  Then top with crushed pineapple, dividing evenly between cups.


To make the muffin batter, combine all the ingredients in a bowl.  Quickly stir with a wooden spoon, do not beat.  The batter will be lumpy.

Divide the batter evenly between the cups (filling to about 2/3 full).


Bake for 15-20 minutes at 400 degrees until golden. Mine took 18 minutes.


Loosen the edges of the muffin cups with a spatula or knife.  Invert immediately onto a cookie sheet. Let the pan rest on the muffins for about a minute then remove pan.


If any pineapple mixture sticks to the cups remove it and spread it over the bottom of the muffins.

Serve warm.

NOTES

So there was some reading misunderstanding on my part and I used foil cupcake holders instead of just doing them in the muffin tin itself.  The original method will be easier because I found my batter tended to stick to the sides of the foil cups.  Still delicious and edible.

I used Bisquick but you can use any packaged biscuit mix.

The other thing I meant to do was put a piece of maraschino cherry in the topping as well to make it more traditionally pineapple upside down...next time!


Tuesday, December 30, 2014

Dark Chocolate Salted Caramel Pecan Fudge


I am discovering that my favorite treats to experiment with are ice cream and fudge.  When you can establish a good base recipe, it makes an excellent platform for experimentation.  I like to explore new taste options or try variations on things I've tasted elsewhere. As salted chocolates are still pretty trendy, I thought I'd give it a whirl myself.

If you are looking for an easy-to-make hostess gift for New Year's, I think you should try this.

DARK CHOCOLATE SALTED CARAMEL PECAN FUDGE

2 cups dark chocolate chips
1 cup milk chocolate chips
1 (14 oz.) can sweetened condensed milk
1/2 cup chopped pecans
1/2 cup caramel bits
1 to 1-1/2 tbsp. grinder salt

In a deep saucepan over low heat, melt together the chips and condensed milk until smooth and well blended.


Fold in the pecans and caramel bits and pour into an 8" x 8" (or 9" x 9") baking pan lined with wax paper, and spread out evenly and smoothly.


Sprinkle the salt on top.

Put in the fridge to set for at least 30 minutes before removing and cutting into bite-sized pieces.

Ready to package or to nibble at your leisure.

NOTES

I found some caramel bits at Southern Season in Charleston which I used for this recipe, but Kraft makes caramel bits too.  If you can't find those, you can small dice the wrapped caramels to add to the mix.


I also used Celtic Sea Salt (a Christmas gift from my good friend CJ) as my salty sprinkle, but you can use whatever kind you'd like.  You want a nice rough grain salt to stand out on top of your treat. 


Treat boxes are pretty easy to find these days, I get mine from Not Just Paper in Durham, NC (red ones), but you can also find them in Michael's or AC Moore's (usually white ones).  I use 1/2 pound boxes lined with wax paper.


Then I either pre-cut the fudge into bite-sized pieces (will fit 8-10 depending on what you call bite-sized) or cut out a piece that just fits in the box and include a little plastic knife in the box so your recipient can cut their own pieces.  Tie up with a decorative ribbon and you're all set.

Monday, December 29, 2014

Dad's Favorite Congo Bars


For the pater's birthday this year, I had a request for the Congo Bars like his grandmother used to make.  Wasn't sure what to expect, but the best way to describe them is chocolate chip nut bar on steroids. Chewy and crunchy-crusted and big and delicious.  You'll find out why Dad is such a fan.

CONGO BARS

2-3/4 cups sifted flour
2-1/2 tsp. baking powder
1/4 tsp. salt
2/3 cup shortening
2-1/4 cups brown sugar
4 eggs
1 cup chopped nuts (I used walnuts)
1 (12 oz.) pkg. semi-sweet chocolate chips
1 tsp. vanilla

Mix together flour, baking powder, and salt.  Set aside.

In a deep saucepan, melt shortening.


Once liquid, mix in brown sugar and mix to a paste.


Remove from heat and allow to cool slightly.

Add in eggs, one at a time, mixing well after each egg.


Add in dry ingredients, a bit at a time until all is well blended.


Stir in vanilla then fold in nuts and chocolate chips.

"Pour" mixture into a greased 8"x 12" pan (can use 9" x 13") and spread out evenly.


Bake at 350 degrees for 25-30 minutes or until center is cooked through (use a toothpick to test).


Remove from oven, slice, scarf down, enter Congo Bar coma.

NOTES

Do NOT melt shortening and brown sugar together. Someone may have learned the hard way that if you do them together they form a crumbly mixture (versus a smooth paste) and thus can't be mixed well with other ingredients. 

Congo Bars ARE supposed to be "cakey and moist" in the center, not "raw and doughy."  

Sunday, October 26, 2014

Ooey Gooey Crunchy Chewy Monster Eyeballs


I know using "eyeballs" in a food title is problematic but it's almost Halloween!!!  I will warn you that while these are adorably disturbing, they are a little messy to make...but delicious.

Ooey Gooey Crunchy Chewy Monster Eyeballs

1-1/4 cup dried apricots, small chopped
1 cup dates, small chopped
1 cup pecans, small chopped
1 cup flaked, sweetened coconut
1 can (14 oz.) condensed milk
4-5 graham crackers, crushed
1 (16 oz.) package milk chocolate CandiQuik
Wilton candy eye

In a large bowl, mix together dried apricots, dates, pecans and coconut.  Add the condensed milk and mix until well blended.


Put the mixture in the fridge for about 30 minutes, letting it firm up.


Add enough crushed graham crackers to keep the mixture from being too moist and enough that you can easily roll it into 1-1/2" balls.  Place balls on a cookie sheet covered with wax paper.


Melt the chocolate bark over low heat.  Once ready to go, dip the balls in the chocolate, shake off any excess, and replace on wax paper.  Pop a candy eye on the top before the chocolate hardens.


Spooktacular!  Nice little rush sugar for all the little ghoulies to enjoy.

Sunday, October 19, 2014

Pumpkin Pie'scream


I've not been shy over the years about my undying love of all things pumpkin, and tonight I'm excited to bring you another exciting iteration of that love.  This was one of those driving home from work brainstorm creations.  As always, you're very welcome.

Pumpkin Pie'scream

1 (15 oz.) can pure pumpkin
2 cups light cream
3/4 cup sugar
1 tsp. cinnamon
1/2 tsp. ground ginger
1/4 tsp. ground cloves
2 eggs
1/2 cup graham crackers, broken into bits
2-3 tbsp. caramel sauce

Whisk together pumpkin, light cream, sugar, spices, and eggs in a deep saucepan.  Bring to a low boil over medium-high heat, then remove from heat.


Transfer mixture to a bowl (preferably metal) and place in the fridge to cool off.

Once the mixture has cooled to at least room temperature, put in the ice cream maker and follow directions of machine to make ice creamy.

If you don't have an ice cream maker, pour the mixture into a metal baking pan and place in the freezer.  Will take a bit longer, but will work the same.


Once the ice cream reaches soft serve stage, fold in graham cracker bits and caramel sauce (loosely so that the caramel doesn't blend too much).


Transfer to a freezer friendly container and allow to set.

Scoop up, top with some whip cream, garnish with some pecan bits and savor the pumpkin fabulousness of a non-pie piescream treat.

DAD'S NOTE

Dad's recommendation is to take this delicious frozen treat and put it in a pie crust and make it a Pumpkin Pie'scream Pie.  Maybe add some whip cream, a couple pecans...an additional caramel drizzle might not come amiss.  Now you know where my genius comes from.