Google Groups
Subscribe to The Culinary Creative
Email:
Visit this group
Showing posts with label fruit. Show all posts

Wednesday, April 1, 2015

Fruit Gazpacho


No foolin' -- this is a great cold soup to enjoy as the weather is getting warmer, and just one of the many delicious recipes you'll find in Eat Raw, Eat Well.

Fruit Gazpacho
from Eat Raw, Eat Well (p. 110) with notes by K2

2 cups chopped hulled strawberries
1 cup frozen raspberries (see Tips)
1 cup frozen blueberries
1 cup chopped kiwifruit
1 cup coconut water (see Tips)
1/4 cup freshly squeezed lime juice*
1/4 cup fresh mint leaves
pinch fine sea salt

In a food processor fitted with the metal blade, pulse strawberries, raspberries, blueberries and kiwi until chopped and broken down (it is important to keep the texture at this point). K2: I was a little too enthusiastic so lost some of my texture.


Add coconut water, lime juice, mint and salt.  Pulse to combine.

Serve immediately or cover and refrigerate up to 3 days.

TIPS

(from page 110) You may use any blend of frozen fruit in this recipe. I also like using blackberries, gooseberries or cherries. When making this soup, make sure to use at least 2 cups frozen berries to give the soup body.  K2: I used a frozen berry mix that had blackberries, black raspberries, blueberries and cherries. 


(from page 21) Coconut water, which is the watery liquid inside a young coconut, is nature's electrolyte replacer. It is full of naturally occurring salts and sugars, which help to regulate many bodily functions. It is also a great source of potassium. The best kind is straight from a young organic coconut, but if that is not available the next best thing is pure organic coconut water in cans not lined with biphenol A (BPA) or Tetra Paks. If you're purchasing coconut water, look for high-quality products that don't contain additives or preservatives (many prepared coconut waters have added sugar and other ingredients).

* two small limes will yield 1/4 cup fresh squeezed juice


Saturday, January 31, 2015

Pineapple Upside-Down Muffins


Hello!  The prodigal blogger returns.  Have been busy in the kitchen but mostly whipping up old favorites to help Mom during her post-surgery convalescence.  BUT today I had some friend over for brunch and was determined to try something new.

Found this gem of a recipe in my 1965 "McCall's Practically Cookless Cookbook." I love going through the old books because you never know what you'll find.  I realized that I have never made pineapple upside-down cake before so figured this would be my baby step to the big league.

Pineapple Upside-Down Muffins
paraphrased from original recipe, makes 16

pineapple topping
1/3 cup butter, melted
1/2 cup light brown sugar, packed
1/2-2/3 cup pecan halves
1 (8 oz.) can crushed pineapple, drained

muffin batter
2 cups Bisquick
1/4 cup granulated sugar
2 tbsp. butter, melted
3/4 cup milk
1 egg

Grease bottoms of 16 muffin tin cups.

To make the pineapple topping, first combine the melted butter and brown sugar.  Divide evenly between muffin cups.


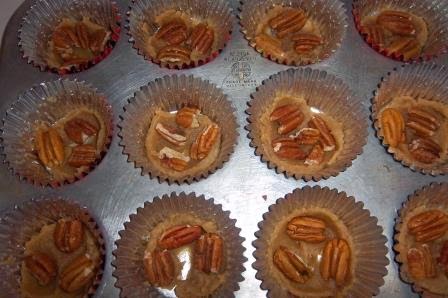
Arrange 2-3 pecan halves per muffin cup.  Then top with crushed pineapple, dividing evenly between cups.


To make the muffin batter, combine all the ingredients in a bowl.  Quickly stir with a wooden spoon, do not beat.  The batter will be lumpy.

Divide the batter evenly between the cups (filling to about 2/3 full).


Bake for 15-20 minutes at 400 degrees until golden. Mine took 18 minutes.


Loosen the edges of the muffin cups with a spatula or knife.  Invert immediately onto a cookie sheet. Let the pan rest on the muffins for about a minute then remove pan.


If any pineapple mixture sticks to the cups remove it and spread it over the bottom of the muffins.

Serve warm.

NOTES

So there was some reading misunderstanding on my part and I used foil cupcake holders instead of just doing them in the muffin tin itself.  The original method will be easier because I found my batter tended to stick to the sides of the foil cups.  Still delicious and edible.

I used Bisquick but you can use any packaged biscuit mix.

The other thing I meant to do was put a piece of maraschino cherry in the topping as well to make it more traditionally pineapple upside down...next time!


Sunday, December 28, 2014

Check It Out: Spiced Cranberry Prosecco Punch


With New Year's right around the corner, if you are looking for a festive beverage, you need to check this out. It's not a recipe of mine, but one I want to point you in the direction of. I've had this concoction a couple of times at holiday fiestas hosted by my friends Dana and Mike. It is ridiculously addictive and usually requires them re-batching several times during the evening.

When I finally got around to asking Dana for the recipe, it turns out that she got it online from "Heather Christo: Eat Well, Live Free. Deliciously Allergy Free Recipes," a great website you should check out. She has really sexy food photos. I've paraphrased the original recipe here for your convenience, but for how-to photos go check it out on her webpage.

Spiced Cranberry Prosecco Punch (paraphrased from Heather Christo)
makes 20 servings

cranberry ice cubes
2 ice cube trays
fresh or frozen cranberries

Place the cranberries in the ice cube trays, fill with water and freeze until hard, at least 4 hours to overnight.

spiced punch
bag of party ice
4 cinnamon sticks
zest of 2 oranges
5 cups cranberry juice
3 cups orange juice*
2 bottles Prosecco
2 oranges (regular or blood), sliced
1 cup dark rum or bourbon (optional)

Put bag ice and cranberry ice cubes in a large punch bowl or punch dispenser. See photo above.

Add in cinnamon sticks, orange zest and orange slices, then pour in the cranberry and orange juices.

Next stir in the prosecco and mix well.

Voila! Delicious, delicious, tantalizingly addictive punch.

NOTE

*You can do orange juice with no pulp or some pulp.  If you are using a regular open punch bowl, it doesn't really matter, if you are using a punch dispenser as shown above, you may have some spigot blockage if you get an orange juice with too much pulp in it so heads up on that.


Monday, December 8, 2014

Rustic Cranberry Pear Tart


Hello and happy holiday season!  I've been a slacker, no excuses, but have been stockpiling ideas so trying to get back into my groove before the end of the year rolls around.

Here is another rustic tart I think you are going to like.  Since both pears and cranberries are in season, I thought I might let them hang out together in a quick to make dessert.  Great for gifting or just tearing into with your loved ones (if you so inclined to share).

Rustic Cranberry Pear Tart

tart dough
1-1/2 cups flour
1/2 tsp. cinnamon
1/8 tsp. salt
6 oz. (1-1/2 sticks) cold butter, cubed
1/3 cup cold water

4 tsp. sugar
2 tsp. flour

filling
2 pear, peeled and sliced thin
1/2 cup whole cranberries
2 tbsp. brown sugar
1 tsp. cinnamon

To make the crust:

Mix together 1-1/2 cups of flour with the cinnamon and salt.

Cut in the cold butter cubes with a pastry blender or fork until the mixture forms pea-sized crumbs.  You can also put ingredients in a food processor and pulse on low until it crumbs.

Make a well in the center of the mixture and pour in the water.  Using your hands, knead the ingredients together until they form a ball.

Roll out onto a floured surface and knead for 2-3 minutes.  Roll out with a rolling pin to a thickness of approximately 3/8".

Cover a large cookie sheet or pizza pan with parchment paper.  Use the rolling pin to roll up your flattened dough and transfer to the papered surface.

Mix together the remaining 2 tsp. flour with the sugar and sprinkle across the surface of the dough.

For photos of the how-to process, click here.

For the filling:

Mix together pear slices, cranberries, brown sugar and cinnamon, then pour into the middle of the rolled out crust, spreading it out evenly.


Fold the edges of the crust over the edges of the filling.


Bake at 350 degrees for an hour until edges are browned. Remove from oven and allow to set for a minute before serving.


NOTES

The tart is not overly sweet, the cranberries provide a nice tart flavor to offset the milder pears.

You can serve hot, cold, or at room temp.  With a bit of French vanilla ice cream on the side, you cannot go wrong.  

Wednesday, November 19, 2014

Flatbread Pizza with Spaghetti Squash, Pear, Brussel Sprouts and Balsamic Drizzle


Okay that's a very long name for a food, but no real easy to shorten it so there you go.

Though I took a short sabbatical from posting, food is never far from my mind and I'm looking forward to bringing you some new fall dishes and dessert treats as we go into the holiday season.

But to start, brussel sprouts...they really are the most adorable little mini cabbages!  Teeny and delicious and very fun to cook with.  So the inspiration for this pizza came from the flatbread appetizer I'd mentioned last time. Made one or two K2 alterations and voila! Something new and exciting.

Flatbread Pizza with Spaghetti Squash, Pears, Brussel Sprouts and Balsamic Drizzle
Since this is a pizza recipe, I don't have exact measurements for everything, just adjust the amounts to what you like and go from there.

Flatbread rounds
Olive oil
Spaghetti squash, roasted and "spaghetti'd"
Brussel sprouts, quartered
Pear, sliced thin
White cheddar cheese, shredded
1/4 cup balsamic vinegar, reduced

PRE-PREP

Spaghetti Squash -- cut the squash in half, scoop out the guts, bake at 350 degrees (face up) for 30-40 minutes.  Take a fork and scrape the insides out to spaghetti it.


Brussel Sprouts -- quarter the sprouts and dry fry them (no oil or coating) in a non-stick pan for 4-5 minutes or until fork tender (and not zombified).


Pear -- slice the pear very thin (1/8") and dry fry them in a non-stick pan for 2-3 minutes or until almost translucent.


Balsamic Vinegar -- in a small saucepan, bring 1/4 cup balsamic to a boil, allow to boil for 3-4 minutes, until it starts to reduce.  Set aside and let it continue to reduce in the pan away from the heat. You can use whatever type of balsamic you'd like, I actually had a sample bottle of Cranberry Pear Balsamic that really did the trick.

LAYERING

I brushed my flatbread with olive oil to give it a minimum coating and add some moisture.

Then I laid my pear slices down, sprinkled them with the shredded white cheddar.

Next I added the brussel sprouts and covered it all with a thin layer of the spaghetti squash.

Finally, I drizzled a moderate amount of the balsamic reduction across the top of the pizza.


Baked at 350 degrees for about 10 minutes, though you can do less time or more time depending on how done you like your pizza.

All that's left is to slice and enjoy.

Little shout out here to my friend Bethany who served as guinea pig on this my latest culinary experiment.  It got a two thumbs up so I think you're going to like it too.


.

Sunday, October 26, 2014

Ooey Gooey Crunchy Chewy Monster Eyeballs


I know using "eyeballs" in a food title is problematic but it's almost Halloween!!!  I will warn you that while these are adorably disturbing, they are a little messy to make...but delicious.

Ooey Gooey Crunchy Chewy Monster Eyeballs

1-1/4 cup dried apricots, small chopped
1 cup dates, small chopped
1 cup pecans, small chopped
1 cup flaked, sweetened coconut
1 can (14 oz.) condensed milk
4-5 graham crackers, crushed
1 (16 oz.) package milk chocolate CandiQuik
Wilton candy eye

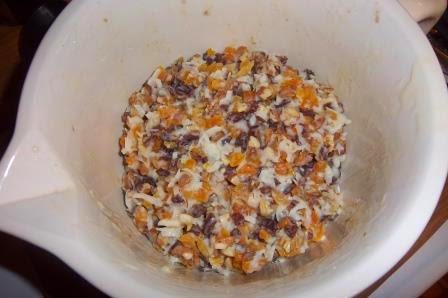
In a large bowl, mix together dried apricots, dates, pecans and coconut.  Add the condensed milk and mix until well blended.


Put the mixture in the fridge for about 30 minutes, letting it firm up.


Add enough crushed graham crackers to keep the mixture from being too moist and enough that you can easily roll it into 1-1/2" balls.  Place balls on a cookie sheet covered with wax paper.


Melt the chocolate bark over low heat.  Once ready to go, dip the balls in the chocolate, shake off any excess, and replace on wax paper.  Pop a candy eye on the top before the chocolate hardens.


Spooktacular!  Nice little rush sugar for all the little ghoulies to enjoy.

Sunday, July 27, 2014

Spiced Pickled Apples: Part I


I'm excited about this one.  Had never heard of pickled apples before but they came up in a conversation about country foods.  My friend Blair's grandma used to make them and as she sat there drooling at the memory of pickled apples, I started thinking that this would be a great post idea.  Then I started thinking about things I could do with pickled apples, like make a rustic tart. Mm-mmm.

Step 1 in this road to rustic tart scenario is actually making the pickled apples themselves so I searched around to find some recipes and then picked and chose the parts I liked best and came up with the one below.

Figured I would start them this weekend, we'll let them pickle up during the week, then next weekend, we'll tart 'em up.

Spiced Pickled Apples

2 cups apple cider vinegar
1 cup water
1/2 cup white sugar
1/4 cup brown sugar (not packed)
2 tsp. sea salt
1 tsp. allspice berries
1 tsp. whole peppercorns
1 cinnamon stick
2 star anise
3 Granny Smith apples, cored and sliced

In a medium saucepan, simmer all ingredients except the apples until the sugars and salt dissolve.


Place the sliced apples in a non-conducive bowl and pour the liquid mixture over them. Let it sit until it cools to room temperature, then put in a jar with a sealed lid and let sit for a week until ready.


NOTES

A lot of the recipes I looked at removed the peel from the apples before pickling, but I left mine on because I like the skin. We'll see how that works out.

If you're not familiar with whole peppercorns, allspice berries, or star anise, this is what they look like (below).


Sunday, July 13, 2014

Asian Cabbage Salad

 
I met some friends for lunch the other day at The Nasher Museum Cafe in Durham and enjoyed a delicious salad that was so crispy and light and filling I decided that I wanted to try it at home.

I'm very happy with my final product and as an added bonus I now have a recipe for the same miso-ginger dressing that you get on your salad at a Japanese steak house. Num! All around good stuff.

Asian Cabbage Salad

2 cups shredded white cabbage
1 cup shredded red cabbage
1 cup grated carrot
1/2 cup cooked edamame
1/3 cup toasted cashew halves
1 orange, peeled, de-pithed and segmented
3-4 tbsp. miso-ginger dressing

Toss everything together in a large bowl. Serves 4.


miso-ginger dressing
1/4 cup white miso
3 tbsp. rice wine vinegar
1 tbsp. white wine vinegar
1 tbsp. water
1 tbsp. minced ginger
1-1/2 tsp. sugar
3 tbsp. sesame oil

Blend together all but the sesame oil in a food processor.  Slowly add the oil in as you pulse the mixture on low.  Leftovers will keep up to a week in the fridge.


NOTES

You can find pre-made ginger dressings in the grocery store.  To make the dressing, I went to a local Asian market to get the miso.  Heads up, found it in the refrigerated section of the store and it was not inexpensive, but worth it.  I'll be seeing what other recipes I can come up with to use it.


Sunday, June 29, 2014

Jack the Pirate's Mangria

 
Hope everyone is enjoying their weekend. Mine has been both ridiculously fun and blog inspirational.

Yesterday my friend Deborah drug me out (all but kicking and screaming) for a tubing adventure with her Meet Up group. This is because occasionally I suffer from InARut syndrome. The day ended up being perfect -- sunny but not too sunny, water was cool but not too cool, fellow floaters were friendly and fun, so just the right of everything for a relaxing afternoon.

Many of our co-adventurers brought along adult beverages to make their afternoon float more even relaxing which made us sincerely regret our lack thereof. Yeah, that one's on me...I had a wagon moment before the weekend that left us "unprepared" for our water adventure. 

Then Jack saved our day. We were very happy to make friends with Jack, the awesome guy who shared with us his OJ jug of "just thrown together this morning" homemade sangria. YAY! This was not your everyday sangria, it was not too sweet and packed a bit of a punch that earned it the nickname "mangria" by one of our fellow floaters. 

So now, for your future floating adventure enjoyment, may I present Jack the Pirate's Mangria.

MANGRIA

3 cups orange juice
1 bottle red wine
2 oz. tequila
1 medium apple, cored and sliced (peel optional)
1 cup fresh blueberries

Mix. Drink. Nosh. Enjoy.

RIVER NOTES

For easy mixing and sipping, I highly recommend the Jack the Pirate method of using an empty or near empty orange juice jug (as seen in photo above). Has an easy-to-hold handle and is plastic (read: floatable) in case of mangria overboard.

FYI, Jack isn't really a pirate, we started calling him that because he reminded me of a pirate drinking from his grog jug and it just made sense at the time.

Mangria is best when sipped and shared, but make sure lid is securely fastened before passing from tube to tube to avoid spillage because it is only fun and games until someone spills the mangria and then it's no fun for anyone.

Orange juice, red wine and tequila brands are left entirely up to you. Pick your faves and make it happen.

The apple and blueberries are best consumed after they have been soaking for a while. My blueberries were not handpicked from a bush by my mom like Jack's were, but I did handpick the container from the grocery store collection. Close enough, still delicious.

And always, please please please, Remember to Float Responsibly. Thank you.

Wednesday, May 28, 2014

Kale Smoothies


I know, sounds weird, right?  Kale in a smoothie?  That's just crazy talk, but here at TCC we are crazy talkers.  I was skeptical going into this but in the name of culinary science, I had to give it a whirl and you know what I discovered?  Crazy good!

When I went to buy my kale, I saw that they had both green AND purple which inspired my second smoothie.  Be brave and try these, I promise you won't be sorry.

Green Kale-Pear Smoothie

3/4 cup green kale, chopped
3/4 cup pear, peeled and chopped
1 (6 oz.) container lowfat French vanilla yogurt, cold
3/4 cup almond milk, cold

In a blender, puree the kale, pear and yogurt together until the kale is in even smaller bits and the mixture is semi-smooth.

Add in the almond milk and blend until well mixed.  Pour and enjoy.


Purple Kale-Blueberry Smoothie

1/2 cup purple kale, chopped
1/2 cup fresh blueberries
1 (6 oz.) container lowfat French vanilla yogurt, cold
1 cup almond milk, cold

In a blender, puree the kale, blueberries, and yogurt together until the kale is in even smaller bits and the mixture is semi-smooth.

Add in the almond milk and blend until well mixed.  Pour and enjoy even more. This was my favorite of the two.

NOTES

I keep all my ingredients in the fridge to make sure my beverage is cold.  You could always add crushed ice to chill it down, or use some frozen yogurt to make it chilly too.

If you want to add some protein to the mix to make it more of a meal, you can add a dab of almond butter.

Wednesday, May 14, 2014

Orange Cinnamon Pecan Waffles


Happy Belated Mother's Day to all the maternal gals out there!  Since my momma loves her some pecan waffles, I treated her to a flavor upgrade for Mother's Day brunch.  So yummy!  With a little turkey bacon on the side, it was all good and then some.

Orange Cinnamon Pecan Waffles
will need to use a waffle iron with this recipe, just FYI

2 cups flour
1 tbsp. sugar
4 tsp. baking powder
1/2 tsp. cinnamon
1/4 tsp. salt
2 eggs
1-3/4 cups milk
1/2 cup saffron oil
1/2 tsp. vanilla
2 tsp. orange zest
1/2 to 3/4 cup chopped pecans

In a large bowl, mix together flour, sugar, baking powder, cinnamon and salt.  Set aside.

In a smaller bowl, beat eggs until they're "fluffy."  Whisk in milk, oil and vanilla.

Pour wet ingredients into the dry mix and beat together until smooth.


Mix in the orange zest until well incorporated.

Heat your waffle iron according to instructions.  For a single waffle, pour 1/2 cup of waffle batter on the iron and as it spreads out, sprinkle some of the chopped pecans on top before closing the waffle iron lid.


Cook for 3-4 minutes or until iron lid lifts easily and the waffle is to your consistency taste.

Remove, drizzle with your favorite syrup and try not to hurt anyone as you shovel your waffle into your face.

Wednesday, April 30, 2014

Blueberry Pineapple Salsa (with Grilled Pork)

 
Haven't gotten around to braving the Orange Pie experiment again so have something new and different for you.  Still fruit-based but inspired by what was on the shelves in the fridge when I was sightseeing in there the other day.

Again, its spring, time to dust off the grills and start some outdoor cooking.  One of my favorite things is grilled pork and since pork is a great vehicle for fruited condiments here is a light and refreshing salsa to accompany it.

Blueberry Pineapple Salsa

2 cups chopped vine ripe tomatoes
1 cup fresh blueberries, divided
1 cup chopped pineapple
2 tbsp. minced green onions
2 tbsp. pineapple juice
1 tbsp. jalapeno, deseeded and minced
1 tsp. salt

In a deep bowl, muddle half of the blueberries.  Then add in the rest of the ingredients.


Cover and refrigerate for at least an hour.  Very important because the flavors need time to blend.


Grill up some thick chops or pork loin slices.  When done, top with a generous helping of salsa.

NOTE

As with everything, depending on what your flavor preference feel free to modify amounts to suit your own taste.  If you like it with a bit more bite, add more jalapeno.  If you like it with a bit more zing, add more onion.  For a softer taste, add more bluebs or p'napple.

We did thick cut boneless pork chops and to prepare them I did a really simple rub with ground sage, salt, and cracked black pepper.  Tasty!

Sunday, April 13, 2014

Dipping Fruit with Basil Sugar

 
Now that the weather is getting nicer, more people are flocking to the great out of doors to dine al frescoYou can tell that people around here are desperate for sunlight and fresh air because despite the yellow pollen coating EVERYthing the outdoor seating area at a local eatery was packed this morning.

So I was in Paris last week for business (yeah, new job is pretty okay) and we ate ridiculously well.  French food is not only delicious, it's so beautifully and creatively presented that you can't help but eat whatever they put down in front of you.  You will be seeing things coming up that have a Parisian inspiration, including tonight's very simple post.

No matter what time of day, there seemed to be a plethora of fresh fruit to enjoy and tonight's post is based on some of the snacks that we were offered during our work day.  These are light, refreshing, easy to make and a great new addition to any picnic offering.

Dipping Fruit with Basil Sugar

1/4 cup white sugar
1-1/4 tsp. basil paste

blueberries
raspberries
Mandarin oranges
pineapple chunks
4" skewers

In a food process, blend together sugar and basil until mixture is a consistent texture.  Put in a small bowl, set aside.


Thread fruit on skewers in descending size order -- pineapple, orange, raspberry, blueberry.

To enjoy, simply dip the fruit in the basil sugar.

Voila, simple dish with a pretty presentation.  Wow your friends.

NOTES

Basil paste is available in the produce section of the grocery store with the fresh herb packages.

If you can't find basil paste, you can always food process fresh basil leaves before adding to the sugar.  Made sure to add a drop of oil to help it come together as a paste, then add in the sugar afterwards.


Wednesday, April 2, 2014

Strawberry Butter (aka Butter Late Than Never)

 
I'm going to apologize upfront for the bad photos tonight.  Apparently Technical Difficulties is the order of the week.

As best I can tell there is nothing wrong with the TCC blog itself and if you are a subscriber, you should have no problems with the email posts.  There is something wonky that happens sometimes when you try to access the website itself, so as you do with home and work, don't click on anything that you are not familiar with.  Apologize for any inconvenience and let's get back to our usual culinary programming. Thank goodness for fallback Wednesdays, huh? (Yes, that is what I'm calling them now).

So spring is in the air and strawberries are in the market so I wanted to try something new with them.  As the Parental Tasters will attest, this one is pretty sweet (and simple to boot)!

Strawberry Butter

1 cup (2 sticks) salted butter, softened
3/4 cup strawberries, chopped small
1/4 cup powder sugar

In a mixer, blend together the softened butter and fresh chopped strawberries.


Sift in the powder sugar and mix until blended together.


You can leave your final product chunky (like I did) or blend it until the strawberries break down a bit more.

I baked up some biscuits (sorry, not from scratch) and Dad slathered them with the strawberry butter.  Happiness ensued.

NOTES

The butter would go great on pancakes or waffles too. 

Should be able to store in the fridge for at least a week, well...if it lasts that long.