Google Groups
Subscribe to The Culinary Creative
Email:
Visit this group

Wednesday, October 28, 2009

Creepy Crunchies

Halloween is the best time of the year! Costumes, candy and creepy crunchies. No trick, these treats not only look fun, they taste good and everyone will love them.


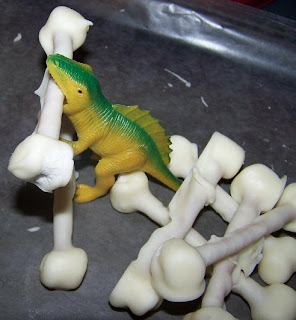
Dem Bones

Basic Short Dough

1 cup (2 sticks) of butter, room temp
1 large egg, room temp
1 cup sugar
1 tsp almond extract
1 tsp vanilla
2-2/3 cups all purpose flour
1 tsp baking powder
1 tsp salt

Cream the butter, egg, sugar, almond extract, and vanilla until smooth.

Mix in flour, baking powder, and salt.

Cover the dough or wrap in wax paper (or Saran Wrap) and chill for at least 30 minutes.

Roll a piece of the dough into a long thin cylinder, then roll four small balls of dough.


Put two balls on each end of the cylinder and smooth the dough together.


Bake at 325° for 20-25 minutes or until slightly brown around the edges.


Zombie Fingers

Basic Short Dough
Green food coloring
Sliced almonds

Make the Basic Short Dough and add 5-6 drops of green food coloring. Cover and refrigerate for 30 minutes.

Roll pieces of the dough into “finger”-size lengths (see photo from 28 Oct 2008 post).

Slide a sliced almond into one end and, with a paring knife, make three notches in the dough right below the almond and another three halfway down from those – these make up the knuckles.

Bake at 325° for 20-25 minutes or until slightly brown around the edges.


Werewolf Claws

Basic Chocolate Short Dough

1 cup (2 sticks) of butter, room temp
1 large egg, room temp
1 cup sugar
1 tsp almond extract
1 tsp vanilla
2-1/3 cups all purpose flour
1/3 cup cocoa powder
1 tsp baking powder
1 tsp salt
Shredded coconut
Whole almonds

Cream the butter, egg, sugar, almond extract, and vanilla until smooth.

Mix in flour, baking powder, and salt.

Cover the dough or wrap in wax paper (or Saran Wrap) and chill for at least 30 minutes.

Roll a piece of the dough into a “finger”-sized length.


Roll the fingers in the coconut and then press a whole almond into one end.


Bake at 325° for 20-25 minutes or until slightly brown around the edges.


See, it can be creepy crunchy fun for the whole family.


Hey Carmen! She likes it!

Saturday, October 24, 2009

Monster Eyes and Tasty Bones!


Nothing says Halloween better than loads and loads of sugar. Today's treats are not only fun to make, but kid-friendly, great for kids to help with.

Monster Eyes

1-1/2 cups creamy peanut butter
1/2 cup (1 stick) butter, at room temperature
1 (1-lb) package confectioners’ sugar (about 4 cups)
1 teaspoon vanilla extract
1 (12-oz) package semisweet chocolate chips (2 cups)
2 tablespoons solid vegetable shortening
Miniature M&Ms or sugar eyeballs

1. Blend the peanut butter with the butter, sugar, and vanilla in a medium bowl. It may be easiest to use your hands (kids love doing this).

2. Line a rimmed baking sheet with wax paper. Roll the peanut butter mixture by the teaspoon into small balls and place on the baking sheet. Refrigerate for at least 1 hour to firm up the eyeballs.


3. Put the chocolate chips and shortening in a microwave-safe bowl and melt the chocolate in the microwave. Heat on high for 60 seconds, then stir well. If it’s not quite smooth, heat in two or three 10-second bursts, stirring well after each burst. (Alternatively, you can melt the chocolate, stirring frequently, in a double boiler, over just-simmering water. Avoid overheating, which can cause chocolate to seize up into a stiff mass.)

4. Take the sheet of peanut butter balls from the refrigerator. Use a fork or a toothpick to dip each one most of the way into the chocolate, leaving a round or oval opening of undipped peanut butter on top. (This opening in the chocolate will be the cornea.) Hold each ball over the chocolate to catch the drips, and then return to the wax paper, cornea side up.


5. Place an M&M or sugar eye in the center of the peanut butter cornea to make an iris. Refrigerate for at least 1 hour before serving. Store the eyeballs in the refrigerator or freezer and serve chilled.


White Chocolate Bones

1 (12-ounce) package white chocolate chips (2 cups)
36 pretzel sticks and rods of various sizes
72 mini-marshmallows (about 1 cup)

1. Line a rimmed baking sheet with parchment or wax paper.

2. Place the white chocolate chips in a double boiler over just-simmering water and melt, stirring frequently. As soon as the chips are just melted (there may even be a few solid ones left), remove the pan from the heat and remove the top section of the double boiler so the chocolate’s temperature doesn’t keep rising.

3. Stick marshmallows onto both ends of the pretzels, with the marshmallows’ flat sides parallel to the pretzel.


4. Dip each pretzel in the chocolate and lift out with a fork, letting the excess drip back in the bowl. Lay the bones on the baking sheet and refrigerate for 30 minutes to harden the chocolate. Store in an airtight container in the refrigerator or at a cool room temperature.


Many thanks to Teia and Tori for all their help with the eyeballs and bones!!! You can find these recipes (and others) on epicurious.com.

Monday, October 19, 2009

Is It Soup Yet?

According to k2's Aunt Judy, it certainly is! So this is not an oven-baked dish, but when days get dark early and time seems so much shorter, a quick soup is sometimes the way to go...and soup is great comfort food.


We're going to feature a recipe "borrowed" from Judy. It's SO simple and tasty and has become a staple in our recipe locker.

Enchilada 6-Can Soup

19 oz. can Old El Paso Enchilda Sauce
16 oz. can black beans, undrained
16 oz. can whole kernel corn, undrained
16 oz. can diced tomatoes
12 oz. can Campbell's Tomato Soup
10 oz. can Ro-Tel Diced Tomatoes with Green Chilies
1 lbs. ground turkey


(this is the sexy rock can album cover pose)

Okay, pay close attention because this is where it gets tricky.

Open cans, empty into large pot.
Brown ground turkey and add to pot undrained.
Heat for at least 30 minutes over medium to medium-high heat.
Dish it out, serve it up with shredded cheese, a dollop of sour cream and tortilla chips (from experience, blue corn chips make a very tasty addition).


We believe good food doesn't necessarily have to take forever to make, it just needs to seem like you did. :)

Variations

* some people (k2) prefer to puree the diced tomatoes before adding in
* can use your favorite type of diced tomato, we used Hunt's Fire-Roasted
* you can add white corn, yellow corn or Mexican corn
* you can add Campbell's Tomato Bisque to give it a richer, thicker flavor
* substitute ground beef, pork, chicken or vegetarian Grilled Crumblers for the ground turkey

Sunday, October 18, 2009

Apple Crisp


To us, comfort foods go beyond main courses and one dish that screams fall comfort food is Apple Crisp. This dish is really easy to put together. It takes an hour to bake and while it bakes it will fill your kitchen with the smell of baking apples and cinnamon, but it will definitely be worth the wait.

Apple Crisp

4 tbsp cold butter, cut into pieces
1/2 cup packed light-brown sugar
1/2 cup all-purpose flour
1/2 cup rolled oats
2 tsp ground cinnamon
4 apples, washed, cored and cut into 1/2-inch dice
2 tbsp fresh lemon juice

Preheat the oven to 350°F. Grease an 8-inch square baking dish.

For the topping, combine the butter, sugar, flour, oats and 1 tsp of the cinnamon in a bowl. Work together with fingertips until mixture resembles coarse meal, then set aside.

Toss the diced apples with lemon juice. Pour the apples into the baking dish and sprinkle with the remainder of the cinnamon. Spread the topping evenly over the apples.

Bake in center of the oven for 1 hour or until bubbly and the apples are tender.

When done baking, let cool slightly. Serve warm, topped with ice cream or whipped cream, if desired.

Notes:

- If you like nuts, you can add ½ cup of chopped walnuts or pecans to the crumble topping.

- We used Macintosh apples to give the crisp a nice tart flavor.

- If you don’t like the texture of cooked apple peels, you can peel the apples before coring and cutting.

Wednesday, October 14, 2009

It's the Cheesiest (and we're not talking about the post)


What is it about macaroni and cheese? Is it the fact that it's a dish that makes eating crazy amounts of cheese acceptable? Is it the fact that most of us have some memory from our childhood of eating the bright yellow boxed mac and cheese? We don’t know. What we do know: macaroni and cheese is definitely one of our top comfort foods. The recipe that we’re sharing is fairly basic, but can be modified to suit your individual taste (see below notes).

Baked Macaroni and Cheese

Topping:

1/4 stick of melted butter
1 cup of Panko bread crumbs
3/4 cup shredded cheddar cheese
1/4 cup grated parmesan

Mix all the ingredients together and put to the side.


Macaroni and cheese sauce:

1/2 stick of butter
1/4 cup flour
2 1/2 cups milk
3 cups shredded cheddar cheese
1/4 cup grated parmesan
1/2 lb. tube pasta (elbows, ziti, rigatoni, shells, you get the picture)
1/4 cup white wine
1/4 cup pasta cooking water

Preheat oven to 400 degrees.

Melt butter, and whisk in flour. Continue whisking for 3 minutes. Add milk to the butter/flour mixture, whisking continuously until it comes to a boil. Reduce heat, and simmer for 3 minutes, whisking periodically. Add cheeses to the sauce, and whisk until cheese is incorporated, and mixture is smooth. Add salt and pepper to taste, and remove cheese sauce from heat. Cover sauce with wax paper.

Cook the pasta to al dente, and strain (don’t forget to keep 1/4 cup of the cooking liquid).

Mix the reserved liquid, wine, pasta, and cheese sauce together.

Pour mixture into a greased 8 x 8 casserole dish, and top evenly with the crumb topping.

Bake at 400 degrees for 20-25 minutes (until the cheese is bubbly and the crust has turned a nice shade of brown).


Let your mac and cheese cool a couple of minutes before you dig in. This allows the cheese to set up a bit, and also helps to prevent 3rd-degree cheese burns on the roof of your mouth.


Notes:

- Change up your cheeses, try some gouda (aged Gouda would work really well here). Try out some blue cheese, or some pepper jack. The milder the cheese, the less you will taste it in the final dish. Because of this, we recommend using a stronger flavored cheese.

- If panko isn’t available where you live, you can use regular breadcrumbs. We have also used herbed stuffing mix instead of the panko.

- Add some chopped onions, leeks, or even fennel to the roux while it’s cooking. This can give some interesting flavor to your dish.

- Add some herbs and spices into your sauce, along with your salt and pepper (we added a small pinch of nutmeg).

- If you don’t cook with wine, use ½ cup of your pasta cooking water.

- Your mixture will look a bit runny, but, as it cooks, it will thicken up. It’ll also retain some creaminess when re-heated (if it’s not gone in the first sitting).

- If you’re not crazy about the crumb crust, leave it off. Mix your macaroni and your cheese sauce together, throw a handful of shredded cheese on top of the dish, and bake as directed.

- If you want more substance to your mac and cheese, add in some chunks of meat, or shellfish if you want to get really fancy. Your meat and shellfish should be precooked. If you’re a vegetarian, add in some cauliflower, or squash (butternut, or pumpkin). Parboil your veggies beforehand, to make sure they’re not still raw when the dish comes out of the oven. Whether you add in meat, fish, or veggies, do it at the end, when you’re mixing the pasta and the sauce together.

Sunday, October 11, 2009

Pork Chop and Apple Bake

If you grew up on pork chops and applesauce, you'll love this recipe. It's definitely a plan-ahead kind of dish because it takes 1-1/2 hours to bake, but when it finally comes out of the oven and you can dig into the moist chops with your own homemade applesauce, it will have been worth the wait.


PORK CHOP AND APPLE BAKE

4-6 pork chops (1/2" thick chops work best)
4-5 granny smith apples, peeled and sliced
1/2 cup brown sugar
1/2 tsp cinnamon
2 tbsp butter
ground sage
salt and pepper to taste

1. Peel and slice the apples. Spread the slices out in the bottom of a 9 x 13" baking dish.


To prepare the apples, we used an apple peeler, it's fast and easy. Check out Check It Out! for K2's recommendation.

2. Sprinkle the apple slices with brown sugar and cinnamon, then dot with butter.

3. Sprinkle one side of the pork chops with ground sage, a dash of salt and some pepper, then rub into the meat.


4. Transfer the chop, rubbed side down, to a hot frying pan over medium-high to high heat.


We don't use oil if it's a teflon-coated pan, but if you don't have a coated pan, use a light spray or touch of olive oil.

5. While the first side is browning, sprinkle the side facing up with sage, salt and pepper. Once the first side is done, flip over until the second side has a nice brown color as well.

You don't have to cook the pork chop through, just give it some nice color and then it'll finishing cooking while you bake it.

6. Arrange the browned chops on top of the apple slices in the baking dish, cover with aluminum foil and then bake at 400 degrees for 1-1/2 hours.


WARNING - if you open the oven at any point to check on the chops, just know that you will be assailed by the smell of cinnamon and apple deliciousness which will make the waiting that much more agonizing...so be careful and don't say you weren't warned.


Remove chop from pan, top with a hearty serving of homemade applesauce, serve it up with your favorite sides and enjoy!

Wednesday, October 7, 2009

Releasing Your Inner Italian

Making a basic lasagna is a lot easier than one might imagine and, one of the best things about lasagna, besides it’s being an extreme comfort food? It can be assembled a day or two ahead of time, popped in the oven and, within the hour, you’ll be eating something hardy!

Don’t be intimidated, there are just a couple of hurdles that need to be jumped to get a well made meal. Don’t worry, we’ll point out the usual suspects of improperly made lasagna, and how to compensate for them.

BUT, the best thing about lasagna, is that it’s completely customizable… that’s right people, customizable. Start with the below basic recipe:

1-2 jars of pasta sauce (depending on how saucy you like your lasagna)
1 box of lasagna noodles
15 oz container of ricotta
16 oz mozzarella
6-8 oz parmesan
1-3 eggs (see notes on cheese mixture)
2 tsp. Italian seasonings (more or less to taste)
Salt and pepper to taste

Preheat your oven to 400 degrees.

Parboil your lasagna noodles- This, dear readers is one of the steps that can lead to a potentially eh, sort of lasagna. Here’s what we do to ensure that our noodles are cooked al dente in the finished meal.


• throw your noodles in some boiling water with a touch of olive oil and some salt.

• cook the noodles for about 5-7 minutes. You will know they’re done when you take the noodle from the water, and it is just under al dente (go ahead, take one out, try a bite, if you can sink your teeth in, but it’s not quite palatable enough to digest, this is what you’re looking for)

• rinse your noodles under cold water. This is done for two reasons, 1) it stops the cooking process, and 2) it makes it much easier to handle the noodles when they’re cold.

• Put your noodles back in the cooking pot, mixed with a little more olive oil to prevent sticking together.


The cheese mixture is another step that might cause a little apprehension, see below to get YOUR perfect cheese mixture consistency.

• To make the cheese mixture a little less firm, and more cheesy, remove an egg, to make it more firm, add another. (This seems counter intuitive since prior to baking the mixture will seem looser with that extra egg, but after baking, the proteins in the egg, will actually firm the cheese mixture up).

Mix ricotta, 8 oz mozzarella, 3 oz of parmesan, egg(s), and seasonings together in a bowl.


Coat the bottom of a 9 x 13 in pan with pasta sauce (enough to fully cover the bottom of the pan. You don’t want a THICK layer, but enough that when the dish is cooking, the noodles can pick up some of the sauce moisture, and finish cooking.


Lay the semi cooked lasagna noodles in the pan to cover the sauce. Spread ½ of the cheese mixture over the noodles. Cover the cheese mixture with sauce (don't be too stingy, remember, your noodles are getting moisture from the sauce to finish their cooking. If you don't have enough sauce, your lasagna may end up dry), and sprinkle 1/3 of the remaining mozzarella over the sauce.


Repeat the layering of noodles, cheese mixture, sauce and cheese.

The final layer will be a layer of noodles, a layer of sauce, and the remaining mozzarella and parmesan.

Once you’ve built your lasagna, cover with aluminum foil and bake for 30 minutes. Remove the foil at 30 minutes, and bake uncovered for another 15 minutes, or until the cheese is melted and starting to brown.

Before hacking into the pan, let it sit for about 15 more minutes (it’s a hard wait…). The resting period allows the cheeses to firm up a bit, and make for easier cutting.

So now that you have the basic recipe, start having fun with it. Again, work through the fear, and experiment.

- Use some thawed frozen chopped spinach (make sure it’s well drained. To do this, take a nice handful of the frozen stuff, place it in a colander, run a bit of water over it, to start the thawing process, and walk away. After about 5 minutes, come back and push on the spinach, this will help push through that extra moisture). Add this to the cheese mixture.


- Pre-roast some veggies and toss some chunks in, between the cheese mixture layer, and the cheese layer.

- Play around with different cheeses. For example, Wendi’s favorite lasagna is comprised of the following: ricotta, small curd cottage cheese, goat cheese, cream cheese, mozzarella and parmesan, all combined with Italian seasonings for the cheese mixture. For the cheese layers, mozzarella, parmesan, and super sharp cheddar.

- If you’re a meat eater, throw in some pre cooked ground meats, beef, chicken, turkey, pork, lamb, sausage…

- Try adding alternate spices to give the lasagna a different feel, throw in some cumin, some chili powder, hot pepper flakes, garlic (fresh or roasted).

- Experiment with different sauces. Use an Alfredo if you really want some cheese!! Doctor up the jars of tomato sauce from the store, or make your own.

- Instead of making a pan of lasagna, roll the cheese mixture, and some shredded cheese into individual rolls.

Lasagna could easily become your ‘signature’ dish… write us and tell us your favorite lasagna variations! Happy cooking, and even happier eating!

Saturday, October 3, 2009

Fall Food Favorites

We love this time of year with its cooler temps, falling leaves, and Halloween just around the corner. It's all about comfort foods and not minding having a hot oven heating up the kitchen. This month we'll be focusing on casseroles and hot dishes that require minimal stove-top prep that you can just pop in the oven.

First up, a staple of the K2 recipe collection -- College Casserole. Got the recipe in college, easy to make and an inexpensive was to feed several people, so a real hit. (Originally called Hamburger Casserole, but after an unfortunate encounter with bad beef, adjustments were made and "College" casserole came into being.) The beauty of this dish is its versatility and endless variations which make it possible to tailor it to your particular taste

COLLEGE CASSEROLE

1 lb ground turkey
8 oz. can of corn, drained
8 oz. can of French-style green beans, drained
15 oz. can of fire-roasted diced tomatoes, pureed
2 cup bag of shredded mozzarella
8 oz. can of tomato sauce
Salt and pepper to taste (optional)

(Note: the ingredients shown below cost less than $15.)

1. Brown the ground turkey and drain.

2. Mix turkey in bowl with corn, beans, and tomatoes.

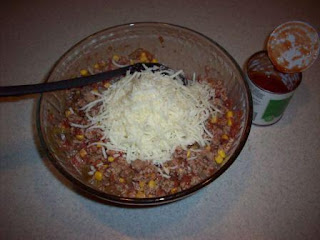
4. Add in some cheese, as much as you'd like, there's really no strict guideline for this. To add some moisture to the mix, I stir in some of the regular tomato sauce. (K2 note: unfortunately this is one of those times where a bit of food waste comes into play, I never use the whole can of sauce and what's leftover is never really enough to hold onto.)


5. Put mixture in a baking dish, top with extra shredded cheese.


6. Cover and bake at 350 degrees for 30-35 minutes.


It makes about six servings (depending on your serving size). Add in a loaf of your favorite artisan bread (to warm up the bread, wrap it in foil and toss it in the oven next to the casserole for about 10-15 minutes) and a nice glass of wine, and tah-dah! a simple, tasty, all-in-one dish.

VARIATIONS

Substitute ground beef, ground chicken, ground pork, or Morning Star Grilled Crumblers for the ground turkey.
Use white, yellow, or shoepeg corn.
Use cut green beans, your favorite canned bean, or peas.
Use your favorite type of canned tomato. (K2 note: I prefer non-chunky tomatoes which is why I puree my toms, but you can use crushed or diced as is, it's all about personal preference.)
Substitute shredded cheddar or Monterrey Jack cheese.
You can add a cup of cooked rice to the dish.