Google Groups
Subscribe to The Culinary Creative
Email:
Visit this group

Sunday, February 17, 2013

Quinoa with Toasted Pistachios


Either as a side dish or part of a vegetarian meal, here is savory low-cal way to serve up pistachios. Quinoa is an excellent source of plant protein, which teams up well with the good for you qualities of these little green nuts.  Enjoy!

Quinoa with Toasted Pistachios

3/4 cup quinoa
1-3/4 cups water
2 tsp olive oil
1 cup red bell pepper, fine chopped
2 green onions, sliced thinly
1/2 cup shelled pistachios, unsalted
2 tsp white wine vinegar
salt and pepper to taste

Bring quinoa and water to a boil in a medium-sized saucepan. Then cover and simmer for 13-15 minutes until cooked through.


While quinoa is simmering, place pistachios on a cookie sheet and bake at 350 degrees for 8-10 minutes, until browned and fragrant.


Allow to cool, then rough chop and set aside.


Heat 1 tsp of olive oil in a small skillet, add red bell pepper and green onion and cook until softened.


Mix together cooked quinoa, chopped nuts, veggies, vinegar and 1 tsp olive oil.


Season with salt and pepper, then serve.

Wednesday, February 13, 2013

Good and Good for You: Pistachios

 
So I know a lot of you spend a lot of your time trying to nail down that perfect gift for that special day this month, but c’mon…what could be more perfect for World Pistachio Day than pistachios?!?!? 

So to help you make Feb 23 just a little bit more wonderful, I’m going to work on some special pistachios recipes.  But first, what makes those little green nuts so darned fabulous?  Let’s find out.

PISTACHIOS

People have been noshing on these little treats since way back in the way back-whens (that’d be the BCs).  Pistachios are one of the oldest flowering nut trees and native to the Middle East.  Because they grow so well in hot climates, pistachios spread across the Middle East to the Mediterranean. Their high nutritional value combined with a long shelf life made pistachios the perfect caravan road trip snack food and they were carried by travelers, traders and explorers.

Around the Mediterranean, they became revered as a delicacy.  According to multiple sources, King Nebuchadnezzar grew them in his fabled Hanging Gardens of Babylon as a treat for his wife.  The Queen of Sheba called dibs on them as a royal food and forbade the commoners from growing them for their own use.

Moving ahead to the ADs, Roman Emperor Vitellius is rumored to have polished off many a fine meal with a mouthful of pistachios and they are mentioned in the first century Roman cookbook by Apicius.

One of the most interesting things I found out is that pistachios are one of only two nuts mentioned by name in the Bible.  Genesis 43:11 – Then their father Israel said to them, “If it must be, then do this: Put some of the best products of the land in your bags and take them down to the man as a gift—a little balm and a little honey, some spices and myrrh, some pistachio nuts and almonds. I still haven't discovered what the other nut was yet...oh, maybe almonds. :/

It took a while for pistachios to make their way to the Americas and it wasn’t until the 1940s that, with the help of a little vehicle called ice cream, pistachios became quite popular.  It was another 30 years or so later before pistachios were cultivated domestically in the U.S.

You used to be able to more easily find red-dyed pistachios sold in the store.  They were colored to make them more "appealing" and hide flaws, but honestly, I find their naturally green state much more to my liking.  Though the thought of Christmas still conjures up images of my Grandma J sitting in a chair by the fireplace plowing through a bag of red pistachios...she does love her pistachios.  (Sorry, Gma, but you know it's true!)

And how good are they for you?
  • Pistachios are a rich source of energy and a plentiful source of good fats and antioxidants.
  • Consumed regularly, they can contribute to lowering bad cholesterol and increase good cholesterol levels within your blood.
  • Pistachios are a great source of potassium, which helps lower blood pressure.
  • They are high in fiber, especially soluble fiber which aids in the digestive system.  The brown skin around the nut adds extra fiber and nutrients to your pistachio intake benefits, so it’s okay to it them.
  • Pistachios are a good snack for those with diabetes because they can help with controlling blood sugar levels.
All that and they are darned tooting tasty to boot!  So if you haven’t given them a chance before, you should certainly check them out.


Sunday, February 10, 2013

My Mint Milanos

 
Okay, made my decision and today I turned out some homemade Pepperidge Farm treats.  These are some of my all-time favorite cookies.  Turns out it's actually a very simple recipe, and they are DEE-licious...plus very braggable.  Oh, you bought us Mint Milanos!  No, I MADE you Mint Milanos.  Aren't I fabulous?  :)

Mint Milanos ®
Classic Snacks, page 26, recipe occasionally paraphrased

YIELD:  18-20 sandwich cookies
TOTAL TIME:  2-1/2 hours including rest time
DIFFICULTY: 2
SPECIAL EQUIPMENT:  stand mixer, pastry bag(or zip top bag) with large round piping tip

cookies
1-1/4 cups (5-3/8 oz) unbleached all-purpose flour
1/2 tsp baking powder
1/8 tsp kosher salt
3 large egg whites
8 tbsp (4 oz) chilled unsalted butter, cut into 1/2" cubes
1 cup (4 oz) powder sugar
1/2 tsp vanilla extract

chocolate filling
4 oz semisweet chocolate, coarsely chopped (a scant 2/3 cup)
1/4 tsp peppermint extract

Make the Cookies

Preheat oven to 300 degrees. Line 2 large cookie sheets with parchment paper or Silpat liners.

Whisk the flour, baking powder and salt together in a medium bowl.  Set aside.

Whisk the egg whites by hand in a separate small bowl for about 30 seconds, until bubbly, frothy, and slightly thickened but still liquid.


In the bowl of a stand mixer fitted with the paddle attachment, beat the butter and sugar together starting on low speed until the butter coats the sugar.


Then beat on medium speed for about 2 minutes until the butter is pale and creamy.


Scrape down the bowl and add the egg whites in thirds on low speed, making sure each addition is fully incorporated before drizzling in more.

Scrape the bowl again, add the vanilla, and mix (still on low) to incorporate.  There will still be a few chunks of butter visible.


Add the dry ingredients and mix until combined into a thick, whipped batter.  Do not overbeat.


Fit a pastry bag or gallon-size zip-top bag with a large round piping tip and fill the bag with batter.


Form each cookie directly on a prepared baking sheet by piping a line of batter about 2-1/2 inches long, then reversing directions -- still piping -- to make a second line, forming a "U" with the long edges touching.

great illustration of piping from book (on page27)

Space the cookies about 1-1/2 inches apart, since they'll spread slightly.  Because the batter is thicker than a typical frosting or filling, it may take a few tries to get into the rhythm of piping, and you may need to squeeze lower on the bag -- closer to the piping tip -- than you normally would.


Bake for about 15-18 minutes (I baked mine for 16-17 minutes), until the cookies are no longer puffy and glossy and are just turning golden brown at the edges.  The cookies will still be a little soft, but they'll crisp as they cool.  I left mine on the cookie tray for 5 minutes.


Transer them to a wire cooling rack to cool completely.

Fill the Cookies
 
When the cookies are cool, melt the chocolate in a small, heavy-bottomed saucepan over low heat, stirring constantlywith a silicone spatula until smooth.  Remove from heat and stir in the peppermint extract.


Dip the flat (bottom) side of the cookie in the melted chocolate, or brush on chocolate using a silicone pastry brush; top with another cookie, flat side down, to make a sandwich. 
 

Repeat with the remaining cookies. All the chocolate to firm up for at least 1 hour before serving the cookies.


Store at room temperature in an airtight container for up to 3 days.  Hahahahahaha, that's funny, like they would last that long.  Whooo (wipe a tear), that's a good one.

NOTES

Author:  "I bet you thought 'Milano' was just a random name bestowed by Pepperidge Farm, but the cookies -- at least the homemade version -- really do have an Italian background.  The recipe for the pale, crispy cookie wafers is based on a traditional recipe called ossi dei morti, or "bones of the dead."

K2:  For all you fans out there of The Walking Dead, I thought this sounded appropriate for today.

Author:  "Want to make these in another flavor?  Substitute orange, almond, or your favorite extract for the peppermint in the melted chocolate.  Or just leave the chocolate plain for the original version."

K2:  They may not be "exactly" like the original, but they're so close everyone (including yourself) will be impressed.
 

Wednesday, February 6, 2013

Check It Out: Classic Snacks Made From Scratch

 
New cookbook! New cookbook! New cookbook!

Hey TCCers, have a new cookbook that I think you might like.  If you, like me, look back on your childhood through a fond sugar-glazed haze of snack food memories, you are going to want to get this for your kitchen collection.

It's got EVERYTHING!!!!  The sections cover all the basic snack food groups -- Cookies (Nutter Butters!), Cakey Treats (Devil Dogs!), Cheesy Snacks (Nacho Cheese Doritos!), Salty Snacks (Funyuns!), Ice Cream Treats (Strawberry Shortcake Bars!), and Sweets and Candies (Peeps! yeah, I said Peeps!).

The only thing I wish the book had was more photos.  You will be on your own trying out the recipes because (unlike TCC) there are no step-by-step photos. But what there is, is a way to preserve the classic Hostess goodies like Twinies and Chocolate Cupcakes in your kitchen and hearts forever.

Yes, I am more than a little excited to be able to add this to my culinary library.  The hardest thing now is deciding what I'm going to make for you this weekend...decisions, decisions...

An enthusiastic two thumbs up.

Classic Snacks Made From Scratch by Casey Barber
January 2013, Ulysses Press, 192 pp, $17.95
ISBN 978-1-61243-121-5


Sunday, February 3, 2013

Quick-n-Easy Shrimp Po'Boy

 
Hope everyone is enjoying their Superbowl Sunday.  Go Team! 

I wanted to try something I've not made before -- a po'boy and what I'm bringing you tonight is a variation on a Dressed Shrimp Shorty.  Po'boys are a Louisiana specialty sandwich and consist of roast beef or fried seafood served on a French baguette.  A regular po'boy is a foot long, while a shorty is a 6" sandwich.  If you ever grab a po'boy in New Orleans and they asked you if you want it dressed, this mean do you want it with lettuce, tomato, pickles and mayo, onions and spicy mustard are an option too.  Usually a roast beef po'boy will have gravy and sometimes french fries on it.

So my Dressed Shrimp Shorty has red leaf lettuce, sandwich-sliced Kosher dills, and Cajun mayo (aka remoulade).  Spicy and flavorful, if you like them, the pickle slices are KEY! Now you can deep fry up some shrimp, but I went the semi-premade route which works just as well.

Quick-n-Easy Dresssed Shrimp Shorty Po'Boy

frozen shrimp poppers
red leaf lettuce
French baguette
sliced pickles
Cajun mayo (see recipe)

Cajun mayo
1 cup mayonnaise
2 tbsp chili sauce
2 tsp horseradish
2 tsp spicy brown mustard
2 tsp Creole seasoning*
1 tsp paprika
1 tsp Tabasco
1/2 tsp lemon juice

Mix together all Cajun mayo ingredients and set aside.


Cook up shrimp according to package directions.


Slice 6" section of French baguette lengthwise.


Slather bread with Cajun mayo, layer with lettuce and pickles. Pile cooked shrimp on top and enjoy.

NOTES

*In case you don't have Creole seasoning on hand, here is a recipe to make your own batch.

Creole seasoning
2-1/2 tbsp paprika
2 tbsp garlic powder
1 tbsp salt
1 tbsp black pepper
1 tbsp cayenne
1 tbsp oregano
1 tbsp dried thyme

The Cajun mayo has a really nice flavor, would be great for a Creole chicken salad, a spicy egg salad, or as a spread for a roast beef sandwich.

Wednesday, January 30, 2013

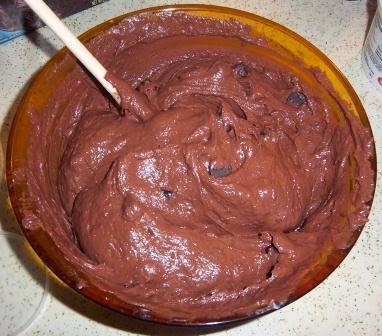
Chocolately Chocolate Crockpot Cake

 
Okay, been having too much fun with my crockpot, but couldn't move on without trying something sweet.

Was curious to find out if anyone had ever tried a crockpot cake and it turns out they have.  I checked out several recipes online and picked the "best of" parts.  So here you go.

Chocolately Chocolate Crockpot Cake

1 box Devil's Food cake mix
1 pkg chocolate fudge pudding mix
4 eggs, lightly beaten
8 oz sour cream
1 cup water
3/4 cup oil
1 cup dark chocolate chips

MIX everything together until smooth(ish).

 
FOLD in chocolate chips.


SPRAY the inside of the crockpot with baking spray or lightly coat with shortening.

POUR mixture into crockpot.


CROCKPOT on low for 6-8 hours or until an inserted skewer comes out clean. Yes, I just used crockpot as a verb.


SCOOP out and serve with your favorite ice cream, or whipped cream and fruit. I recommend strawberries.

NOTES

Here's where you really get to benefit from my trial-and-error.  Most of the recipes I found said to cook it on High for 3-4 hours or on Low for 6-8.  I took the High road and after 2 hours the smell of burnt cake was blending with the smell of deliciously baked chocolately chocolate cake, so I dropped the temperature until it cooked enough that my skewer came out clean.

When I scooped it out, the cake tasted fine and the texture was fabulously baked but moist (thank you pudding mix) only the outer edge (against the sides of the pot) was burnt.  Problem was a combo of heat was too high and I did not coat inside before pouring mix in.

I am recommending that you take the Low road because you'll have more control over the baking and a better chance of it cooking consistently (= no burning).

Originally this was suppossed to be a Irish Whiskey Chocolate Cake and I used 3/4 cup water + 1/4 cup Jameson's, but by the time it was done, you couldn't taste the whiskey.  I think the key next time would be to use just 1 cup whiskey in lieu of water.  If you are feeling brave and want to give that a try, let me know how it turns out.

Sunday, January 27, 2013

Crockpot Cubed Steak

 
More fun with crockpots!  Here's another easy-peasy recipe.  Pop it in the pot first thing in the morning and it will be ready in time for dinner.  It's an all-in-one dish, just serve up with your favorite crusty bread and beverage.

Crockpot Cubed Steak

2 lbs pot roast beef, cubed
2 (10.5 oz) cans Cream of Celery soup
1 cup water
1 pk beefy onion soup mix
1/2 lb fingerling potatoes, halved
1 cup baby carrots, halved
1 cup frozen peas

I bought pre-cut pot roast cubes and then just made sure they were all the same size by cutting up any bigger chunks.


Mix all but the frozen peas in the crockpot.

 
Set on low and cook for 5-6 hours until beef is cookedthrough and veggies are fork tender.

Mix in the peas 15-20 minutes before serving.

Dish out and enjoy!

NOTES

Chell (aka The Crockpot Queen) shared her recipe for this with me and I used it as a starting point.  Hers called for Cream of Mushroom and only 3/4 cup water, but it didn't include vegetables.  The beauty of this recipe is that you can change it up to suit your own taste.  So if you wanted to switch out beef for chicken, you can do that.  You could pick whichever Cream of Soup that you prefer.  It's a great chance to be creative in the kitchen.