Google Groups
Subscribe to The Culinary Creative
Email:
Visit this group
Showing posts with label cookies. Show all posts

Sunday, February 16, 2014

Congo Bars

 
Was scratching my head to come up with a post for tonight, and Dad suggested (again) trying out the old family recipe for Congo Bars.  I've never tried the originals, and I think it turned out the way it's supposed to, but in any case, the best way to describe what resulted is a deep dish chocolate-chip-nut cookie bar.  Big smile.  Pass the milk.

Congo Bars

2-3/4 cups flour
2-1/2 tsp. baking powder
1/4 tsp. salt
2/3 cup shortening
2-1/4 cups brown sugar (not packed)
4 eggs
1cup nuts, chopped
1-1/2 cups chocolate chips
1 tsp. vanilla

Mix flour, baking powder and salt in a bowl.  Set aside.

Melt shortening in a deep, heavy bottom pan.


Add in brown sugar.  Stir until well mixed.  Remove from heat and allow to cool slightly.


Add in the eggs, one at a time.

this is egg #2 being added

Add in dry ingredients until well blended.


Fold in nuts, chocolate chips, and vanilla.

 
Pour mixture into a well-greased 8x10 baking dish.


Bake at 350 degrees for 25-30 minutes, or until golden brown along the edges cooked through in the center.


NOTES

I used a mix of pecans and walnuts for my nut mix because it was what I had in the freezer.

I used a mix of milk chocolate, dark chocolate, and semi-sweet chips because it was what I had in the cupboard.

If you don't want to use shortening, you can substitute margarine instead.

Yes, I was too lazy to go the store so made due with what was on hand, but it did not adversely affect the results, so 'speriment away, my friends.

Sunday, December 22, 2013

Chocolate-covered P'nut Butter Ritzes

 
Hello readers.  I don't know about you, but it's been a long year.  I'm looking forward to a little break from the folderol of the work week and so will be treating myself to a little off time.  This will be my last post for 2013, but I will be back fresh and brimming with new ideas in January 2014.  Before I sign off for this year though I wanted to leave you one more parting recipe. 

This is a variation of a treat that my friend Michell brought into the office as part of her holiday baking share-with-the-office treats extravaganza.  They are a salty sweet addictive treat.  Just ask my pants that don't fit any more.

I say variation because while she and her mom take the time to carefully double-dip them in a concoction made from hand-shaved chocolate.  I am too lazy to do that, so here is K2's CCPBRs, the knock-off version.

Apologies for the lack of photos for this post.  Between being sick the better part of the month and trying to get ready for a holiday break, I didn't have the time.  But because this is apparently a very popular treat, I am providing a link to images of the same (and multiple varieties) for your viewing pleasure.

CHOCOLATE-COVERED P'NUT BUTTER RITZES

Ritz crackers (full-sized or snowflake-shaped or mini)
creamy peanut butter
white chocolate candy bark, melted

Spread your peanut butter on a cracker and cover with a second cracker.  Do not squoosh them together because you don't want your peanut butter oozing out the sides.

Melt your chocolate and then carefully dip the cracker sandwiches into it, coating it on all sides.

Set them on a sheet of parchment paper so the chocolate can harden.  If the coating is too thin, dip the cracker a second time.

Stuff into face.  Repeat.  Enjoy.

NOTES

Trying to spread peanut butter with a knife can get a bit messy, so my recommendation is to put your peanut butter in a pastry bag (or a zip lock with a corner tip nipped off to be used as a pastry bag) and squish the PB on the crackers.  Less muss, less fuss.

Looking through the photos on the link, I saw there were actually a number of things you can do with this treat.  F'rinstance:

-- use Nutella instead of peanut butter
-- use dark or milk chocolate instead of white chocolate and then drizzle with white chocolate
-- decorate with sprinkles or colored sugar or candies
-- use white chocolate, but tint it a color to match your party/gifting décor

So use your imagination and have a little fun with them.

Happy Happy Holidays to you all.  Safe travels, full bellies, good times!  Looking forward to a happy new fun-eating year!  Hasta 2014!

K2


Wednesday, December 18, 2013

Joe Froggers

 
What the hoogly-moogs is a Joe Frogger, you ask?

A Joe Frogger is a soft, oversized spice cookie (reputed to originally have been baked to the size of lily pads), originating in Marblehead, Massachusetts and dating back to Colonial times. They were made by "Aunt Crese" who kept a tavern on Gingerbread Hill and were named after her husband, a Revolutionary War patriot and freed slave, Joe Brown.

Because the cookies used rum and water as ingredients, they would keep for long periods of time and so were packed up by the barrel-loads for fishermen to take with them on extended trips.

My dad’s side of the family hails from New England and we got this recipe from my grandmother, but my first memory of enjoying Joe Froggers was when my mom made them one Christmas when I was a teen. Because rum is one of the main ingredients in the cookie, I was pretending to be drunk on cookies which led to a giggling fit that lasted so long and got so out of control that my mom eventually sat on me to try to calm me down. Good times, good memories. Yes, she sat ON me. Mom claims not to remember the incident, but that’s the kind of thing that sticks with you so I remembered and that's all that matters.

They take a little time to make but are SO worth the effort. 

JOE FROGGERS

2 cups whole wheat flour
1/2 tsp salt
1/2 tsp ginger
1/4 tsp nutmeg
1/8 tsp cloves
1/8 tsp allspice
1/2 cup honey
1/4 cup dark molasses
1/4 cup vegetable oil
3 tbsp rum
2 tbsp hot water
1/2 tsp baking soda

In a small bowl, mix together flour, salt, and spices. Set aside.


In a medium bowl, combine honey, molasses, oil, rum, water, and baking soda. Will be super liquidy. FYI, beware of the onslaught of rum fumes as everything mixes around in the bowl, may cause dizziness and/or excessive giggling.


Stir in flour mixture, a bit at a time, until well blended.


Chill dough in fridge for 1/2 hour.

Measure out dough by the 1/4 cup (should make 10 cookies) then roll into balls.  Dough is going to get sticky as it warms up so if needed, toss it back in the fridge for a few minutes to make it easier to manage.


Place dough balls on a greased cookie sheet, spaced 3" apart. Press balls out using a flat-bottomed glass or dish.  I pressed my glass in some of the flour before mashing down the dough balls to keep them from sticking to the bottom of the glass.


Bake 375° for 9-10 minutes.


Remove cookies from oven and transfer to a cooling rack.  Will be soft and mooshy, not crunchy.


YAUHM!!!

NOTES

You can roll out dough to make smaller cookies to share. Mine actually turned out smaller than I was planning, but they still work.

You can spread a little flavored cream cheese or some other tasty filling between two cookies to make a soft cookie sandwich.

YAUHM!!!


Wednesday, December 11, 2013

Joyeux Macaroons

 
I've been wanting to do a good coconut macaroon recipe for a while.  For some reason, to me coconut macaroons are the epitome of reception desserts.  Bite sized, chewy, decadent, delicious. 

Joyeux Macaroons

1/3 cup softened butter
3 oz. softened cream cheese
3/4 sugar
2 tsp. orange juice
2 tsp. almond extract
1 egg yolk
1-1/4 cups flour
2 tsp. baking powder
1/4 tsp. salt
6 cups sweetened coconut flakes, loose packed, divided
Hershey's Almond Kisses, unwrapped

In a mixing bowl, cream together butter, cream cheese and sugar.


Add in OJ, almond extract and egg yolk and blend until smooth.

In a smaller bowl, mix together the flour, baking powder, and salt.  Add into the butter mixture a bit at a time, making sure it is well incorporated.

Fold in 3 cups of the coconut flakes.


Set dough in the fridge for at least 45 minutes, or until easy to roll without getting dough all over your fingers.

Once the dough was ready, roll into 1-1/2" balls.


Roll the dough balls in the leftover coconut flakes and space evenly on an ungreased cookie sheet.

 
Bake for 11 minutes or until golden brown.

While the cookies are baking, unwrap Hershey's Almond Kisses.  When the cookies are done baking, remove from oven and press one Kiss into the center of each.  Let sit on the cookie sheet for a few minutes before transferring them to a cookie rack to cool.


Serve up on a pretty platter and enjoy.

Sunday, September 29, 2013

Witchy-Poo Cookie Craft (It's Edible!)

 
And so it begins, the ramp-up to my favorite holiday.  YAY!  This weekend I was invited to keep my friend Michelle company while she hosted her 8-year-old daughter's Halloween-themed sleepover.  One of the fun projects on the evening's docket was decorating cookie ball witch heads.  She thought it might be a fun project to share with you and I very much agreed.

If you are brave enough to try this with your kiddoes (or growed-up friends), I would recommend following it up with an activity that let's them run off the sugar rush that follows.  You have been warned.

Witchy-Poo Cookie Craft

witch heads
1 pkg. (16 oz.) ready-to-bake sugar cookie refrigerated dough
1 can white icing
1/2 (12 oz.) bag of green candy melts


hats and parts
8 sugar cones (hat tops)
16 thin chocolate wafer cookies (hat brims and collars)
chocolate icing (for hats)
licorice strips, Twizzlers, or sour straws (hair)
chocolate-covered sunflower seeds (for noses)
candy eyes or flat sprinkles (for eyes)
assorted Halloween sprinkles (hat decoration)

chocolate-coated sunflower seeds
 
Sorry no photos for the first couple of steps, I got so carried away with what we were doing that I forgot to grab some photos.

For the witch heads, you need to bake the sugar cookies according to the package directions EXCEPT that you want to cook them for the least amount of time listed.  The cookies should be on the slightly undercooked side (very chewy, little to no crunchy). 

When the cookies are done baking, transfer them to a rack to cool completely.

When the cookies are cool, put them in a food process and run until they are little crumbles.

Mix the cookie crumbles with 1/2 cup of white icing and moosh together until it forms a (not smooth) dough.  Because you undercooked the cookies, the crumbles will be moist and dough will be more malleable.

Roll the dough into eight (8) 2" balls.  Set on a plate and refrigerate for at least 30 minutes.


When the dough balls are ready, remove from fridge and set aside while you melt the green candy pieces.  In a thick bottomed saucepan over low heat (setting 2 or 3) or in a double broiler, stir candy pieces until fully melted and smooth.


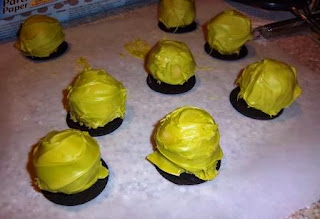
Dip the balls in the melted candy and roll around until well-covered.  Remove and set each ball on a thin chocolate wafer cookie.  Smooth down the chocolate with a butter knife or small spatula.  The candy will set within 5-10 minutes.

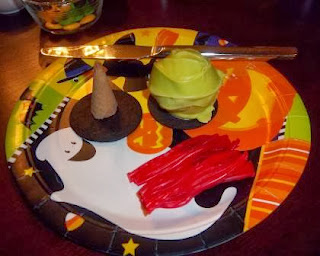
The only other pre-decorating frenzy prep we did was to pull apart the licorice strips so the girls didn't have to do it.  We used Cherry Twizzlers which we cut in half lengthwise and then separated into strands of threes.

 
Each girl then got a plate with a blank witches head, the hat parts and some hair and license to go crazy.


It was a fun project and everything is edible.  The results were adorable and the girls had a great time building their masterpieces.

 
NOTES

We learned the hard way that you want to make sure to put the candy-coated cookie balls on the cookie wafers right away, or at least on a sheet of parchment or wax paper, because the candy coating will start to harden immediately and then need to be pried off the plate that you unwittingly put them on to start with.

If you want different color hair, Punch Straws would work, they have a sugary coating though so won't look the same as the licorice or Twizzlers.

You can usually find chocolate-covered sunflower seeds in specialty stores or grocery stores that stock non-traditional candies.  Michelle got hers at Trader Joe's, I believe.

The eye candies and Halloween sprinkles can be found at Michael's or A.C. Moore's craft stores, or any place that sells Wilton products.

Other variations -- use white candy melts and decorate them as vampire heads or instead of cookie balls, make cookie cylinders, cover them with the green candy coating and decorate them as Frankenstein heads.  Get creative and go crazy with it, there's no wrong answer here.

Wednesday, April 10, 2013

Cornmeal Sage Thumbprint Cookies with Blackberry Jam

 
You know me, I love a good savory-sweet combo and found a new favorite with these cookies.  Sage and cornmeal go hand-in-hand nicely and sage pairs up well with blackberry or apricot so thought why not bring all these players together for a baking good time.  Cornmeal and sage may sound like an odd combo for a cookie, but trust me, they work almost too well together (read: highly addictive).

For my thumbprint fill I decided to go with a homemade blackberry jam I picked up at the Farmers Market, but you could just as easily use an apricot marmalade or maybe even try a cherry compote.

Cornmeal Sage Thumbprint Cookies with Blackberry Jam

1 cup (2 sticks) butter, softened
2/3 cup sugar
2 large egg yolks
1-1/2 tsp vanilla
1/8 tsp salt
3/4 cup cornmeal
2 cups flour
2 tsp rubbed sage (dried, crumbled) or 2 tbsp fresh minced sage
1/2 cup fruit jam (approximately)

With a mixer, blend together butter, sugar, egg yolks, and vanilla until fluffy and light.


Add cornmeal to the bowl and combine until well mixed.

Remove the bowl from the mixer and add in flour and sage.  With a wooden spoon, or other sturdy implement, stir everything until it just comes together.


Turn the dough out onto a rolling mat and knead until smooth.  Once you get the dough together, let it rest for a few minutes.


Roll the dough into 1-inch balls and place on an ungreased cookie sheet.  You want to leave some space between dough balls, but no need to leave a lot because the cookies don't spread while they bake.


Using a spoon, or your (washed and cleaned) thumb, press a little dent in the middle of each cookie and then fill the dent with the jam of your choice.


Bake for 13-14 minutes at 350 degrees until lightly browned on the bottom.


Remove from oven and transfer cookies to a cooling rack.  You want to be careful to let them cool a few minutes before popping them in your mouth only because the jam is going to be VERY hot when you pull it out of the oven.


These cookies make the perfect date for a cup of coffee (or tea).

Wednesday, March 13, 2013

Irish Cream Chocolate Pudding with Chocolate Chip Cookie Crumble


So before you get confused by the recipe and photos that follow, let me tell you a little story.  I'd like to call this, The Cheesecake-Pudding Exchange: A Learning Experience by K2.

I found this fabulous looking recipe for a no bake cheesecake in a cookbook that my parents brought back from their trip to Ireland last year.  Because it was a European cookbook, I needed to make some adjustments, but there may have been some issues with the translation to U.S. kitchen-friendliness.

Everything seemed to go according to plan until it was time to release the "cheesecake" from the springform pan.  As the dessert squelched from its confines and my Ahhhh moment turned into an Ooooohhhh moment, I realized that something had gone awry.  I didn't have time to remake it for this post, but fortunately all was not lost.  Though expecting a creamy delicious cheesecake with chocolate chip cookie crust, I found myself with a creamy delicious pudding with chocolate chip cookie crumble instead.  In my book, a very doable exchange.

So...if you like pudding, follow the recipe below as indicated.  If you want to try and succeed where I fell a little short, see the revised "cake" ingredient list which includes suggested changes to make it what it should have been.

Irish Cream Chocolate Pudding with Chocolate Chip Cookie Crumble
formerly known as No Bake Chocolate Irish Cream Cheesecake

crust/crumble
1-1/2 cups crushed chocolate chip cookies see Notes
4 tbsp butter, melted

"cake" pudding
1-1/4 cups semi-sweet chocolate chips
1-1/4 cups milk chocolate chips
1/4 cup Sugar in the Raw, food processed
12 oz fat free cream cheese
15 fl oz heavy cream or Half and Half, room temp
3 tbsp Bailey's Irish Cream

revised "cake"
1-1/4 cups semi-sweet chocolate chips
1-1/4 cups milk chocolate chips
1/4 cup Sugar in the Raw, food processed
12 oz cream cheese, softened do NOT use Fat Free
1-3/4 cups heavy cream or Half and Half, room temp
3 tbsp Bailey's Irish Cream

Cheesecake crust:  Line the bottom of an 8 inch springform pan.  If non-stick, use cooking spray or shortening to grease the sides with.


Put the cookies in a zip lock bag and crush them to crumbs with a rolling pin.  Pour the crumbs into a small bowl.


Melt your butter in a small saucepan over low heat or in the microwave for 25-35 seconds.  Pour the butter over the crumbs and mix until the crumbs are moistened evenly.

 
Cheesecake crust:  Press the crumbs into the bottom of the lined springform pan
Pudding crumble:  Press the crumbs out on a cookie sheet lined with wax or parchment paper.
I used a fork to spread them out and then pressed them down.


Put the pan in the fridge and let the crust/crumble chill for at least 1 hour.

Melt the chocolate together.  You can either either melt them in a heatproof bowl set over a sauce pan of simmering hot water or melt them in a thick-bottomed sauce pan over low heat.  Once melted, leave to cool. Just room temp cool or slightly above that, not cold cool.


Take your Sugar in the Raw and toss it into a food processor.  Pulse for 1-2 minutes, then let process for another 1-2 minutes.  Set aside.  see Notes

In a mixer, beat sugar and cream cheese together until smooth.


Then remove bowl from mixer and fold in the heavy cream with a spoon or spatula, a bit at a time, until well blended.


Next fold in the melted chocolate until well blended.


Finally, stir in the Irish Cream.


Cheesecake:  Spoon the mixture into the springform pan over the crust.
Pudding:  Pour the mixture into a bowl.


Cover the pan/bowl with plastic wrap and put in the fridge.  Let chill for at least 2 hours or until very firm (cheesecake) or much less jiggley (pudding).

Cheesecake:  When you're ready to serve, remove the cheesecake from the springform pan and slide onto a serving dish.  Using a knife dipped in hot water (to get a clean cut), slice cheese cake and serve.
Pudding:  Scoop into small bowls, crumble the crumble over top and serve.

Garnish with fresh berries and/or a cheeky dollop of whipped cream.

NOTES

So, I think one of my problems is that I used fat free cream cheese which is very malleable, even when cold.  For cheesecake, you want cream cheese with a little more structure to it so don't skimp and do go full fat with your cream cheese.

I would also reduce the amount of heavy cream added to the mixture.  I kind of realized when I could pour my batter, versus spooning it out, that I might have a consistency problem with the batter.  These two adjustments should make a big difference, but I would recommend adding the cream a bit at a time and use your best judgment in determining how thick/thin your batter is. 

12 (1/2 oz) cookies = 6 oz (what the original recipe called for) = 1-1/2 cups crushed.  I used store-bought (versus homemade) because I wanted them to have that kind of crispycrunchyness that makes for good crumb action.


The original recipe calls for golden caster sugar, which is a finer, unprocessed sugar than we have here.  You could substitute superfine white sugar, but there is a slight taste difference.  By food processing the Sugar in the Raw (left-before, right-after), you get the finer texture you need for this recipe without being too grainy like regular processed sugar.