Google Groups
Subscribe to The Culinary Creative
Email:
Visit this group

Sunday, July 29, 2012

Buttermilk Peach Ice Cream


Last weekend I shared with you a recipe for some scrumptious hushpuppies.  And for that recipe I had to use buttermilk, which I have never been able to find sold in anything less than a quart in the store. Hmmm, what to do then with all that leftover buttermilk...

How about some ice cream?  When I started thinking about making buttermilk ice cream, I remembered seeing a booth at the Farmer's Market last weekend selling baskets of gorgous peaches.  Because buttermilk is a bold flavor I thought the peaches would make a nice sweet addition to help soften it.

This was all very exiting because I've never made homemade ice cream before.  It was an adventure and I learned a couple of things that I put down in the notes.  But it was all worth the effort.

I highly recommend a scoop or two of buttermilk peach ice cream topped with some Kirsch, Creme de Cassis or homemade raspberry cordial.

Buttermilk Peach Ice Cream

6 egg yolks, room temp
3/4 cup sugar
1 cup heavy cream
2 cups buttermilk, cold
1 large peach, peeled and small chopped (approx 1 cup)

In a medium size bowl, blend the sugar and egg yolks.  Set aside.


In a saucepan, over low heat, scald the heavy cream.  Once warmed, slowly whisk the heated cream into the sugar-egg yolk mixture.


Pour the mixture back into the saucepan and heat until the back of a spoon is coated when you dip it in.  You do not want the mixture to boil.


Remove saucepan from heat and stir in the cold buttermilk.

Either ice down the mixture (using an ice bath) or pour into a non-reactive container and refrigerate until completely cooled.


Using an ice cream maker, follow product directions.


Important to note that peaches should only be added in 5 minutes before ice cream should be ready.


Once it's done doing it's spin-n-freeze thing, transfer it to a freezerable container and enjoy.

NOTES

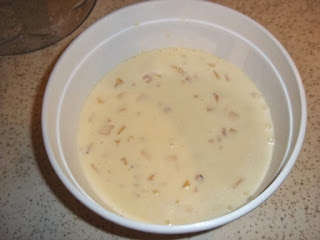
Despite the fact I was using an ice cream maker, I did not let my mixture cool down enough so even after 40 minutes of spinning in the container, my ice cream didn't freeze up properly.  I resorted to finishing up with a non-ice cream maker method.

not quite there

If you do not have any ice cream maker, you can make this recipe but plan to make it the day before you want to eat it so it can be left in the freezer overnight.

Put your mixture in a freezer-safe container, best to find one that is shallow so that you have more freezing surface.  About 30-40 minutes after you put the mixture in the freezer, take it out and spoon it around.  The edges will have started freezing but spooning it around incorporates the not-yet frozen parts.  Do this 2 or 3 times before leaving overnight and it will be ready to serve the next day.

quite there

Wednesday, July 25, 2012

Holy Moley, I Can't Believe It's Chocolate Fudge


My friend Jenn (two Ns), knowing of my love of all things pumpkin, lent me her Hungry Girl cookbook to peruse because she said the HG is big on using pumkin puree in her recipes.

If you're not familiar with Hungry Girl: Recipes and Survival Strategies for Guilt-Free Eating in the Real World by Lisa Lillien (St Martins, 2008) you should check it out. She's created lower cal, lower fat versions of popular foods, comfort foods and other yummy goodnesses...including chocolate fudge. And that brings us to tonight's recipe. Chocolate fudge that uses pumpkin as it's base, how could I pass this up?  What follows is based on her recipe, but I didn't go the low cal route, so be warned.

It's an interesting taste, chocolate without being overly chocolatey. You can taste the pumpkin but it's not overwhelming and the peanut butter is very subtle. But that probably has more to do with the fact I blended more than I swirled (see below). It's very different, but I like it, I like it alot.

All-in-all, 3 ingredients = 1 tasty treat.

Dreamy Chocoalte Peanut Butter Fudge
Hungry Girl, page 171 (recipe paraphrased)

1 box chewy fudge brownie mix
2 cups canned pumpkin (= 1 can + a tidge)
2 tbsp creamy peanut butter

Mix the brownie mix and pumpkin until well blended. Will be just a bit thicker than regular brownie mix.


Spray down a 9x9 baking pan (or 7x10 like I did).  Spoon the batter in.and spread out.

Plop your peanut butter on top and using a knife or spatula, swirl the peanut butter across the brownie mix.  I got a little enthusiastic, so mine is less swirly and more spread out.


Bake at 350 degrees for 35 minutes.


When it's done, remove from oven and allow to cool.  Once it's cooled down, cover pan with foil and set in the fridge for about 2 hours before cutting up to serve.

NOTES

One can of pumpkin is just short of two cups. So if you didn't want to open a second can just for that last ounce, I think the batter would still work okay.  I would just cook it for a little less time to make sure it doesn't dry out.


For each of her recipes in the book, Hungry Girl has interesting notes and tidbits about related foods.  She also provides the Per Serving breakdown of calories, far, sodium, carbs, fiber, sugars and protein.  Really useful if you are counting those. If you're interested in finding the book -- ISBN 978-0-312-37742-7.


Sunday, July 22, 2012

Fried Green Tomato Hushpuppies


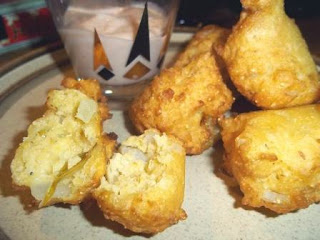
Can you think of anything more Southern?  Bought some gorgeous heirloom green tomatoes at the Farmer's Market and was trying to come up with something new to do with them.  Saw a recipe for hushpuppies and that made me wonder what would happen if you combined the two.  Little piece of food nirvana.

Fried Green Tomato Hushpuppies

vegetable oil
1-1/2 cups yellow cornmeal
3/4 cup self-rising flour
1-1/2 tbsp sugar (= 4-1/2 tsp)
1/2 cup chopped green tomato
1/2 cup chopped sweet onion
1 large egg, lightly beaten
1-1/4 buttermilk

Pour veggie oil into a Dutch oven or deep saucepan to a depth of 3 inches and heat to 375 degrees.


In a medium size bowl, combine cornmeal, flour, and sugar.  Add in green tomato and onion, mix until well coated.  Use your fingers if you have to do de-clump the tomato.  Since it will be pretty moist when you dump it in the mix, it will have a tendency to clump up.


Add in the egg and buttermilk.  Mix until just moistened and then let sit for about 10 minutes.


When the batter has set, drop it by rounded tablespoon into the oil.  Cook up about 1-2 minutes per side or until golden.  Best to do a single one to begin with to make sure your oil isn't too hot and that the batter cooks through.


Once you've done your test puppy, cook the rest in batches.  After you remove from oil, set on a paper towel to drain.


Serve up right away with a little dipping sauce.  You could blend up a little horseradish mayo or mix some chili sause with some mayo.  The mayo base makes a great complement for deep fried food.

Wednesday, July 18, 2012

Check It Out: OXO Angled Measuring Cups


Want to tell you about some kitchen toys that I have and really like.  They were a gift from the GP Parentals to help make life in the kitchen a little easier (and food production for sampling faster too, I'm sure).

Never fully appreciated how really super useful they were until my friend Meredith was visiting.  As she was standing in the kitchen one morning, with one hand busy holding a baby and the other measuring out milk for pancake batter (because apparently I was off with my bonbons and French novel instead of helping), I heard her say, "this is great."  And I looked over to see her using one of my angled measuring cups.

And they are great.  No more bending over to make sure you hit the right measurement as you're trying not to pour your liquid all over the counter or your head.  You simply look down into the cup.  Simple.  Easy.  Thank you Mom and Dad.


They're made by OXO, have the nice grippy handles, and come in at least 4 sizes that I know of -- 4 cup, 2 cup, 1 cup and 4 tbsp (1/4 cup).  You can find them pretty much anywhere they sell measuring cups and cost between $4-10 depending on the size.


It's a good investment and if you're like me, you really can't have too many measuring cups.

Sunday, July 15, 2012

Egg and Sausage Polenta Cups


It's actually kind of tricky finding new and interesting things to do with eggs, so I went back to someone I trust to provide me something tasty to create -- The Muffin Tin Chef.  YAY!  This was another one that looked really good for either breakfast or breakfast for dinner and since I'm feeling too lazy to come up with my own version, I'll just share this one more of his recipes with you.

Seriously, if you haven't purchased this cookbook yet, run, don't walk to the nearest computer and do so RIGHT NOW.  You will not be sorry.  I heart TMTC!

Egg and Sausage Polenta Cups
The Muffin Tin Chef, page 20

3/4 cup low-fat milk
3/4 cup water
1/2 cup corn grits (polenta)
2/3 cup shredded Asiago, Swiss, or fontina cheese (about 3 ounces)
2 tbsp finely chopped fresh rosemary
1/2 tsp salt
2 tsp grapeseed or canola oil
3 ounces uncooked turkey sausage, casing removed, and chopped*
6 small eggs
watercress or arugula, for garnish

* or for those who like a good time-saving shortcut, you can use Jimmy Dean Fully Cooked Hearty Turkey Sausage Crumbles :)  Three ounces worth of the crumbles comes to about 3/4 cup or 1 very scant cup.


Bring the milk and water to a slight simmer in a  medium pot over medium heat.

Slowly whisk in the corn grits, and continue whisking until it begins to thicken and resemble creamy oatmeal, 3 to 4 minutes.


Remove from the heat and stir in the cheese, rosemary, and salt.  Let cool.


Heat the oil in a medium skillet over medium heat.  Cook the sausage until lightly browned and no longer pink, about 3 minutes.  Or if you're short-cutting, open the bag of JFCCH Turkey Sausage Crumbles.

Preheat the oven to 400 degrees F.  Line 6 medium muffin cups with paper liners.  Divide the polenta among the prepared muffin cups.


Using your fingers, form a deep well in each one by pushing the polenta up the sides of the muffns cups.  Crack an egg into each polenta cup and scatter the sausage on top.


Place the muffin tin on a baking sheet to catch any egg overflow.  Bake until the egg whites are firm but the yolks are still slightly runny, about 20 minutes.  I would check them after 10 minutes, then again at 15, my yolks were almost completely cooked through at 20 minutes.


Let cool for several minutes before unmolding.  Garnish with the watercress or arugula and additional shredded cheese, if desired.

NOTES

I didn't have any of the recommended cheeses, but had some shredded Parmesan on hand which makes a good substitute.

I also used my larger-than-regular muffin tin because I only had extra large eggs on hand and didn't feel like running to the store for small ones just to do the recipe.  I also used my floral cupcake holders (from Michaels Arts & Crafts store).  I like the floral cups a lot because the tall petals make it really easy to remove the goodies from the pan.


I did not desire to garnish my polenta cups with any greenery which is why you don't see any in the photo.  The rosemary is strong in this one (much like the Force in Luke) so if you are not a big fan of rosemary, I would suggest cutting it back to 3-4 tsp instead. 

EGG EXPO Follow Up

Had a question from a reader about blue eggs and speckled eggs and wondering what's the what with them.  Again, all eggs are created equal -- shot out the back end of a chicken -- and there is no nutritional difference.  But color-wise, man-oh-man, never realized such an amazing spectrum of color shades existed, all of which depend on the breed of chicken.  Found this cool egg color chart for you to check out at BackYardChickens.com.  

Wednesday, July 11, 2012

Which Came First...the Color or the Egg?


As we were snarfing down garam masala pancakes on Sunday, GP Mom said she had a post question for TCC. Said she'd always wondered, what was the difference between white eggs and brown eggs?

Now other than the fact that brown eggs seem to be touted as better for you and cost a little more in the store, I wasn't really sure so thought I'd take a crack at it and do a little research. Yeah, I went there.

And what I found was that the only difference between white eggs and brown eggs is (are you ready for it?)...

white eggs are laid by white hens
brown eggs are laid by brown hens

TAH-DAH!

Though I should be more specific in case there's some confusion. White eggs are laid by hens with white feathers and white earlobes (not making this up) while brown eggs are laid by hens with red/brown feathers and red/brown earlobes (why would I make this up?). It all has to do with genetics and natural pigments.

Otherwise, both types of eggs are nutritionally the same. Take a medium-sized egg of either color and you can expect to find about 70 calories, 7 g fat, 210 mg cholostrol, 12 g protein, and a healthy dose of vitamin C all around.

One source indicated that the reason you pay a bit more for brown eggs is because red/brown hens are higher maintenance than white hens.  They tend to be bigger in size and so need more food to produce.

What you do want to look for when buying your eggs, of either color, is the grade. Eggs are graded based on both their exterior qualities (cleanliness, soundness, texture, and shape) and interior qualities. The albumen (egg white) is graded according to clarity and thickness, while the yolk is graded according to outline, size, shape and lack of defects or blemishes. So what you want is Grade A because they will be the best.

So there is the leghorn and short of it.  Eggs is eggs.

Sunday, July 8, 2012

Garam Masala Pancakes with Spiced Apple-Mango Chutney


More pancakes! YAY!

So this post was inspired by one of your co-readers. Thank You Lynnette! She wrote and told me that one of her favorite pancake additions was the Indian spice, garam masala. Num-num! I love Indian food and thought this would be a fun thing to try.  So not wrong.

Lynnette said that she serves her with syrup or jam, but I wanted to try something new so made a spiced fruit chutney to go with it because it just seemed to be a good match.

Garam Masala Pancakes with Apple-Mango Chutney

apple-mango chutney
3/4 cup water
3/4 cup sugar
1/2 cup vinegar
1 mango, peeled and chopped
1-1/2 Gala or Jazz apples, pared, cored and chopped
1/2 cup raisins
1-1/2 tsp fresh ginger, minced
seeds from 2 cardamon pods, crushed
1/8 tsp ground cloves

You can rough chop the mangos...because you may have no other choice.  If anyone knows how to neatly cut up mango, let me know.


The apples you can small dice.


Bring water and sugar to a boil over medium heat. Add in rest of ingredients and bring back to a boil.  Let boil for 20-25 minutes until liquid is reduced.


Remove from heat and place in non-metal container. Serve at any temperature.


garam masala pancakes
2 cups pancake mix
1-1/2 cups water
1 tsp garam masala

Mix ingredients in a bowl until well blended. 


Pre-heat a skillet over medium heat. Drop 1/3 cup batter per pancake. Once they start to bubble, flip until other side is golden brown.

Top with chutney and a drizzle of your favorite syrup and enjoy.

NOTES

Of course, after my disclaimer of last post, I actually made beautiful rounded, lightly browned pancakes and totally forgot to take process photos, so that you don't think I made this up here's the full meal photo and look at my pretty pancakes!


I used Jazz apples, but you could use another sweet firm apple.  Granny Smith would be too tart and you want something less mealy than Golden or Red Delicious.


FYI, one individual serving box of raisins = 1/2 cup.


Wednesday, July 4, 2012

Charlie's Upsidedown Pineapple Pancakes


Happy 4th of July!  Hope everyone is revving up for a fun day of food, friends and fireworks. 

At Casa K2 we started out our day with a new recipe from my friend Charlie.  Love pancakes, but have never thought to upsidedown them this way.  The fresh pineapple is awesome and the brown sugar subtle, topped with your favorite syrup, it's a refreshing way to enjoy breakfast.

Disclaimer:  Despite my many culinary accomplishments, there are three simple items I have not yet mastered the art of "perfect" for -- meatloaf, coffee, and pancakes.  Perfectly round and golden brown pancakes are a rare and exotic occurrence in my kitchen so if you look at photo and think, wow, so not pretty, there's a reason for it. 

Charlie's Upsidedown Pineapple Pancakes

1 cup buttermilk pancake mix
1/2 cup water
2 tbsp pineapple juice
1 thick slice fresh pineapple (or the pre-cut equivalent), chopped
3-4 tsp brown sugar

Chop your pineapple and place on a paper towel to drain any excess liquid.  Let sit.


In a medium bowl, mix pancake mix, water and pineapple juice.  Will be fairly thick.

In a small bowl, toss pineapple pieces with brown sugar to coat.


Fold pineapple into pancake batter.


On a medium-hot griddle or in a pre-heated saute pan, drop 3-4 tbsp of batter.  Once they start to bubble, flip until other side is golden brown.


Serve up with syrup, a dollop of whipped cream and top with a maraschino cherry.  NOM!

Makes about half a dozen 5" pancakes.

NOTES

Was thinking that if you wanted to adult this up for an evening brunch or turn it into a fancy dessert course, you could replace 1 tbsp of pineapple juice with 1 tsbp of rum, garnish with toasted coconut, add some spiced rum to your syrup and take it in a pina colada route instead.