Google Groups
Subscribe to The Culinary Creative
Email:
Visit this group
Showing posts with label grilling. Show all posts

Wednesday, November 20, 2013

The New Southwest: Pomegranate and Lime Chicken Thighs


Okay, this was the recipe that originally caught my eye when I was checking out The New Southwest.  Takes a little more time than the enchiladas did, but the flavor is pretty outstanding.  I ended up making the enchiladas as a side dish to go with the chicken thighs and it made for an outstanding meal together.

The original recipe is set up for grilling the thighs, but because I do not have a working grill, I made some modifications and prepared them stovetop.  My modifications are noted below, but I've provided the recipe as is in the book.

Pomegranate and Lime Chicken Thighs

For the thighs

1 cup Green yogurt plain
1/2 cup pomegranate juice
1 teaspoon salt
1 teaspoon garlic powder
4 bone-in, skin-on chicken thighs I used 5 boneless, skinless chicken thighs
Pomegranate arils for garnish (optional)

For the Pomegranate and Lime Glaze

2 cups pomegranate juice
1/2 cup granulated white sugar
1/4 cup freshly squeezed lime juice = juice from 2 small limes
2 tablespoons honey
2 tablespoons Dijon mustard

To marinate chicken, combine the yogurt, pomegranate juice, salt and garlic powder in a ziptop bag.  Add chicken thighs and toss well to coat.  Refrigerate for at least two hours or up to overnight.  I whisked the yogurt, juice and spices in a bowl first to get them well blended, then poured them over the trimmed chicken thighs in the bag.


Once you are ready to cook the thighs, preheat your grill to medium heat.

To prepare the glaze, place the pomegranate juice, sugar, lime juice, honey, and mustard in a small saucepan, whisk together and bring to a boil.  Reduce to a simmer and cook until thickened, approximately 20 to 25 minutes. Remove from heat and set aside.


Meanwhile, place chicken thighs skin side up on heated grill, cover, and cook until chicken has browned and is no longer pink, approximately 25 to 30 minutes.  Uncover, flip thighs, and cook for just 2 to 3 minutes more to crisp and slightly char the skins.  Remove cooked thighs, top with glaze, garnish with arils, if desired, and serve immediately.

Okay for the grill-free folks out there, I went stovetop.  I put them in a deep skillet over high heat for a few minutes, then drained off the excess liquid.


I continued to cook them over high heat until they were seared, then lowered the temperature. 


I added about half of the glaze to the pan (holding some back the rest to drizzle over the thighs when I plated them), and continued to cook the thighs, turning every couple of minutes until they were no longer pink inside.


I garnished them with fresh arils and then served them up with some stacked squash enchiladas on the side.


Muy bueno!

YIELD: 2 to 3 servings

NOTES

I found the small container or arils at Harris Teeter.  You should check the produce area at your grocery store to see if they sell them separately.  Otherwise, pomegranates are currently in season and easy to find whole.

The flavors in this dish are really well balanced.  I could tell because when we started eating, Dad said that he could really taste the lime in the glaze, Mom said the honey was the first thing she tasted and for me the stand-out flavor was the Dijon, so we enjoyed a difference experience form the same dish.

Wednesday, July 24, 2013

Herby Pork Chops with Peach Salsa

 
For those who subscribe for auto post notices, sorry about the double email on Sunday.  Got a notice the first time I hit publish that it didn't go through.  Apparently that was a big fib. :/

Anywho...still rolling with that what's-in-season thing.  Since you have to buy peaches in batches at the Farmer's Market and I had some leftover, I thought I would try to do something savory with them and this is what I came up with.

Herby Pork Chops with Peach Salsa

chops
6 thick boneless pork chops
salt and pepper to season
1 tsp. olive oil

herby mix
1/4 cup fresh chopped thyme
1/4 cup fresh chopped sage
1/4 cup fresh chopped parsley
4 tsp. olive oil

peach salsa
2 cups fresh peach, peeled and rough chopped
1/4 cup red onion, finely chopped
1 tbsp. lemon juice
1 tsp. fresh mint, finely chopped

Mix together the peach, red onion, lemon juice and fresh mint.  Cover and set aside to let the flavors hang out for awhile.


Rinse and dry your helps, then chop finely.


In a small bowl, mix them together with the olive oil.  Let sit while you prep the chops.


Lightly sprinkle your chops with salt and pepper.


In a hot skillet with a little bit of olive oil, brown the chops, 2-3 minutes per side, over medium high heat.


Remove from skillet and place in a baking dish.  Distribute the herby mix evenly over the tops of the chops.


Place pan in oven on top rack.  Cook at 375 degrees for 12 minutes.  Then set oven to broil and continue to cook for 3-4 minutes.


Remove from oven and let stand for 1-2 minutes.

Serve up with a generous scoop of peach salsa and your favorite sides.

NOTES

Because it is ridiculously hot outside these days, we chose NOT to grill, but you could adapt the recipe/cooking to do it outside.

You want to make sure your salsa is at room temp before serving so that you are not putting cold peaches on a hot chop (sorry Dad).

While they go great together, I was informed by my favorite guinea pigs that both the chops and the salsa would be able to stand on their own merit.

Thursday, July 4, 2013

BBQ Sauces

 
Happy 4th of July!!!

Hope everyone is having a day filled with family, friends, food and fun.  As promised, here are a couple of sauces for you to try.  We're doing pulled pork (thank you Mom!) and pulled chicken for our celebratory feast.

I've got an Eastern NC-influenced sauce and a Lexington-style sauce for you to try.  Enjoy.

Eastern NC BBQ Sauce

1 cup apple cider vinegar
3/4 cup white vinegar
1 tbsp. brown sugar
1 tbsp. cayenne pepper
2 tsp. Tabasco sauce
1 tsp. crushed red pepper flakes
1 tsp. black pepper
1 tsp. salt

Blend all ingredients together. Refrigerate for at least 3 hours, stirring occasionally (to make sure sugar dissolves), to allow flavors to blend.

Serve up with pulled pork.


Lexington-style NC BBQ Sauce

1 cup apple cider vinegar
1/2 cup ketchup
2 tbsp. Worchestershire sauce
2 tbsp. brown sugar
1/2 tsp. chili powder
1/2 tsp. salt
5-6 dashes Tabasco

Blend all ingredients together. Refrigerate for at least 1 hour to allow flavors to blend.

For both sauces, you want to make sure the sauces are at room temperature, though you can heat them a little before serving (so that you are not putting cold sauce on hot pork).

Serve up with pulled pork.


"Quick"-n-Easy Pulled Pork

6 lb. bone-in pork butt

Place pork butt in a foil-lined pan, fat side up.  That way the drippings from the fat will cook into the meat keeping it moist.

Bake at 325 degrees for 6 hours.  Drop oven temperature to 300 degrees, continue to cook for 1 hour. 


Remove loin from oven.  Using a pair of forks, pull the meet from the bone and crisped fat.


Serve up with favorite sauce.

Sunday, April 28, 2013

"Khan" Cakes (aka Corn Cakes)


In preparation for the upcoming release of Star Trek: Into Darkness, some friends and I decided to have a Star Trek sleepover this weekend.  In case you were wondering, the answer is No, you can never be too old for a sleepover.  In honor of the occasion, we donned our finest Vulcan ears and indulged in some Star Trek-themed eatin's.

My cousin whipped up some delicious "Khan" Cakes for the occasion and since I'm still rolling with a spring veggie theme, I asked if she'd mind if I shared the recipe with you all and I grabbed some off-the-cuff photos.

For those who are not dedicated Trekkies, but fans of Earth-grown corn, I think you'll enjoy these just the same.  The sweet taste of the grilled corn goes really well with the fresh basil.  Not a combo I've tried before but now I'm hooked.

"Khan" Cakes
(aka Corn Cakes)

3 ears fresh grilled corn
1 (6 oz) pkg buttermilk cornbread mix
2/3 cup water
1/4 cup fresh basil, chopped

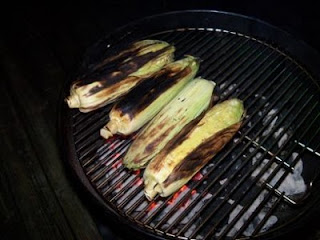
Husk your ears of corn and wrap them each in aluminum foil with a dab of butter.  Cook them on a grill over medium-high heat for 10 minutes, turning every 2 minutes for even cooking.

Remove from grill and unwrap from foil.  Let them sit for a minute to cool while you prepare the batter.

In a medium size bowl, combine the cornbread mix and water until smooth.  Fold in the fresh basil, then set aside.

With a knife, cut away the kernels from the ears of corn and add to the batter mix.

 
Pour about a 1/4 cup of batter for each corn cake onto a hot, lightly greased griddle.  You want to set your griddle on medium-high for this.


Cook the corn cakes for 3-4 minute per side, or until the top bubbles up and the edges look cooked.
 

Remove when both sides are golden brown.  Ready to eat!

NOTES

If you don't have a grill, you can boil the corn, but I would recommend grilling if you can.

Boiling corn will actually leach some of the flavor from the veggie and you don't want to miss out on the sweet grilled taste of the corn.  A better alternative would be to microwave the corn instead.  Just wrap the corn in some waxed paper and cook on high for about 2-3 minutes.

Want to send a shout out to Dana and Mike for being excellent Federation hosts and to Jen for coming up with the recipe to share!  Eat Long and Prosper, my friends.


Sunday, October 2, 2011

Tailgate Treats & Eats: Grill Corn and "Scalloped" Potatoes


Bringing you some of the side products that came out of the K2-Parental Guinea Pig brainstorm session about what to grill up with our Zowie Burgers.  The results were dee-lish.  Easy to make so you can focus your energy elsewhere, like screaming in the stands or smack-talking the opposition.  These are actually some old family favorites, so thanks to the PGPs for suggesting them!

Dad's Grill Corn

5-6 ears of corn
5 gallons water
1/4 cup salt

You want to remove the outer husk layer(s), but leave enough to still provide a light sheath around the corn.

Mix the water and salt together in a large pot or bucket.  Then add in the corn and let soak for about 4 hours.


Remove the corn and allow to drain briefly, then set on grill over hot coals.
Cook approximately 10 minutes per quarter rotation (total of about 40 minutes).  Since the husk sheath is thin, if the corn gets grill marks, not to worry.  I think they actually taste better with a little marking on them.


When done, remove from grill and slather with butter, liberally sprinkle with salt and enjoy!

Mom's "Scalloped" Potatoes

2-3 dozen small yellow potatoes (about 2-3" in diameter)
4-6 tbsp stick butter
salt and pepper
aluminum foil
1/2-3/4 cup grated Asiago cheese

Wash and pat the potatoes dry.  Remove any uggies from the skin, but leave the skin on.

Slice the potatoes into 1/4" slices and divide into three piles.

Lay each third on a sheet of aluminum foil.  You want a big enough piece of foil that you can fold over and cover the potatoes making a nice flat packet.


Divide the butter up and dollop or "pat" on top of the potatoes and sprinkle with salt and pepper.  Fold the foil over the potatoes to create a flat packet. 


Cook about 20 minutes per side on grill over hot coals.

Remove the packets from grill, then open.  Sprinkle the cheese (divided between the three packets) over the potatoes and then close the packets again.


Let those sit for about 5 minutes, then serve.  Mmmmmmm.

NOTES

I've had people tell me that they add lime juice to the corn soaking water to give the ears a bit more zest.


Because grills can vary, heat can vary, cooking time can vary too.  You can use the time mentioned above as a guideline, but I recommend playing it by "ear" when you're actually cooking. (Yeah, I went there.)


If you don't have Asiago cheese, I would HIGHLY recommend using another hard pungent cheese.  You don't need to use a lot if its strong because even a little will go a long way.  You're not trying to overwhelm the potatoes, just give them a bump up on the flavor scale.

Wednesday, September 28, 2011

Tailgate Treats & Eats: Zowie Burgers


Here is a pretty simple one.  I have a firm belief that most everything tastes better with horseradish in it (I did say "most").  This may be low in ingredients, but its high in taste. 

Zowie Burger

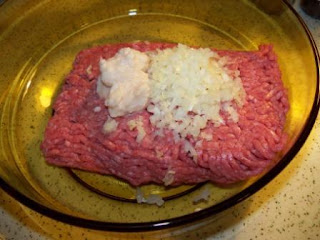
1.25 lbs ground beef
1/4 cup white onion, minced
4-6 tbsp horseradish (depending on your tolerance)

Mash the ingredients together in a bowl by hand.


Form into patties.


Throw on a nice hot grill.  Sear both sides, then cook to grilled preference.


Serve up on a Kaiser roll with some red leaf lettuce and provolone cheese.  Nom nom nom.

NOTES

You know what goes great on a Zowie Burger?  Spicy Ketchup!  Now if we only knew where to find a recipe for that.  Hmmmm....(http://goo.gl/D2Z4c). :)

If you want to kick it up another notch, instead of provolone, throw on some jalapeno Jack Cheese.

(In case you were wondering, those ghostly white patties on the grill are Zowie Turkey Burgers for the non-beef eaters in the crowd.  Same simple recipe, different ground meat, same good taste.  Zowie!)

Sunday, September 11, 2011

Tailgate Treats & Eats: Surf-n-Turf Kabobs


Bringing you more fun with food-on-a-stick and this time something a little meatier to dig your teeth into.  The steak and shrimp each have their own marinade, but with a similar flavor that makes for a singular taste sensation.

Surf-n-Turf Kabobs

6  8" skewers, soaked for grilling

Surf
1 dozen raw jumbo shrimp
2 tbsp fresh lime juice
2 tbsp fresh parsley, minced
1 tbsp fresh ginger, minced
1-1/2 tsp fresh garlic, minced
fresh cracked black pepper, to taste

Clean and devein the shrimp, then put in a bowl.  Pat dry.


Add the other ingredients to the shrimp and mix until they are well-coated.  Cover and refrigerate for at least 1 hours.


Turf
1/2 lb of flat iron steak
2 tbsp sweet chili sauce
2 tsp fresh lime juice
1/2 tsp fresh ginger, grated
1/4 tsp fresh garlic, minced

Cut the steak into thin slices.  You want them thick enough to stay on the skewer, but thin enough that they will cook quickly like the shrimp.


Put the steak strips in a bowl and add the rest of the ingredients.  Mix until they are well-coated. Cover and refrigerate for at least 1 hours.


Start your grill about 45 minutes before you're ready to cook.  Once the coals are close to white hot, thread the skewers.  Two large shrimp per skewer alternated with strips of the steak.


Put the skewers on the grill and cover.  Cook for 3-4 minutes.


Uncover and flip the skewers.  The steak should have a nice little brown edging on the cooked side.  Cook another 3-4 minutes with the lid on. 


Remove from grill, they are now ready to serve, no additional flavor or sauce needed.


NOTES

In lieu of flat iron steak, you could use skirt steak or flank steak.  What you're looking for is something that cuts easily into strips.

I realized when Mom presented me with the head-on shrimp (fresh North Carolina shrimp, y'all) that I have never beheaded shrimp before. 


It wasn't as hard as I thought it would be (though I wore gloves so I wouldn't get any uggies on my fingers).


The heads popped off easily, just had to rinse afterwards and then deshelled them down to the last tail segment.  The legs came off very easily too, a little deveining, and then...all that was left was a beautiful LARGE piece of shrimp.