Google Groups
Subscribe to The Culinary Creative
Email:
Visit this group
Showing posts with label spices. Show all posts

Sunday, September 21, 2014

Turkish Tacos


Found a new ground turkey recipe I love and changed it up a bit to make an awesome taco filling...because crunchy food is fun and tacos rock.  You're welcome. :)

Turkish Tacos

1 small onion, chopped
1 small red pepper, chopped
2 tsp. minced garlic
1 lb. ground turkey
2 tbsp. tomato paste
1-1/4 tsp. cumin
1/2 tsp. ground red pepper
1/2 tsp. cinnamon
1 (14 oz.) can diced tomatoes
1/4 cup chopped olives
1/4 cup sliced almonds
1/4 cup raisins
2-3 tbsp. capers
salt and pepper, to taste

corn taco shells
shredded lettuce
shredded Monterrey Jack cheese

In a large skillet, sauté the onion, pepper, and garlic until onions are translucent.


Add in the ground turkey and cook until cooked through. Mix in the tomato paste, cumin, ground red pepper, and cinnamon.  Cook, stirring, for 2-3 minutes.


Add in the diced tomatoes, almonds, raisins and capers.  Continue to cook uncovered for 5-6 minutes.


Salt and pepper to taste.  Adjust spices as desired.

Stuff into taco shells with shredded lettuce and cheese.  Just try to stop at one, I dare you.


Wednesday, February 5, 2014

Homemade Croutons

 
I like to think of this as a "wing and a prayer" recipe.  I invited some friends over to watch basketball this past weekend.  Since they were bringing the pizza I thought I'd toss together a big salad to go with.  Knowing that my friend Jan is a big fan of the crouton salad accessory and knowing I had the butt end of a couple artisan loaves sitting in the cupboard, I figured I'd get online and find a make-it-yourself recipe.

What's that thing about best laid plans?  Well about 10 minutes before they were to show up at my door I realized I'd not gotten online and not found a recipe, so instead I "wung" it.  Gotta say, I was pleasantly surprised by the results and will be adding these delicious tidbits to many more of my future salads.

I hope you enjoy them as much as we did.

K2's Holycraptheyaregoingtobehereanyminute Croutons

3 cups old artisan bread (but not moldy bread), cut into cubes
1 tsp. Italian seasoning
1 tsp. garlic salt
3-4 spritzes spray butter or 1/2 tbsp. butter melted

Before you begin, preheat your oven to 350 degrees.

In a small bowl, toss together the bread cubes, seasonings, and butter.  They don't need to be saturated or overly coated, just a couple of light turns around the bowl should do.


Pour the coated bread cubes into a small baking dish or onto a small cookie sheet.


Put them in the oven and set your oven on broil.

Stir/flip the cubes every 1-2 minutes until browned along the outer edges. Should take about 5-6 minutes total, if even.

Once nicely browned, turn the oven OFF and leave the croutons in the oven for another 3-4 minutes.  This will allow them to dry out in the center, but not burn.


Remove from oven and toss on salad...or in mouth...

NOTES

I buy artisan bread loaves (not bagged sandwich breads) which tend to be denser and work best for making croutons.

Wednesday, January 22, 2014

Chocolate Caliente, Mayan style


Now that the weather in NC has been snowy and chilly and very keep-indoorsy, I keep thinking back to my visit to Antigua where I was able to enjoy for the first time the wonderful treat of Guatemalan hot chocolate at the Choco Museo.

If you did not know, hot chocolate actually originated in Central America but which is not any hot chocolate you're familiar with, it was a whole different beast.

The concoction was made from the seeds of the fruit of Cacahuaquchtl, meaning not just the cocoa tree, but the Tree, the tree of the Mayan gods.  The seeds were roasted in earthenware pots and then crushed by rolling them between two stones to create a powder.  The powder was then whisked together with boiling water to make a beverage.  To this drink was added either chili, honey, musk, spices or ground maize (if you wanted a heartier beverage).  It was considered a sacred food and was used for royal or religious ceremonies.  It could be consumed hot or cold.

It was the Spanish conquistador, Don Hernan Cortes who, recognizing the commercial value of the product, brought the cocoa bean to Europe.  There's a whole long story to go with that as to how it evolved and changed over the centuries to become which is commonly recognized today as "hot chocolate" but that's a story for another day.

I haven't had a chance to get out and check myself yet, but rumor has it that you can buy the bars of drinking chocolate in the U.S., which are not like regular chocolate bars, but rather bars of pressed cocoa that is crumbly until mixed with boiling water.

The first time we were at the Choco Museo, I ordered a Chocolate Caliente, Mayan style with hot milk (though I had the choice of hot water), chili and honey.  It was rich and spicy (probably because I added three pinched of chili), but what I loved the most about it was the process.  As you see in the photo above, they brought each ingredient out in its own container.  You started by putting the chocolate paste in the earthenware mug, then added the honey, a pinch or two of chili and then stirred in the hot liquid.  SO GOOD!

My second visit, I tried the Chocolate Caliente, Conquistadore style with hot milk again, cinnamon stick pieces, and whole cloves.  Gotta admit, I liked kicking it Mayan style better, but the idea of being able to add other spices was intriguing and fun.

Since I've been home, I've tried a couple of K2 make-at-home adaptations. 

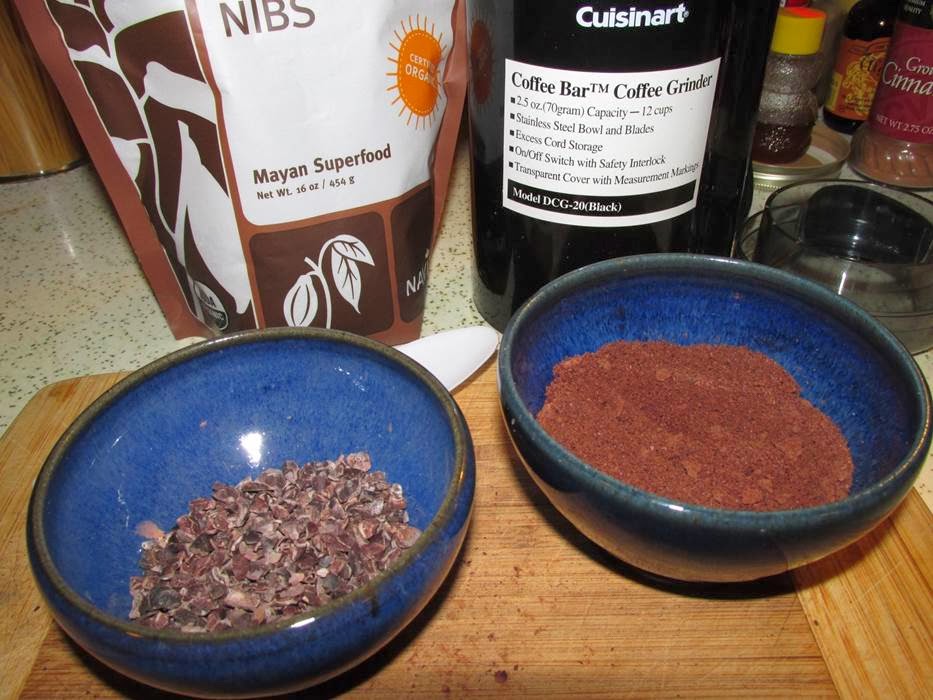
Faux Mayan:  since I had used cacao nibs before, I ground some up in a coffee grinder to make a base powder and then added hot water, pinch of chili powder, cinnamon stick, and honey.  Very savory, not very sweet, slightly grainy, but an interesting taste sensation. Very addictive.


So American:  the other one that you might want to try out is using Hershey's Special Dark syrup, pinch of chili powder, and honey with hot milk.  Closer to home, more on the sweet side but with a chili kick. Tasty.


If you're feeling adventurous some cold wintry night, try kicking it old-old school.  I think you'll have some fun.

NOTE

Want to send a shout out to my friend Nicole who made me the ceramic cup with the skulls that is now my official drinking chocolate cup.  Thank you!

Wednesday, December 18, 2013

Joe Froggers

 
What the hoogly-moogs is a Joe Frogger, you ask?

A Joe Frogger is a soft, oversized spice cookie (reputed to originally have been baked to the size of lily pads), originating in Marblehead, Massachusetts and dating back to Colonial times. They were made by "Aunt Crese" who kept a tavern on Gingerbread Hill and were named after her husband, a Revolutionary War patriot and freed slave, Joe Brown.

Because the cookies used rum and water as ingredients, they would keep for long periods of time and so were packed up by the barrel-loads for fishermen to take with them on extended trips.

My dad’s side of the family hails from New England and we got this recipe from my grandmother, but my first memory of enjoying Joe Froggers was when my mom made them one Christmas when I was a teen. Because rum is one of the main ingredients in the cookie, I was pretending to be drunk on cookies which led to a giggling fit that lasted so long and got so out of control that my mom eventually sat on me to try to calm me down. Good times, good memories. Yes, she sat ON me. Mom claims not to remember the incident, but that’s the kind of thing that sticks with you so I remembered and that's all that matters.

They take a little time to make but are SO worth the effort. 

JOE FROGGERS

2 cups whole wheat flour
1/2 tsp salt
1/2 tsp ginger
1/4 tsp nutmeg
1/8 tsp cloves
1/8 tsp allspice
1/2 cup honey
1/4 cup dark molasses
1/4 cup vegetable oil
3 tbsp rum
2 tbsp hot water
1/2 tsp baking soda

In a small bowl, mix together flour, salt, and spices. Set aside.


In a medium bowl, combine honey, molasses, oil, rum, water, and baking soda. Will be super liquidy. FYI, beware of the onslaught of rum fumes as everything mixes around in the bowl, may cause dizziness and/or excessive giggling.


Stir in flour mixture, a bit at a time, until well blended.


Chill dough in fridge for 1/2 hour.

Measure out dough by the 1/4 cup (should make 10 cookies) then roll into balls.  Dough is going to get sticky as it warms up so if needed, toss it back in the fridge for a few minutes to make it easier to manage.


Place dough balls on a greased cookie sheet, spaced 3" apart. Press balls out using a flat-bottomed glass or dish.  I pressed my glass in some of the flour before mashing down the dough balls to keep them from sticking to the bottom of the glass.


Bake 375° for 9-10 minutes.


Remove cookies from oven and transfer to a cooling rack.  Will be soft and mooshy, not crunchy.


YAUHM!!!

NOTES

You can roll out dough to make smaller cookies to share. Mine actually turned out smaller than I was planning, but they still work.

You can spread a little flavored cream cheese or some other tasty filling between two cookies to make a soft cookie sandwich.

YAUHM!!!


Wednesday, September 25, 2013

Holy Mole Spicy Crockpot Chicken

 
More fun with crockpot food.  As the weather gets cooler, this spicy dish will make you feel warm inside and out.

Holy Mole Spicy Crockpot Chicken

8 boneless, skinless chicken thighs (about 2 lbs.)
1 tbsp. flour
1 (14 oz.) can diced fire-roasted tomatoes
1 (10 oz.) can RoTel diced tomatoes and green chilies
1/2 cup creamy peanut butter
1 tbsp. soy sauce
1 tsp. cumin
1 tsp. chili powder
1 tsp. brown sugar
1/2 to 1 tsp. Rooster Sauce* (depends on how hot you want it)
2 medium carrots, peeled and sliced chunky
1/2 medium onion, chopped

Put fire-roasted tomatoes, RoTel tomatoes, peanut butter, soy sauce, cumin, chili powder, brown sugar and rooster sauce in the crockpot on low.

 
Cook for 10-15 minutes until the peanut butter is melted and everything is blended together.

 
While that is cooking, trim any excess fat off the chicken thighs.  Sprinkle with flour until pieces are evenly coated.

 
Add chicken, carrot chunks and chopped onion to the crockpot.

 
Cook on low for 5-1/2 to 6 hours, stirring often.

Serve over rice, garnish with toasted peanuts and/or cilantro.  Enjoy the heat.

NOTES
 
*If you're not familiar with it Rooster Sauce is a chili garlic sauce available in some grocery stores and in Asian markets.  It's pretty potent, so adjust usage to suit your heat level preference.
 
You can use bone-in skinless chicken thighs for this recipe.  My grocery store just happened to have some that were boneless, so I went with those.

Thursday, July 4, 2013

BBQ Sauces

 
Happy 4th of July!!!

Hope everyone is having a day filled with family, friends, food and fun.  As promised, here are a couple of sauces for you to try.  We're doing pulled pork (thank you Mom!) and pulled chicken for our celebratory feast.

I've got an Eastern NC-influenced sauce and a Lexington-style sauce for you to try.  Enjoy.

Eastern NC BBQ Sauce

1 cup apple cider vinegar
3/4 cup white vinegar
1 tbsp. brown sugar
1 tbsp. cayenne pepper
2 tsp. Tabasco sauce
1 tsp. crushed red pepper flakes
1 tsp. black pepper
1 tsp. salt

Blend all ingredients together. Refrigerate for at least 3 hours, stirring occasionally (to make sure sugar dissolves), to allow flavors to blend.

Serve up with pulled pork.


Lexington-style NC BBQ Sauce

1 cup apple cider vinegar
1/2 cup ketchup
2 tbsp. Worchestershire sauce
2 tbsp. brown sugar
1/2 tsp. chili powder
1/2 tsp. salt
5-6 dashes Tabasco

Blend all ingredients together. Refrigerate for at least 1 hour to allow flavors to blend.

For both sauces, you want to make sure the sauces are at room temperature, though you can heat them a little before serving (so that you are not putting cold sauce on hot pork).

Serve up with pulled pork.


"Quick"-n-Easy Pulled Pork

6 lb. bone-in pork butt

Place pork butt in a foil-lined pan, fat side up.  That way the drippings from the fat will cook into the meat keeping it moist.

Bake at 325 degrees for 6 hours.  Drop oven temperature to 300 degrees, continue to cook for 1 hour. 


Remove loin from oven.  Using a pair of forks, pull the meet from the bone and crisped fat.


Serve up with favorite sauce.

Sunday, December 30, 2012

Spicy Turkey Buns

 
In anticipation of New Year's, here's a warm snack that's a handful of spicy goodness.  Easy and filling, great for a night of celebration.

Spicy Turkey Buns

2 tbsp low sodium soy sauce
1 tbsp warm water
1/2 tsp cornstarch
1 tsp curry powder
1/4 tsp red pepper flakes
1/4 tsp five spice powder*
1 tbsp water
1 egg
1/2 lb ground turkey
2 tsp minced garlic
1/8 cup minced green onion (optional)
1 (8 ct) pkg refrigerated biscuits

In a measuring cup or small bowl, whisk together the soy sauce, water and cornstarch until smooth. Stir in the curry powder, red pepper flakes and five spice powder, mixing well.  Set aside.


Whisk together the water and egg until well-blended.  Set aside.

Brown the ground turkey with the minced garlic over medium high heat until it is cooked through, then drop the heat to low.


Add the spice mixture to the skillet and cook, stirring, for an additional minute until the turkey is evenly coated.  Stir in green onions.  Remove from heat and set aside.


Open the biscuits and place them, individually, between two sheets of wax paper. Gently roll them out until they half their original size.


Spoon a small heap of the spiced turkey into the center of each biscuit.  Fold over one end to form a half circle and pinch the edges closed.


Place the half-buns on a lightly greased (or parchment-covered) cookie sheet. Brush the tops of each with the egg wash.


Bake at 400 degrees for 10-11 minutes or until lightly browned.


Can be served warm or at room temperature.

NOTES

*Five spice powder is a Chinese spice blend that you can find in most grocery stores in the specialty spice area.

You can substitute your ground meat or use the Morning Star Grillers (vegetarian) instead of turkey.

If you want a less bready bun, split the biscuit in half (separate the layers) before you roll them out. Additionally it will double your bun production. :)

I made a Asian Mayo to dip mine in -- a mixture of soy sauce, mayo and lemon juice to taste.

Wednesday, September 12, 2012

Creamed Corn with Garam Masala Butter


Now I've never been a huge fan of creamed corn, too bland and mooshy for my taste, but the garam masala butter piqued my interested so I thought I would give it a whirl for you guys.  Let me tell you, there is a WORLD of difference between canned creamed corn and the fresh-made version.  And the butter, the garam masala gives it an oddly non-sweet sweet taste.  I liked it, I liked it very much and hope you will too.

The recipe is from the August 2012 Bon Appetit magazine, though I halved the recipe since I'm not serving a small army.  I also did not make the garam masala from scratch because, well, I'm a working gal and there's only so much time I have during the week to lavish on the fancy stuff, besides, I had enough of the pre-made left in my spice cabinet to cover this recipe.

Creamed Corn with Garam Masala Butter
page 79, Bon Appetit, August 2012 -- recipe halved and directions paraphrased

5 large ears corn, husked
1/4 cup water
4 tbsp (1/2 stick) unsalted butter, divided
1/4 cup finely chopped onion
3/4 tsp minced garlic (1-1/2 cloves)
1/2 tsp kosher salt, plus more
2-1/4 tsp garam masala

Cut kernels from cobs in to a large bowl (should make about 4 cups). Scrape cobs with the back of a large knife to release juices into bowl.  I cut mine into a glass baking dish to give myself some room to maneuver, I would use whatever kind of dish you are most comfortable with.


Combine half the kernels with juice (2 cups) and 1/4 cup water in a blender; puree until smooth.


Melt 1 tbsp butter in  a large saucepan over low heat.  Stir in onion, garlic, and 1/2 tsp salt.  Cover and cook about 10 minutes, stirring often until onion is soft and translucent.  Do NOT brown.  The recipe in the magazine said to add water by the tablespoons if your onions dry while cooking, but I found that I didn't need to because the cover helped keep in moisture.


Add pureed corn and remaining kernels and cook, stirring occasionally until corn is tender, about 10 minutes.  Stir in 1 tbsp of butter and salt to taste.  I bumped up the heat to medium-low to help with the cooking, my corn was tender, but still had a little crisp to it which I liked.  You can cook for longer until it's the consistency you want.


Heat remaining 2 tbsp of butter in a small saucepan over medium heat.  Add 2-1/4 tsp garam masala and a pinch of salt.  Whisk until fragrant, about 15 seconds.


Drizzle over creamed corn.  Tasty and different (in a good way)!


Wednesday, September 5, 2012

Spicy Lamb (Curry Dish 3)


To disclaim once more, this is not a super hot dish.  You can bump up the chili powder if you need more kick, but since I knew my audience included GP mom who prefers not to have to wipe her nose or tears while eating, I didn't adjust mine.  It still has a really nice flavor and is quite filling.

Spicy Lamb

1 tbsp veggie oil
4 cardamon pods
1 cinnamon stick
4 whole cloves
1 large shallot, finely chopped
1 lb ground lamb
2 tsp garam masala
1 tsp chili powder
4 cloves garlic, minced
3 tsp grated fresh ginger
1 tsp sea salt
1 cup potatoes, small dice
1 (13.5 oz) can diced tomatoes
1/2 cup hot water
2 tbsp fresh cilantro, chopped
2 tbsp fresh mint, chopped

Heat oil in a large skillet over medium heat. Stir-fry cardamom pods, cinnamon stick, and cloves until fragrant, about a minute.


Add shallots and cook until soft, about 1-2 minutes.

Stir in ground lamb, garam masala, chili powder, garlic, ginger, and salt.


Cook for 4-5 minutes until lamb changes color.

Add potatoes, tomatoes with juice, and water. Reduce heat to low, cover, and simmer about 10-12 minutes until potatoes are tender.


Remove from heat, add cilantro and mint.

Serve with rice.

NOTES

If for any ethical, allergic or preferential reason you don't like lamb, you can easily subsitute your preference mild ground meat into this recipe (chicken, pork or turkey). 

Keep an eye on your potatoes, it may take less than 10 minutes, it may take more, depends on your potatoes and your heat so judge for yourself when you think it's done.

Remember that there is a cinnamon stick, four cardamon pods and four cloves in your dish -- might want to give your guests a kindly heads up so they don't chomp into them.