Google Groups
Subscribe to The Culinary Creative
Email:
Visit this group
Showing posts with label Halloween. Show all posts

Sunday, October 20, 2013

Chocolate Caramel Apples with Albino Spiders

 
Inspired by a trip to the NC State Fair this weekend, the impending arrival of my all-time favorite holiday, and continuing with my recent All Apples All the Time posting, I bring you a twist on an old favorite...chocolate caramel apples with albino spiders! Okay, the spiders are white chocolate but that doesn't sound nearly as cool.

Chocolate Caramel Apples with Albino Spiders

apples
6 small red delicious apples
1 (14 oz.) package microwaveable caramel
8-10 oz. chocolate candy melts, CandiQuik or candy coating
6 skewers (8") or candy/caramel apple sticks

albino spiders
2-4 oz. white candy melts, CandiQuik or candy coating
small disposable piping bag or small baggie

PRE-PREP

Here's a great way to get your caramel to stick better to the apple.  Boil a small pot of water.  Do a quick dip and rinse with your apples, then dry them off with a paper towel.

 
The hot rinse will help remove any shiny wax on the skin of the fruit and give it more of a matte finish.  This will help your caramel stick better. A shout out to my friend, Kathy, for that very helpful and effective hint.

APPLE DIPPIN' TIME

Skewer your apples. I  recommend using a more heavy duty stick because the combined weight of the apple + caramel + chocolate is going to required something more than the little popsicle sticks provided in the caramel apple kit.

I went with a microwaveable caramel coating
because it took less time than making caramel
from scratch and was much less messy too.

Heat your caramel according to package directions.  Coat your apples with the caramel.  Place them on a lightly greased cookie sheet or sheet of wax paper.  Place in the fridge to set while you melt the chocolate.


Melt the chocolate candy coating until smooth.

this is actually a full 16 oz. pack of chocolate, discovered
that I did not need all of it for this project, but you'll
see what I did with the leftover chocolate in an upcoming post
 
Remove the apples from the fridge.  Fold the excess caramel that's pooled under the apple back onto the apple.  Caramel should be malleable to fold and press without sticking to your hands or falling off the apple.


With the help of a spatula or spoon, coat the caramel-coated apple with the candy coating.  Gently shake off any excess and place on a sheet of wax paper on a cookie sheet (or in my case, on a wood cutting board).


Place the chocolate-coated apples back in the fridge to allow the chocolate to set.


SPIDERS (Optional)

Melt the white candy coating.


Fill a disposable piping bag, or small baggie with a small hole cut in the corner, with the melted chocolate.  Pipe the chocolate onto a sheet of wax paper.


To create the spiders you can draw four long lines that cross in the middle and then pipe a big blob in the middle -- voila! Albino Spider!  You want to make sure the "legs" aren't too thin or they'll break when you try to remove them.  Should only take a minute or two for the spiders to set.

To attach the spiders to your chocolate caramel apples, dip a butter knife or small pastry knife in a hot mug of water. 
 
 
Shake off excess water and while the knife is still warm, melt a small spot on the top of the apple and on the back of the spider, then press them together.  Should immediately attach.
 

And done!

Sunday, September 29, 2013

Witchy-Poo Cookie Craft (It's Edible!)

 
And so it begins, the ramp-up to my favorite holiday.  YAY!  This weekend I was invited to keep my friend Michelle company while she hosted her 8-year-old daughter's Halloween-themed sleepover.  One of the fun projects on the evening's docket was decorating cookie ball witch heads.  She thought it might be a fun project to share with you and I very much agreed.

If you are brave enough to try this with your kiddoes (or growed-up friends), I would recommend following it up with an activity that let's them run off the sugar rush that follows.  You have been warned.

Witchy-Poo Cookie Craft

witch heads
1 pkg. (16 oz.) ready-to-bake sugar cookie refrigerated dough
1 can white icing
1/2 (12 oz.) bag of green candy melts


hats and parts
8 sugar cones (hat tops)
16 thin chocolate wafer cookies (hat brims and collars)
chocolate icing (for hats)
licorice strips, Twizzlers, or sour straws (hair)
chocolate-covered sunflower seeds (for noses)
candy eyes or flat sprinkles (for eyes)
assorted Halloween sprinkles (hat decoration)

chocolate-coated sunflower seeds
 
Sorry no photos for the first couple of steps, I got so carried away with what we were doing that I forgot to grab some photos.

For the witch heads, you need to bake the sugar cookies according to the package directions EXCEPT that you want to cook them for the least amount of time listed.  The cookies should be on the slightly undercooked side (very chewy, little to no crunchy). 

When the cookies are done baking, transfer them to a rack to cool completely.

When the cookies are cool, put them in a food process and run until they are little crumbles.

Mix the cookie crumbles with 1/2 cup of white icing and moosh together until it forms a (not smooth) dough.  Because you undercooked the cookies, the crumbles will be moist and dough will be more malleable.

Roll the dough into eight (8) 2" balls.  Set on a plate and refrigerate for at least 30 minutes.


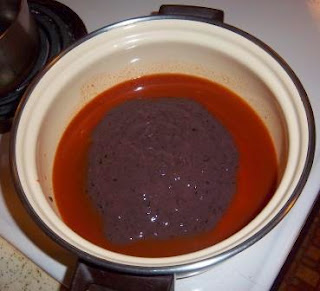
When the dough balls are ready, remove from fridge and set aside while you melt the green candy pieces.  In a thick bottomed saucepan over low heat (setting 2 or 3) or in a double broiler, stir candy pieces until fully melted and smooth.


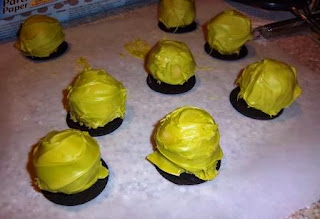
Dip the balls in the melted candy and roll around until well-covered.  Remove and set each ball on a thin chocolate wafer cookie.  Smooth down the chocolate with a butter knife or small spatula.  The candy will set within 5-10 minutes.

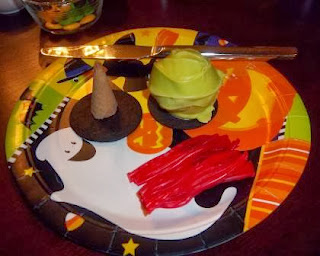
The only other pre-decorating frenzy prep we did was to pull apart the licorice strips so the girls didn't have to do it.  We used Cherry Twizzlers which we cut in half lengthwise and then separated into strands of threes.

 
Each girl then got a plate with a blank witches head, the hat parts and some hair and license to go crazy.


It was a fun project and everything is edible.  The results were adorable and the girls had a great time building their masterpieces.

 
NOTES

We learned the hard way that you want to make sure to put the candy-coated cookie balls on the cookie wafers right away, or at least on a sheet of parchment or wax paper, because the candy coating will start to harden immediately and then need to be pried off the plate that you unwittingly put them on to start with.

If you want different color hair, Punch Straws would work, they have a sugary coating though so won't look the same as the licorice or Twizzlers.

You can usually find chocolate-covered sunflower seeds in specialty stores or grocery stores that stock non-traditional candies.  Michelle got hers at Trader Joe's, I believe.

The eye candies and Halloween sprinkles can be found at Michael's or A.C. Moore's craft stores, or any place that sells Wilton products.

Other variations -- use white candy melts and decorate them as vampire heads or instead of cookie balls, make cookie cylinders, cover them with the green candy coating and decorate them as Frankenstein heads.  Get creative and go crazy with it, there's no wrong answer here.

Wednesday, October 31, 2012

Bat Bake

 
Ghouled Evening and Happy Halloween!!!

Got any easy one for you because I know you'll be busy fending off mini monsters and fairy princesses with gobs of goodies this evening.  Halloween-inspired nachos, what could be better?!?  The test name for this recipe was Count Nacholar, but Bat Bake had better alliteration.

Bat Bake

Black bean salsa moosh
Blue corn tortilla chips
Shredded cheddar cheese
Sour cream
Black olive slices

black bean salsa moosh

1 can (15 oz) black beans, drained and rinsed
1/3 cup hot salsa
1/8 cup fresh lime juice
2 tsp minced garlic

Mix moosh according to directions (see link).  Set aside.

Fill the bottom of a baking dish or pan with foil and cover with a layer of tortilla chips.  Sprinkle some shredded cheddar over them, then add another layer of chips on top.


Bake at 350 for 8-10 minutes until cheese is melted and clinging to chips.

Transer to a plate, and dollop with sour cream, and cover dollops with a spoonful of moosh.


Insert two chip "wings", add olive "eyes", and you are ready to dig into some crunchy, tasty home baked-bat!  It's bat-astic!

Sunday, October 28, 2012

Creature from the Black Bean Soup


I was going to save this for Halloween, but figured in case anyone wanted to make it for that special day, I would give you the recipe now.  Plus, I was really craving black bean soup...which is kind of crazy cuz I don't think I've ever had black bean soup before.  Gotta say, I love it when my experiments comes together.  Two words for you, monstrously delicious!

Creature from the Black Bean Soup

1 (10 oz) can tomato soup
2 (15 oz) cans black beans
3/4 cup veggie stock
1-1/2 tsp minced garlic
1 tsp chili powder
1 tsp cumin
sour cream and green olives, to make eye garnish

Puree one can of black beans and mix in a pot with the tomato soup.  Whisk together and cook over medium-high heat.


Drain, but don't rinse, the second can of black beans.  In a skillet, over medium heat, cook beans with garlic, chili powder and cumin until the liquid from the beans is cooked out.  Add beans to soup pot.


Simmer for 20-30 minutes to allow flavors to blend.

NOTES

Depending on how thick you want your soup to be, you can reserve the bean juice from the drained can and use it to thin out the soup.

If you want it a little kickier, add up to another 1/2 tsp each of the spices.

Serve up in a bowl, put dollops of sour cream next to each other and use the olives to make eyes.

I ate mine with some shredded cheddar and some blue corn chips on the side.  Happy happy belly. 

Wednesday, October 24, 2012

Halloween Brews


With Halloween party season coming up, I whipped up a couple of fun new brews to try.   

Blackbeard's Treasure

1-1/2 oz Creme de Cassis
1 oz spiced rum (like Sailor Jerry or Captain Morgan)
gold sugar

Dip the rim of your glass in a tidge of water and upsidedown it in some gold sugar.

In a shaker with ice, blend together Creme de Cassis and rum.  Pour into your shiny glass and yarrrrrr ready to enjoy.

You can buy gold sugar anywhere they sell Wilton baking/cake decorating products.

My Lady's Spectre

1 oz orange vodka
1/2 oz black raspberry liqueur (like Chambord)
12 oz Fresca

Pre-chill the orange vodka and Fresca before mixing.  Blend and serve in a tall glass.  It will send a shiver down your timbers it's so boo-tastic.

Sunday, October 21, 2012

Pumpkin Flurf


What?!?!  More pumpkin?  Of course, because you can never have enough pumpkin.  Here's a quick-n-easy party dip you can make.  It goes great with gingersnaps, fresh apples, Pepperidge Farm gingermen, or just glopped on your finger. I think it would make a nice topping for some molassessy gingerbread too!

Pumpkin Flurf

2 (8 oz) packages cream cheese, softened to room temp
1 can (15 oz) pumpkin puree
2 cups powdered sugar
1 tsp cinnamon
1/2 tsp ginger
1/4 tsp allspice


Blend all together in a  mixing bowl.  Note, the cream cheese doesn't complete blend in, if there are small "lumps" that's okay.


Chill for 2 hours before serving.

Wednesday, October 17, 2012

Candy Corned Cupcakes

 
Okay so this is one of my assemblage recipes.  Basically meaning I didn't make it from scratch but rather assembled some "ready-made" things to create a tasty piece of Halloween art.

My original intent in devising this plan was to layer the cake batter -- orange on bottom, yellow butter on top -- and top with white icing so that when you bit into it, it looked like a candy corn candy.  Cool, right?

But the batter?  Not so obliging with that whole layering thing, so when it baked up the orange crept up the sides and cooked around the yellow butter batter. While the end result was not what I envisioned, it actually turned out pretty well.  Decided to add a layer of candy corn "crumble" on my icing and voila -- Candy Corned Cupcakes!  Every bit as good as the almost-real thing.

Candy Corned Cupcakes

1 box orange cake mix, prepared according to box directions
Add 2 drops yellow food coloring + 3 drops red food coloring (to deepen color)


1 box yellow butter cake mix, prepared according to box directions
Add 3 drops yellow food coloring (to brighten batter)


2 cans cream cheese icing
2 cups candy corns, rough chopped


Fill a cupcake tin with your favorite festive Halloween baking cups.

Fill the bottom half with orange cake batter.  Then fill the rest with yellow butter cake batter.


Bake for 18-20 minutes.  Once the cupcakes are done (tops spring back to the touch), remove from pan and allow to cool to room temperature.


Generously slather with cream cheese icing, then sprinkle candy corn crumble on top.  Makes 2-1/2 dozen (or so).  Fun for the whole Halloween family!

Sunday, October 14, 2012

Zombits Ice Cream Sunday


Sorry about the less than ideal post pics, still working on getting a new camera.

In honor of the season premiere of The Walking Dead and this lovely Halloween season, I whipped up a deliciously gruesome treat.  Hope you (can try to) enjoy!

Zombits Ice Cream

1 cup whole milk, well chilled
3/4 cup sugar

In a medium bowl, mix together milk and sugar until sugar is dissolved.

2 cups heavy cream or half-n-half, well chilled
1 tsp peppermint extract
1/2 tsp vanilla
3-4 drops green food coloring

Add cream and extracts to the mix and blend well.


Pour mixture into an ice cream maker for 20-25 minutes until soft serve consistency.

12 maraschino cherries, rough cut
1/4 pecans, fine chopped
2 tbsp caramel sauce
6-7 half-teaspoons for fudge sauce


Remove ice cream from ice cream maker and put in a freezer safe container.  Gently fold in the cherries, pecan pieces, caramel sauce and fudge sauce so that the sauces ribbon through, not blend in.


Set in freezer for 2-3 hours or overnight.

Dish up with some strawberry sauce, some eye candies or little bone sprinkles (both of which can be found at Michael's, AC Moore, or any place with Halloween baking goodies).


Serve with a zombie finger or two.