Google Groups
Subscribe to The Culinary Creative
Email:
Visit this group
Showing posts with label seasoning. Show all posts

Sunday, September 21, 2014

Turkish Tacos


Found a new ground turkey recipe I love and changed it up a bit to make an awesome taco filling...because crunchy food is fun and tacos rock.  You're welcome. :)

Turkish Tacos

1 small onion, chopped
1 small red pepper, chopped
2 tsp. minced garlic
1 lb. ground turkey
2 tbsp. tomato paste
1-1/4 tsp. cumin
1/2 tsp. ground red pepper
1/2 tsp. cinnamon
1 (14 oz.) can diced tomatoes
1/4 cup chopped olives
1/4 cup sliced almonds
1/4 cup raisins
2-3 tbsp. capers
salt and pepper, to taste

corn taco shells
shredded lettuce
shredded Monterrey Jack cheese

In a large skillet, sauté the onion, pepper, and garlic until onions are translucent.


Add in the ground turkey and cook until cooked through. Mix in the tomato paste, cumin, ground red pepper, and cinnamon.  Cook, stirring, for 2-3 minutes.


Add in the diced tomatoes, almonds, raisins and capers.  Continue to cook uncovered for 5-6 minutes.


Salt and pepper to taste.  Adjust spices as desired.

Stuff into taco shells with shredded lettuce and cheese.  Just try to stop at one, I dare you.


Sunday, December 8, 2013

General Tso's Spicy Veggie Dip


As I was trolling through my old cook books looking for ideas for festive posts, inspiration struck after reading a section called "Easiest Ever Dips" in one of my 1970s entertainment idea handbooks (cuz they knew how to throw parties back then).  And yes, it is this simple.

Their BASIC FORMULA

1 to 2 cups sour cream and/or mayonnaise

plus

1 packet/can dried soup mix / dry salad dressing mix / dry sauce mix / dip mix / canned seafood (well drained) / cheese spread / canned spread meat (deviled ham or chicken)

add-ins

1 to 1-1/2 tablespoons chopped nuts / chopped or sliced olives / chopped onions / chopped chives / relish or chopped pickles / crumbled bacon / chopped dried beef

and/or

1 to 2 teaspoon onion or garlic powder / onion or garlic salt / dried minced garlic

for garnish

paprika / sliced stuffed green olives / sliced hard-boiled eggs / chopped or sliced green onions

So it got me thinking and when I went to the cupboard to see what I had, I found a packet of Sun-Bird's General Tso's Chicken Season Mix.  Hmmm....so here's what I came up with.  If you like zippy and zesty and a little on the spicy side, then you'll like this simple party dip.

My GENERAL TSO'S SPICY VEGGIE DIP

1 packet General Tso's stir-fry seasoning
1 cup sour cream
1/2 cup mayonnaise


for dipping

baby corn spears, drained
carrot sticks
celery sticks
snap peas, raw or lightly steamed

Mix the seasoning, sour cream, and mayo.  Let sit in the fridge for at least 30 minutes to allow flavors to blend.  Serve up with some crisp fresh veggies (that will nicely offset the zingy dip).  Easy peasy and tasty too!

Wednesday, June 19, 2013

Broiled Salmon with Hawaiian BBQ Sauce

 
So the other part of Guinea Pig Dad's Happy Pappy Day feast on Sunday was a little Southern Seas-inspired fish dish that I whipped up for the seafood lover in him.

This taste treat was the result of a conversation I had with my friend Cooper who told me his family makes this delicious grilled salmon with a Hawaiian BBQ sauce.  But since he couldn't remember exactly what all the ingredients were and in what quantity they were used, we brainstormed a list of potential things that could work (in case he forgot to send me the recipe, which he did forget to do, silly Cooper!) and I just ran with it up from there.  I love it when a culinary experiments comes together!

You'll want to make the BBQ sauce about an hour before you plan to cook the salmon so that the flavors have time to sit together and blend.  It only take 10 minutes to prep and cook the salmon once the BBQ sauce is ready.

Broiled Salmon with Hawaiian BBQ Sauce

1-1/2 to 1-3/4 lbs. salmon (with or without skin on one side)

the "rub"
3/4 tsp. chili powder
1/2 tsp. cumin
1/2 tsp. smoked paprika


Hawaiian BBQ Sauce
1 (15 oz.) can plain tomato sauce
1 (8 oz.) can crushed or chunk pineapple
1/4 cup apple cider vinegar
2/3 cup brown sugar, loose not packed
1 tsp. smoked paprika
1 cinnamon stick

In a large bowl, combine all the ingredients for the BBQ sauce.  Cover and refrigerate for at least 1 hour.


When the sauce is ready, strain it into a saucepan and set aside.


Turn the oven broiler on and set the over rack on the 2nd level down from the top.

Take your salmon and cut it into 4-5 oz. individual fillets.  If you bought it with skin-on, leave it on during the cooking process, will be easier to remove once the fillets are cooked.

 
With the skin-side down, sprinkle the "rub" on the top half.


Place the fillets on a broiling pan and cover with a spoonful or two of the BBQ sauce.


Put on the rack in the oven and cook for 5-6 minutes or until the salmon flakes apart and is opaque in the center.


While the salmon is cooking, bring the rest of the BBQ sauce to a boil over medium-high heat.  Remove from heat and add to salmon once it's been served.

All done and yum.

NOTES

Don't forget that there is a piece of skin under the salmon.  Once the fish is cooked, it is very easy to remove.

Special Dad Note:  if your daughter is serving the salmon over rice, put the cooked salmon sauce-side down on the pile of rice, remove skin from bottom, pour more sauce on top.  Less muss, less fuss, more sauce, all good.

In this recipe, you don't want to substitute regular Paprika for Smoked Paprika because you really want to bit of that smoked flavor.  The recipe that Cooper and his family use actually uses Liquid Smoke so if you had that instead, just substitute with a dash or two and you should be set.

Salmon goes really well with whole grain or brown rice.  Mom made a nice fruit & veggie Waldorf salad variation on the side (which I will try to make for another post).

If you don't like salmon, but want to use it on fish, make sure to use another heavier fish (versus a light white fish) so that it holds up to the sauce.  Anything lighter will just get overwhelmed.

The Hawaiian BBQ Sauce would go really well with grilled chicken or on pork, like pork ribs or pork chops.


Sunday, April 7, 2013

Good and Good for You: Sage

 
In theory, spring has sprung...and I only say in theory because I live in North Carolina and the season/weather kind of changes from day to day.  But in any case, it's the time of year to start planting gardens and to look forward to enjoying fresh herbs and veggies.

When I bought my house I planted a couple of sage-lings in the herb garden and every year since then they've thrived and grown into semi-large bushes with that produce more sage than I know what to do with.  And that got me to thinking, what can I do with sage?  I've used it when cooking pork dishes before but since a little bit of sage goes a long way, I thought I'd investigate other options.

SAGE

As with many herbs, sage started out as a medicinal herb.  In fact, the word "sage" comes from the Latin salvus meaning "to save."  The oils and tannins in sage made it both an antiseptic and astringent. 

Brewed as a tea, it can help sooth a sore throat and calm the nerves.  You can also brew it and cool it to use as a gargle that can help with canker sores (mouth sores or ulcers).

Sage is both an appetite stimulant and digestive aid.  Which makes sense considering it's anti-inflammatory properies.  It's been recommended in some instances for those who suffer from inflammatory conditions like asthma or rheumatoid arthitis.  It is also supposed to be good for relieving abdominal cramps and reducing hot flashes in menopausal women.

Sage is listed among the top ten herb and spice sources of antioxidants which help neutralize cell-damaging free radicals.  In case you were wondering about the other nine, they include allspice, basil, cinnamon, cloves, lemon balm, majoram, oregano, peppermint and thyme.  Some herbalists believe that sage is a memory enhancer and it is also believed that a sage rinse will return some color to white or gray hair.  These may be some of the reasons why the ancients believed sage was tied to immortality.

The ancient Greeks used to use sage as a way to preserve meat.  In Medieval times, sage was used primarily as a culinary herb and was used in sauces and stuffings with fatty meats like pork, duck, and goose.  Something in its chemical helps break down the fats and make them easier to digest.

In Italy, sage is sometimes lightly fried with olive oil and served with ham or veal.  I like to use fresh sage in saltimbocca.  In Germany and Belgium, sage is added to eel and other oily fish dishes and in the Middle East it is generoulsly added to salads.

Sage is available almost year-round and can be used fresh, rubbed (crumbled), and ground.  Sage has a strong flavor so you don't want to go overboard when using it.  Fresh sage can be wrapped in a papertowel and stored in the fridge for up to four days.  Rubbed or ground will keep in a tightly closed container in a cool dark place for up to six months.

So my sage advice?  Try it out, it's a great herb and a healthy addition to any meal. :)

Wednesday, November 23, 2011

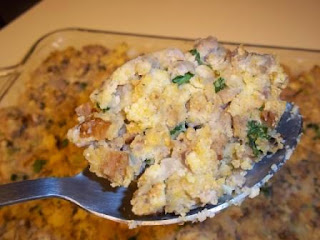
Cornbread-Sausage-Pecan Stuffing


So it was pointed out to me (thanks Juliet) that I had yet to make my Cornbread-Sausage-Pecan Stuffing for you all. It’s been a big hit every time I make it and I never have to worry about leftovers. I’ve been making it for so long that I can’t even remember how I came across it to begin with but it was one of the best finds I’ve got in my collection. I try not to limit making it to Thanksgiving, but it is the perfect time to break it out and share it with family and friends.

Cornbread-Sausage-Pecan Stuffing

1 pkg cornbread mix, to bake and crumble
1-16 oz. pkg ground pork sausage*
1 lg onion, chopped
2 lg. celery ribs, chopped
1-1/2 cups pecans, chopped
1-1/4 cups broth, chicken or veggie
1/4 cup parsley, chopped
1/4 cup dry sherry
1/4 cup milk
1/2 tsp salt
1/2 tsp pepper
1/4 tsp nutmeg

*because one of our T-day dinner diners can't have pork, I substituted chicken sausage instead, so if you look at the photos and think "that pork sausage sure looks funny" it's because it's not pork, but since the original recipe uses pork we'll just pretend

Bake cornbread according to package instructions. After it’s done baking, allow to cool to the touch then crumble into small bits.


Cook sausage in a large skillet over medium heat, stirring until it crumbles and is no longer pink.

(chicken sausage, not pork)

Remove sausage from skillet with a slotted spoon and allow to drain on a paper towel. I usually line a bowl or dish with the paper towel and let it sit for a while.

Reserve 1 tbsp of the sausage drippings in skillet and use to sauté the onion and celery over medium high heat.


Cook the veggies until they are tender. Remove from skillet and drain.

In a large bowl, combine sausage, cooked veggies, cornbread and the remaining ingredients. Stir gently until all ingredients are thoroughly moistened.


Spoon mixture into a lightly greased baking pan (9x13) or in a large covered dish and bake at 350 degrees for 30 minutes or until heated through.

sorry about the yellow photo, my camera died and had to be replaced, but the back-up had to be recharged so a back-up, back-up camera was brought in...it doesn't really look this yellow when you pan it, I promise

Serves 12 – unless your guests REALLY like dressing in which case you won’t be able to feed as many. It makes a great stand alone side in addition to a nice Thanksgiving side.

NOTES

In addition to our non-pork T-day dinner diner, we also had someone with a gluten allergy, so I used a gluten-free cornbread mix and was able to substitute it for a regular mix without losing any of the taste or flavor, but guaranteeing a safe eating experience for our guest.


The chicken sausage we used was also gluten-free.  Of all the flavor varieties available, we chose the one with apples and maple flavoring because it best complimented the cornbread and pecans in the recipe.
 

In the past, to save time, I have also used a bag of Pepperidge Farm cornbread stuffing in lieu of baking fresh cornbread. Because the cornbread stuffing mix is much drier than fresh baked, you can simple add extra broth, milk, or sherry to the mix.

If you substitute chicken or turkey sausage for pork sausage, you are not going to have the same amount of drippings in the pan after frying it up, so if you need to add 1 tsp of olive oil to the pan when cooking your celery and onions.

Sunday, June 26, 2011

Thai Dried Beef with Lime Dipping Sauce

The nice thing about having foodies for friends is that if you ask reeeeeeally nice, they can not only be talked into sharing their favorite To Makes but also into doing a guest post for you.

Here's a fun one that I think you'll like from my friend John (who before moving into IT, worked in several Triangle area restaurants).  This is one of his specialties and I thought this would make a great alternative picnic bring-along snack.  Heads up, it does take some pre-planning and time to make, but is definitely worth the effort.

So now, please, a warm welcome for John and his yummy recipe. (clap clap clap clap clap)

Thai Dried Beef with Lime Dipping Sauce

This is beef is popular in Thailand but unfortunately is not often found in Thai restaurants in America. It is easy to prepare and once the initial drying is completed, it cooks extremely quickly.

Thai dried beef is often called "Thai beef jerky" (Nue Swan) but bears no resemblance to the tough rubbery beef sold in America. The flavor of Nue Swan has a hint of sugar and spices and it’s not tough.

Serves 6 to 8

1-1/2 pounds London broil
2 tablespoons coriander seeds
1/2 teaspoon fennel seeds
1/2 cup + 2 tablespoons granulated sugar
1/4 cup fish sauce
Vegetable oil for frying


LIME SAUCE FOR DIPPING
Makes 1/2 cup

2 Serrano chilies, finely chopped
1/4 cup + 2 tablespoons lime juice
3 tablespoons fish sauce (optional)

Combine all ingredients in a small bowl.


THAI DRIED BEEF INSTRUCTIONS

1. Lay the beef on a cutting board and slice it horizontally into slice 1/8 inch thick, slicing across the grain.


2. Roast the fennel & coriander seed in a dry wok or skillet until they are fragrant and golden.


3. Pound or grind them into a coarse powder in a mortar, blender or coffee/spice grinder.


4. In a mixing bowl or plastic food storage bag, combine the ground seeds with the sugar and fish sauce. Add the sliced beef and mix thoroughly making sure all parts of the beef are covered.


5. Cover the beef and marinate for at least 1 hour at room temperature or, preferably, overnight up to 2 days in the refrigerator.

6. Heat the oven to the lowest possible temperature (150-200°). Place the beef on an ungreased cookie sheet and put it on the center rack of the oven. Close the door and let the beef dry about 10 hours.


After drying, the beef should still be soft, and it will be slightly darker in color than it was in the beginning. In this recipe, drying refers to the surface of the meat being dry, not that the meat is completely dry throughout.

7. Heat 1/2 to 1 inch of oil in a sauce pan to 375° degrees. If you use a candy thermometer, this will allow you to gauge the temperature or you can use a commercial counter top fryer.


If any moisture develops on the surface of the beef, dry it thoroughly with a paper towel to insure that it will brown properly.

8. Fry the beef quickly for 5-15 seconds until the outer surface is crisp and barely brown and the inside is still soft and tender.


Ready to serve and dip and enjoy!

Sunday, June 12, 2011

Dipping Oil for Bread


One of my favorite food trends is dipping oils with bread as an appetizer, especially when they're made fresh and use a really high quality olive oil.  So I decided to do a little 'sperimenting and came up with some simple combos I like.  Hope you will too.

Greek-style Dipping Oil

1/2 tsp ground black pepper
1/2 tsp fresh cracked black pepper
1 tsp kosher salt
2 tsp fresh lemon zest
2 tsp mint flakes (or fresh)
1/2 tsp white balsamic vinegar
2-3 tbsp extra virgin olive oil

Mix all the dry ingredients together, then put on a plate.


Pour olive oil over and stir until blended and serve with a hearty artisan loaf. (I used whole wheat and it was dee-lish).

Mexican-style Dipping Oil

1/2 tsp ground black pepper
1/2 tsp fresh cracked black pepper
1 tsp kosher salt
1/4 tsp red pepper
2 tsp dried cilantro (or fresh)

French-style Dipping Oil

1/2 tsp ground black pepper
1/2 tsp fresh cracked black pepper
1 tsp kosher salt
2 tsp tarragon
1 tsp bay leaf flakes

Italian-style Dipping Oil

1/2 tsp ground black pepper
1/2 tsp fresh cracked black pepper
1 tsp garlic salt
2 tsp parmesan
1 tsp oregano
1 tsp basil

NOTES

All of the measured amounts above are just suggested.  Feel free to change any of them to suit your particular tastes.  I found for me that too much pepper in the mix overtook the flavor, but if you're a pepper junkie, then go for it.

You can also experiment with flavored oils to add another level of taste.  For example, I would use a Spanish Olive Oil for the Mexican-style.  SOO has a stronger flavor than EVOO, very fresh with a lot of vitality that would hold its own against the pepper in the mix.

You want to use kosher salt because it's coarser than table salt, but not as chunky as sea salt.  It blends well without disappearing into the mix.

If you use fresh herbs, add a bit at a time and adjust to taste because fresh herbs will have a stronger taste than their dried counterparts. 

Wednesday, June 8, 2011

Down to Basics: Olive Oil


How about we start with a smidge of background. Olives are a crop traditionally found in the Mediterranean area and it’s believed their earliest cultivation was by the Minoans of Ancient Crete.

Olive oil was used for more than just eating. It was used for medicinal and ritualistic purposes; it was also used for skin care and as a fuel.

Olive trees have an usually long life space, some can even be measured in terms of centuries. It’s a very hardy plant and can survive with minimal moisture.

I just wanted to provide some clarification about the types of basic olive oils you find on your grocer’s shelf. Again, I use many of these, but have never really stopped to find out what the differences were between them.

OLIVE OIL

Virgin Olive Oil – according to the IOOC (International Olive Oil Council, governing body of olive oil production) all virgin olive oils are produced from olives that have been processed using physical or mechanical means (i.e., washing, decanting, centrifuging, and filtering) and have not been treated chemically.

Extra Virgin Olive Oil – is also produced via the virgin olive oil production method, only it’s made from higher quality olives and considered to have a much superior taste. The IOOC has measuring standards (rated by flavor and mouth feel of the oil) to determine which oils qualify as Extra-virgin. EVOO is the best to use on salads, for dipping, and also sautéing because of the higher quality.

Refined Olive Oil – has been chemically treated to neutralize the strong taste and acid content. When cooking with higher temperatures (like for deep frying), refined oils work better than EVOO because the unrefined particles in the EVOO burn which destroys the taste.

(Pure) Olive Oil – oils labeled simply Olive Oil or Pure Olive Oil are actually a blend of refined and virgin production oil.

Light or Extra Light Olive Oil – is also a blend but has a higher ratio of refined to virgin oil.

The best oil you can have on hand is a fresh one, because over time oils will deteriorate and become stale. Sure if you’ve had an oil for a year or more, it’s still very usable, but best used for cooking and not for dipping or dressings. If an oil is really really old, it will turn rancid and you’ll want to get rid of it.

Wednesday, May 25, 2011

Down to Basics: Vinegar


Can a person have too many vinegars?  No..they cannot.

Vinegar is a staple of any kitchen that calls itself a proper kitchen. Not too shabby for the result of a “whoops” – one good cask of wine gone bad and now it’s a household name (and speaking of names, vin aigre means “sour wine” in French).

It caught on pretty well from the start. The ancients Babylonians used vinegar as both a preservative and a condiment. They started the whole herbed and spiced flavoring craze. Roman troops slurped vinegar as a beverage (hey, it was just old wine). And the Queen of the Nile, Cleopatra herself was familiar with vinegar's use as a solvent (she dissolved pearls in vinegar to win a bet that she could consume a fortune in a single meal). Hippocrates extolled the virtues of vinegar as a medicinal aid and the Greeks used it for pickling veggies (yum) and meats (mmm, not so yum).

As you will note on your grocery isle, there are gazillions of types of vinegar, some infused, others made from various products, but all share a common make-up -- natural sugars that have been fermented to alcohol and then again fermented again to become vinegar.

Here’s some tidbittery about a few basic types that you may, or may not, be familiar with.

Apple Cider Vinegar

Apple cider vinegar is made from apple cider (I know, crazy) or apple must*. Apple cider vinegar is a golden brown in color and has a high acidity which creates a bit of a burning sensation if consumed straight.

*Must is when the whole fruit is fresh pressed and still contains all the parts of the fruit – stems, seeds, core, and the like.

Balsamic Vinegar

Balsamic is an aged vinegar traditionally produced in the Italian provinces of Modena and Reggio Emilia. It’s made from the concentrated juice (must) of white Trebbiano grapes. It’s a dark brown in color, highly aromatic and sweetly rich in taste. The finest balsamic vinegars have been aged for years in wooden casks.  A “true” balsamic is aged for 12-25 years.

Fruit Vinegar

Fruit vinegars are made from fruit wines and usually don’t include any additional flavoring because the flavors of the original fruit (like apple, raspberry, or current) remains the final product.

Malt Vinegar

Malt vinegar is produced by malting barley. The grain starch turns to maltose, the maltose is brewed into ale, the ale is left to turn into vinegar, and then the vinegar is aged. It’s usually a light brown in color (and VERY good with fish and chips).

Red or White Wine Vinegar

Wine vinegar is made from red or white wine which is allowed to become vinegar. As with wines in general, there is a wide range of variety depending on what wine is used. The higher quality wine vinegars are made from single grape varieties rather than blends and tend to be aged longer (at least two years).

Rice Vinegar

Rice vinegar is made from fermented rice or rice wine. It’s produced in Japan, China, Vietnam and Korea and comes in three varieties – white, black and red. White rice vinegar is the most similar to Western style vinegars, mildly acidic and clear to pale yellow in color. Black rice vinegar is made with black rice and is smoky in flavor and dark in color. Red rice vinegar gets its color from a red yeast rice.


Flavored vinegars are great for use on salads to add a touch of flavor to your greens.  They are also good for marinades as the acidity of the vinegar helps to breakdown cells and tenderize the meat.

If you get a chance you should check and see if there are any oil and vinegar tasting shops near you.  I found another one in Asheville this past weekend, Olive & Kickin' (http://www.oliveandkickin.com/).  They had some fabulous new flavors I hadn't seen before and I'll be trying one out for the recipe on Sunday.  I bought a sample pack (6 small bottles for $35) which is a great way to try out something before commiting to a whole bottle.